
You are using an out of date browser. It may not display this or other websites correctly.
You should upgrade or use an alternative browser.
You should upgrade or use an alternative browser.
Dr. Bob Woods
Supporter
Jimmy,
I think that gtbob's quote of "My biggest fear is when I die my wife will sell my car and parts for what I told her they cost" is hysterical. I also like the idea of quoting all costs in pounds instead of dollars.
I have spent so much money and effort on tools and facilities that I guess I should just build a second car since most of that is done now.
-Bob
Keith Stafford
Supporter
Dr Bob, it looks fantastic, are you going to plate (electroplate) the suspension components prior to final assembly?
Thanks for the VCR anecdote,.... now I understand why I was advised to hide the invoices in the garage.
K
Thanks for the VCR anecdote,.... now I understand why I was advised to hide the invoices in the garage.
K
Dr. Bob Woods
Supporter
Keith,
I will either electroplate or powder coat them. I have to wait until I determine if I will change the suspension. But it will finally get done.
-Bob
I will either electroplate or powder coat them. I have to wait until I determine if I will change the suspension. But it will finally get done.
-Bob
Keith,
I will either electroplate or powder coat them. I have to wait until I determine if I will change the suspension. But it will finally get done.
-Bob
There are some people that are concerned about hydrogen embrittlement with the plating process ::
Hydrogen embrittlement - Wikipedia, the free encyclopedia
In my opinion, Powder-coating is okay for non competition cars since it very effectively hides stress cracks. I like a nice light coat of light gray or even just a clear-coat for competition vehicles.
This is going to be a very interesting build!
Dr. Bob Woods
Supporter
Randy,
Thanks for your observation. We sometimes use tape or gun blue if we are going to check for stress cracks on our Formula SAE race cars. Paint is removable if you want to check. The suspension on Randy's original GT40 is painted with a thin paint.
I am also concerned about welds on the frame that are ground flat for the panels. If the penetration is good enough then there won't be a problem. But powder coat will hide that too.
-Bob
Dr. Bob Woods
Supporter
Tools:
Before my package arrived I started buying tools that I thought I would need. Now that I have tried to use them, I thought I should pass on some tools that sounded good but just don't work. Perhaps everybody knew this before.
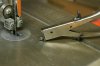
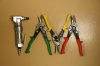
For years, I wouldn't let my students buy anything from Harbor Freight, but I am now one of their best customers with almost daily visits. I thought that this pneumatic nibbler would be great... it was a disaster. It might work well for thinner sheets, but when it did feed into the metal, the top stop piece scared and hammered the metal when it did cut.
The left, right, and straight aluminum shears bent the aluminum sheet which required flattening after the cut. These tools just don't work for this job.
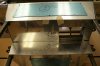
I acquired a small vertical bandsaw with an aggressive blade. This thing slices through with no resistance. I can even take thin sideways cuts. That with some simple cleanup with a file or deburr tool it makes a perfect cut. A jig saw works well too, but I had to use a fine pitch blade on it. You need to either put duct tape on the saw foot or tape on the aluminum sheet so it doesn't scratch. Another tool that works great is the manual nibbler shown in the picture.
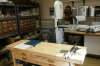
I got a solid oak table from Harbor Freight. It has been a great workspace for the panel trimming.
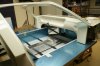
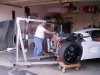
Panels
I have started fitting the panels. After I have all of them cut, I will drill the holes and Cleco the panels in place. I will not rivet them until after I powder coat the frame. I want to see how everything fits together before I make something permanent.
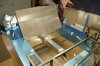
Those guys at Tornado must have a really good jig for the frame. I have been impressed. Everything seems very accurate, symmetric, and well done. When I make a paper template for the right, it fits on the left without modification. Here is a photo of some of the panels in place.
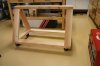
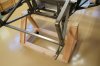
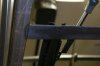
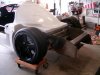
Stands
I built some rolling stands for the car out of wood. I think the wood stands are actually better than a steel stands and it was easier and faster to build with simple tools.
-Bob
Before my package arrived I started buying tools that I thought I would need. Now that I have tried to use them, I thought I should pass on some tools that sounded good but just don't work. Perhaps everybody knew this before.
For years, I wouldn't let my students buy anything from Harbor Freight, but I am now one of their best customers with almost daily visits. I thought that this pneumatic nibbler would be great... it was a disaster. It might work well for thinner sheets, but when it did feed into the metal, the top stop piece scared and hammered the metal when it did cut.
The left, right, and straight aluminum shears bent the aluminum sheet which required flattening after the cut. These tools just don't work for this job.
I acquired a small vertical bandsaw with an aggressive blade. This thing slices through with no resistance. I can even take thin sideways cuts. That with some simple cleanup with a file or deburr tool it makes a perfect cut. A jig saw works well too, but I had to use a fine pitch blade on it. You need to either put duct tape on the saw foot or tape on the aluminum sheet so it doesn't scratch. Another tool that works great is the manual nibbler shown in the picture.
I got a solid oak table from Harbor Freight. It has been a great workspace for the panel trimming.
Panels
I have started fitting the panels. After I have all of them cut, I will drill the holes and Cleco the panels in place. I will not rivet them until after I powder coat the frame. I want to see how everything fits together before I make something permanent.
Those guys at Tornado must have a really good jig for the frame. I have been impressed. Everything seems very accurate, symmetric, and well done. When I make a paper template for the right, it fits on the left without modification. Here is a photo of some of the panels in place.
Stands
I built some rolling stands for the car out of wood. I think the wood stands are actually better than a steel stands and it was easier and faster to build with simple tools.
-Bob
Attachments
Dr. Bob Woods
Supporter
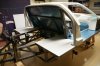
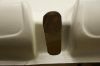
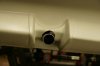
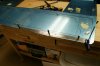
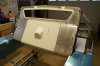
I have continued to make the panels. Here is the current status.
I have cut the hole in the dash for the steering column so I will have a place to store the dash. I used a hole saw for the top part and a small pneumatic saw to cut the longer parts. For one thing, I used a 1 3/8" hole saw instead of a 1 1/4" (only one I had) which made a bigger hole than I would have liked. I also learned that I should measure the frame and then measure the piece very accurately before drilling a hole. This hole was about a 1/8" off from where I wanted it. However, when I secure the dash to the roof, some of the gap on the top will disappear. The same thing happened with the hole in the panel for the steering u-joints, so from now on, I think I will pre-install the part before cutting or drilling panels, etc.
I will continue to pre-install everything to see the fit before I rivet or finalize anything. So far I have pre-installed the front and rear suspensions, the steering, the seats, and the fuel tanks. Next I will pre-install the pedal assembly and the parking brake and then I will mark and cut the openings in the panels to fit those parts.
I finally got around to the very first step in the instruction manual and cut the floor pan. Instead of having bolt heads go through the floor pan from the bottom, I have used countersink bolts to hold the seat rails to the chassis and they will be on the top side of the floor pan. I have small holes in the floor pan to get to the allen head bolts and will tape over them when finished.
We have made all of the measurements of the suspension and steering systems and are in the process of putting them into SolidWorks. Then we can use a suspension analysis program to determine the suspension characteristics.
Attachments
Howard Jones
Supporter
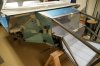
These roll arounds are the best tool I ever made/bought. With 6 inch wheels the car is just the right height to work on and you can still slide underneath.
Just about the cheapest 6 inch wheels will work because the car weights so little. Add some leftover plywood (these are 1/2 thick doubled up and glued together) and you are good to go.
I also LOVE my sawsall. Most useful, cost effective, tool I own.
Just about the cheapest 6 inch wheels will work because the car weights so little. Add some leftover plywood (these are 1/2 thick doubled up and glued together) and you are good to go.
I also LOVE my sawsall. Most useful, cost effective, tool I own.
Attachments
Dr. Bob Woods
Supporter
Panels:
One of our clan of GT40 enthusiasts here in the area said "you'll be paneling for 3 months". When he saw the shock on my face, he said "OK one month". Well I have been at it for just over a month and I am at about 80%. All panels are built, but I have to drill some more holes.
I have made a 1" stainless steel template to drill my holes for panels. It has a 2" spacing. I have been drilling the panel through the template, de-burring the hole, and then mounting the panel on the frame and drilling through the panel. I start the hole with the 4.1 mm drill, drill all the way through with a 1/8" drill, and then re-drill with the 4.1 mm. I use Clecos to hold it in place. I then de-burr the steel frame or panel.
I probably have spent two full days on the rear bulkhead after it was bent to shape. I ordered a glass bulkhead window which required a GRP bezel. I will use rivnuts to mount the bezel and window, so when you install yours, be very careful to center it between the frame members because you have no room to spare. I marked the back side where the frame members are and then transferred that to the front to drill the holes for the bezel. The bezel is very clearly marked as to where to cut and drill holes. I am going to get a 0.045" or 0.050" rubber sheet to put underneath all panels that get rivnut mounted so it will seal and not warp the panel considering the thickness of the rivnut head.
I had to move the brake and clutch pedals to center them on the steering column. I originally centered them on the steel pad, but had to move them to the outside once I installed the steering column. That is why I have two sets of holes on the steering cover panel. This also required that I remake the front upper bulkhead.
Test Fitting:
Remember that my frame is not powder coated yet. I have been doing a test fit / pre-install on several systems to make the mounts in the correct place (after some mistakes) and to be sure I have the parts and understand what to do. I have previously reported that I installed the complete suspension and steering system. I have now installed the hand brake, the radiator and cooling lines, the shifter linkage, the steering column, the engine cover, the rear bulkhead window, and the dash.
Engine:
We are building the engine here. It is finished. As soon as I complete the modifications to the valve covers, I will bring it home. Photos, specs, and a computer simulation of the power to follow...
Clutch:
The clutch was a bit of a problem. I made three attempts to buy one from Centerforce, but they just didn't want to get involved with so many seemingly special parts. After reading SSSammy's introduction, I called McLeod. Lee was very familiar with these applications, the Tornado website, and other GT40 applications. He immediately told me all the correct part numbers and I have ordered them from Summit.
-Bob Woods
Attachments
Bob, not sure how big 4.1mm is in relationship to the size of the rivets but will the holes be large enough once powder coated for the rivets to fit?
I normally use a #30 drill bit for 1/8" rivets and that gives just a little more room, but I'm betting that it would be very tight once powder coated.
Have you bought a pneumatic rivet gun yet?
I normally use a #30 drill bit for 1/8" rivets and that gives just a little more room, but I'm betting that it would be very tight once powder coated.
Have you bought a pneumatic rivet gun yet?
Dr. Bob Woods
Supporter
Hi Randy,
I use the 1/8" drill because it is stubby and accurate positioning. The rivets are not 1/8".
The rivets Tornado sent me require a 4.1 mm drill. They might be metric That is exactly a #20 drill (0.161"). After powder coat I will ream the holes to remove any powder coat. I want to have a solid metal-to-metal contact. If I over-drilled the hole and left the powder coat in it, I would have a compliant fitting that could wear away.
Yes I do have the pneumatic rivet gun although I haven't used it yet.
Thanks for the observation.
-Bob
Last edited:
Keith Stafford
Supporter
Bob, if you haven't already, I recommend that now is a good time to consider panelling the inside of the footwell both sides, it looks a lot neater and the outside of the front bay, which will help to keep out all the muck from the front wheels. An air riveter is the way, the only thing to watch is the head can jump and bang the panel when the rivet pops.
Dr. Bob Woods
Supporter
Keith,
I have looked at yours and several other build logs and I just thought I was through with panels! I agree that I should panel the footwell and engine areas. Thanks for the suggestions
-Bob Woods
I have looked at yours and several other build logs and I just thought I was through with panels! I agree that I should panel the footwell and engine areas. Thanks for the suggestions
-Bob Woods
Bob
Do not panel the inside of the footwells. They are like that for a reason.
Thanks
Andy
Do not panel the inside of the footwells. They are like that for a reason.
Thanks
Andy
Keith Stafford
Supporter
Andy, would you share the reason with GT40 forum members and others that have invested in Tornados. Otherwise I'm going to have to be reckless and drive around with panelled footwells.
K
K
Keith
Whats the reason for putting panels in the footwells?
I can think of 5 reasons not to.
Thanks
Andy
Whats the reason for putting panels in the footwells?
I can think of 5 reasons not to.
Thanks
Andy
Keith Stafford
Supporter
Hey Andy, push the boat out and please, please, please share the information, is that not the raison d'etre of the site?
Do you remember the Harry Enfield character,.... "..... no, you don't wanna do that"
Keith
Do you remember the Harry Enfield character,.... "..... no, you don't wanna do that"
Keith
Since Andy has not answered, I'll share-
Paneling the footwells reduces the (already limited) room for your feet by the pedals- especially true for the Tornado frame. You will for sure have no room for a footrest to the left of the clutch, for those of us with lefthand drive cars.
Paneling the sides of the front frame turns the nose of the car into a giant air trap unless you rework the nostrils to accept more air from the radiator.