Vintage Air Evaporater 10301-VUX-A

Gents

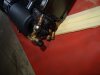
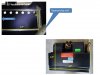
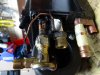
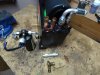
I have pulsed several of you about the tubing configuration of the Vintage Air Slim Line AC unit. Everyone I have spoken to has a unit where the coolant tubes are on the passenger outboard side, which requires the 90 degree hookup to be turned and the tube hookups for the heater lines are located on the inboard side of the unit (opposite the coolant hookups).

My unit has both coolant and heater hookups on the outboard side of the unit up against the outside bulkhead, which is making install an issue. Since the unit is glued tight, there is no way to access the two heater tubes to relocate them, or bend them.

Vintage air (page 50 of their catalog) shows the hookups on opposite sides of each other as they should be.

Has anyone installed the Vintage unit with all connections (heat and coolant) located on the outside bulkhead into the passenger foot well?

How did you do it? :idea:

Thanks
 
Eric/Grant

I should have included a picture to start with (that tape is a mockup of the bulkhead). I want to confirm your evap unit has/had all four connections configured like the picture.

I ask because Vintage shows the heat connectors on the opposite sides (aka left) with coolant connectors on the right (bulkhead side) in their catalog which would certainly simplify the problem.

Grant did you encounter any "separation anxiety" getting the two half's apart, that glue looks impenetrable.

Did you have to modify the cover to accommodate the flip?

Thanks<!-- google_ad_section_end -->
 

Attachments

  • DSC02272.JPG
    DSC02272.JPG
    141.6 KB · Views: 488
Last edited:
Update

Talked to Vintage Air today and they change the design of the AC unit that is supplied with the SLC. They no longer separate the coolant and heater lines on the Slim Line Mini.

The new unit is 17 x 12. The available space is wide enough, but not deep enough (that I can see) to accommodate both coolant and heater lines on one side. At 17 inches from the center beam of the car going outboard, if one goes perpendicular moving forward in the foot well (see picture), we impact the tapering side wall at 9 inches.

Turning the 90 degree coolant connection as many have done, no longer eliminates the interference problem with the tapering foot well, now the heater lines interfere (not sure sweating in an alternate piping will work either).

Grant dismantled his Vintage Air system and reversed the coil unit. Any other solutions to the Vintage Air Mini unit?

Im Stuck.
 

Attachments

  • Air Conditioner.jpg
    Air Conditioner.jpg
    45.7 KB · Views: 426
Hi Dan,
Mine wasn't glued either, just a couple of screws and it all came apart ?
it had the gooey crap on it i just pulled it all off. it was pretty easy. looks like they changed it up?
 
They definitely changed it up. The "glue" they use is actually chips generated during the cutting process so it's melted plastic. They consolidated the pipes as well.

So, I hope some folks share their solutions so we can all get ideas for current and future builds.
 
If this one that I have craps out I will most likely build one from scratch, something smaller will fit better and be quieter this thing howls pretty good on full.
 
Aaron

Yes this car has definitely proven to give headaches in areas least expected. But once started, gotta go the distance and finish the darn thing.

I expect there will other Murphys lurking around the corner still, just wish I knew what they will be.

I will admit that I have learned more to date than expected, invented a few new swear words I'm certain.

I'm keeping my eye on the prize and hopefully it meets my expectations. I had the option to buy another Corvette or Porshe, but the one thing I would not be able to say is "I built it".

So, let's just hope it works when I finish......fingers and toes crossed. Otherwise I will own a huge expensive paperweight...lol
 
The black goop will come off. Once exposed you can loosen the ac fitting and turn it a bit.
For the copper heater pipes, I cut them back leaving enough to attach a hose, also removing the little cross brace on them. Then I flare the ends, attach the hoses and install. It's a tight fit but it works.
 
Thanks Alan

Shortening the two hose connectors was on my radar.......good to see it worked for someone already. I turned the coolant line yesterday.

Tight is close enough, as long as it fits in the end. :thumbsup:
 
I did the same as Allan, he's probably the one who gave me the direction in the first place. I bought the simple bead tool for the shortened copper lines. It's relatively expensive, a bit crude, and it didn't put nearly as large a bead as the portion I cut off had. But you're welcome to use it after Troy is finished with it. I haven't connected the heater hoses yet, but if Allan says it works, you can take that to the bank.

A.J.
 
AJ

Made my cut today so ready to install. What tool did you get? Even crude works. I was told by a radiator shop that even without a bead the hose would stay on.......I won't take that bet. I can hot water spraying inside the cockpit if the thing blew....no thanks, I will bead it.

Hummmm Troy has yours.......
 
A new development in solving the fitment issue with the Vintage Air evaporator. For those of you with the newest configuration (aka heat and coolant tubes on one side), the following approach may be of interest. Even by turning the evaporator valve, I was still banging into the side bulkhead, so I went looking for an alternative approach and found the following idea.

Both the angle of the heat tubes and the size of the expansion valve create an install problem for the evaporator. The heater tubes are the easier solution. Cut them as close to the 45 elbow as possible to create a straight tube from the evaporator. You can 1. either purchase the Earls beading tool Alan shared with us at this point and bead the remaining tube (remove the cross brace and continue plumbing. 2. Or you can cut the elbow off the other end of the factory tube and sweat them back together (not sure about the hose fit with this yet)

I got this tip from one of my local air conditioning guys who is a fellow hot rodder and does this a lot with great success. As for the expansion valve, it can be replaced with an Orifice Tube. The small silver tube in the picture is an Orifice Tube and it has the same function as an expansion valve. It can be plumbed in line between the Dryer and the Evaporator core but does not have to be a direct connect like the factory expansion valve, which frees up some room. Its only about $14 bucks. To remove the OEM expansion valve, clear the "tacky tape" and unscrew it. The attached tube is coiled on a clip that simply unsnaps from the other parallel tube once you clear the tape (its obvious).

FYI: To save some more plumbing, the Trinary switch can be mounted to the dryer as shown.

You can purchase/make and custom bend the tubes coming off the back of the evaporator to create the room you may need, but I'm trying the two 90 fittings for now.

I plan on using bulkhead fittings from Old Air products to enter and exit the cockpit areas. As the build progresses I will post up results for the curious.

More to follow as this saga continues. :shocked:
 

Attachments

  • DSC02286.JPG
    DSC02286.JPG
    181.7 KB · Views: 969
  • DSC02287.JPG
    DSC02287.JPG
    202.1 KB · Views: 467
If the hose fittings on the dryer are open, you'll want to replace the receiver/dryer. Here's a quote from the MACS folks:

"Damage can occur if there’s excessive moisture inside an A/C system. It can cause corrosion, as well as possibly degrade the performance of the compressor’s lubricating oil.

The receiver/drier should be replaced any time the system is opened for service, and most compressor warranties require it. The desiccant is only capable of absorbing a certain amount of moisture, and when the inside of the system and/or the receiver/drier are exposed to the atmosphere, the desiccant can become very quickly saturated from humidity in the air. If this occurs, the desiccant is no longer effective, and will not provide future protection. Additionally, the filter inside the receiver/drier could be restricted by debris that may have been inside the system. This could diminish refrigerant and oil flow."

Some people have tried to dry out the dessicant with various heating methods, but they are so cheap, it's just easier to replace them when you've exposed them to the atmosphere for more than a few minutes.
 
They were unsealed just long enough to install the trinary. AC guy took care of it for me. Very helpful local business.

Thanks

:thumbsup:
 
Back
Top