Well....here goes all or nuthin.

Pete

Lifetime Supporter
Hello Woody,
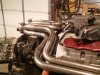
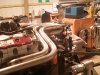
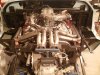
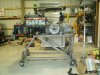
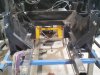
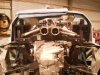
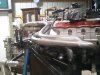
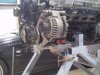
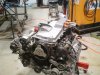
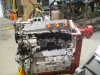
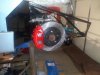
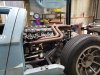
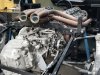
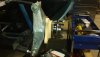
Thanks....it has been taking a little longer than I would've like on this particular area....I did find the ICEgineworks kit helpful for finding clearance and routing issues. I knew I was going to make adjustments when it came to the real thing so I did not rely on the mockup for making my pipe cuts. In the end it's going pretty smooth.

Pete
 

Pete

Lifetime Supporter
Thanks Frank.....as you know this is a labor of love....here's some pics.
 

Attachments

  • DSC00290.jpg
    DSC00290.jpg
    178.1 KB · Views: 744
  • DSC00292.jpg
    DSC00292.jpg
    150.5 KB · Views: 699
  • DSC00293.jpg
    DSC00293.jpg
    163.3 KB · Views: 653

Pete

Lifetime Supporter
okay..so I needed to take the engine back out so I can pull the stock oil pump since I'm going dry sump for clearance. I had to build something that would be useful and allow access to the engine as well as the tranny. I need to make more chassis clearance on the passenger side for the external pump. Didn't plan to originally but it made sense to put it there since my options were running out. And for you clean and organized fellows...I know I know....I need to clean up and sort stuff..I will.. I promise.:embarassed:
 

Attachments

  • DSC00335.jpg
    DSC00335.jpg
    180.9 KB · Views: 689
  • DSC00340.jpg
    DSC00340.jpg
    145.9 KB · Views: 665
If you need more room youvmight want to cut the angled steel panels along the engine bay. I did that and then squared up the area to form shelfs. It will give you a little more room to add things. I put my fuel pumps there. Only down side is yo can barely get to them with the engine in. Have to raise the engine to really work on them. If you want to move the coils, it is also a good place to mount them on a rod under the exhaust.

Bill
 

Pete

Lifetime Supporter
Jeeze,

Finally finished fitting, welding and sanding down the beads. On to the dry sump setup.
 

Attachments

  • DSC00362.jpg
    DSC00362.jpg
    122.1 KB · Views: 588
  • DSC00364.jpg
    DSC00364.jpg
    105.1 KB · Views: 583
Hi Pete
Looking good, great job :thumbsup: Now alI I need to do is try to make mine close to that quality and I will be stoked.
Woody
 

Pete

Lifetime Supporter
A friend of mine who is also on this forum remarked these cars are an exercise in packaging. Truer words were never spoken. In order to retain my A/C pump I needed to go custom on the oil pump for my dry sump setup. The pump is a special small series from Dailey Engineering. I needed to make a bearing support carrier because of the extra long shaft.
 

Attachments

  • DSC00382.jpg
    DSC00382.jpg
    108.1 KB · Views: 511

Pete

Lifetime Supporter
So here is the pump mounting bracket. Next the Plumbing. The engine is upside down......looks better this way don't you think?
 

Attachments

  • DSC00403.jpg
    DSC00403.jpg
    166.6 KB · Views: 510
  • DSC00402.jpg
    DSC00402.jpg
    165.7 KB · Views: 491
  • DSC00404.jpg
    DSC00404.jpg
    156.1 KB · Views: 517

Randy V

Moderator-Admin
Staff member
Admin
Lifetime Supporter
Good think you have a gear driven rotator on that engine stand or it would take three men to flip her back over!

Good packaging job!
 

Pete

Lifetime Supporter
So it's been awhile since my last update. I purchased a CNC for business and decided to put it through its paces on some parts for my project. I am running a dry sump system and had already fabbed a steel pump bracket. I really wanted to make a billet bracket so I went for it. It took awhile to get to it due to life, honey doos, work and you know. So finally modeled up the bracket, made the setup, programmed it and started cutting chips this weekend. Here are a few progress pictures and the steel it's replacing.
 

Attachments

  • 2013-09-22 19.16.58 resized.jpg
    2013-09-22 19.16.58 resized.jpg
    228.2 KB · Views: 485
  • 2013-09-22 19.17.21resized.jpg
    2013-09-22 19.17.21resized.jpg
    208.3 KB · Views: 479
  • DSC00403.jpg
    DSC00403.jpg
    166.6 KB · Views: 526

Pete

Lifetime Supporter
It's been awhile. Since purchasing my CNC mill I've been pretty busy making stuff for other gear heads. I finally got a chance to do some more for my car. I decided I needed to up the size of the rear calipers. The first pic shows the 1997 C5 caliper. I will take off the Corvette name at some point. I machined a foam mockup to fit the same caliper on the rear. Sorry about the quality of the last picture. You can see the wimpy size of the caliper I'm replacing.
 

Attachments

  • C5 caliper.jpg
    C5 caliper.jpg
    132.5 KB · Views: 489
  • 1997 rear caliper bracket.jpg
    1997 rear caliper bracket.jpg
    472.1 KB · Views: 421
  • c5 single.jpg
    c5 single.jpg
    212.1 KB · Views: 540

Pete

Lifetime Supporter
Ok so it's only been 8 years since my last update. Maybe by 2050 I'll have her done. Actually I have been doing little things here and there. I decided to fit up the exhaust for laffs and giggles since I had them ceramic coated.
 

Attachments

  • 20220424_155432.jpg
    20220424_155432.jpg
    464.6 KB · Views: 259
  • 20220424_155555.jpg
    20220424_155555.jpg
    502.3 KB · Views: 273

Randy V

Moderator-Admin
Staff member
Admin
Lifetime Supporter
Ok so it's only been 8 years since my last update. Maybe by 2050 I'll have her done. Actually I have been doing little things here and there. I decided to fit up the exhaust for laffs and giggles since I had them ceramic coated.
Good to see you posting again! Great job on those headers, by the way....
 

Pete

Lifetime Supporter
Thanks Randy. Here is a scan I took of my engine /tranny. You can make out the red fitting, one of two coming off the back of the head for cooling.
FITTING.JPG
 

Pete

Lifetime Supporter
Originally my setup was for C4 calipers. In the end the balance for braking would have been around 80/20 back to front. So I upgraded to C5 caliper for front and rear. In these pictures I mocked up a new caliper bracket machine in dense foam. Once it checked out I went on to machine out of aluminum.
 

Attachments

  • 20150118_204833.jpg
    20150118_204833.jpg
    209.2 KB · Views: 79
  • 20150419_175837.jpg
    20150419_175837.jpg
    345.6 KB · Views: 71
Back
Top