Well....here goes all or nuthin.

Pete

Lifetime Supporter
Hello Jack,

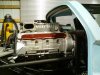
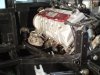
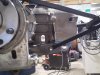
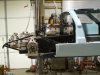
I'm going with the stock ECU for startup and shakedown. Then I'll go from there. As far as the panel goes I think the supercharger is going to protrude through the the crossbeam below the glass.

Hello Cliff,

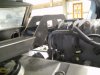
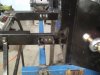
I was able to reverse the motor mounts to move the engine forward. Once I clear the aformentioned crossbeam at the bellhousing It looks like it will settle right in. I'd like to avoid having to cut out the rear of the body.

Pete
 

Attachments

  • DSC00072.jpg
    DSC00072.jpg
    50 KB · Views: 712
WOW! I thought I was crazy :)

Mine will protrude a little out the back, but I think we are going to be able to go back and restore some of the fiberglass that was removed. The rear clip will not hinge properly as is. But we have decided to create a removable center panel. So you will un-clip and remove this panel, then the rear clip will hinge as normal. I have to re-install the rear clip to see how it will shake out, but for now it is in a separate part of the basement!

Cheers!

-J.
 

Pete

Lifetime Supporter
The engine is in it's proper attitude now. I may want to move it forward another 3/8 inch to insure no clash with the body. Now I need to take the spider off and prepare for the clearance modification around the blower. FYI those are 1/4 scale diecast 4.6 engines ordered by Ford during their Terminator program. These are serialised. One thousand of each were made and given to VIPs, dignataries and Ford employees. Can't by em. I was lucky enough to find two different Ford employees that decided to sell em.

Pete
 

Attachments

  • DSC00085.jpg
    DSC00085.jpg
    54.8 KB · Views: 660
  • DSC00084.jpg
    DSC00084.jpg
    47.7 KB · Views: 700
  • DSC00090.jpg
    DSC00090.jpg
    53.9 KB · Views: 750

Pete

Lifetime Supporter
:D
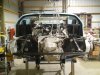
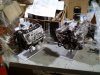
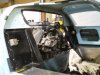
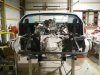
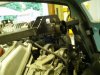
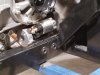
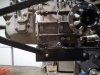
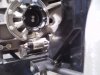
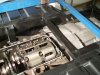
The engine and tranny are in position now. I did not need to remove the spider after all. I did a body check to see if I would need to cut out the rear. No need . Everything's good. I put the blower on to see what I will need to do to clear it. The drive flanges are lined up to the hub carriers. I want to give kudos to Steve26 for his help and advice along the way. Thanks Steve! I figure when you have a guy as talented as Steve who built his totally from scratch ya probably ought to listen to what he has to say.
 

Attachments

  • DSC00111.jpg
    DSC00111.jpg
    46.3 KB · Views: 543
  • DSC00109.jpg
    DSC00109.jpg
    42 KB · Views: 581
  • DSC00114.jpg
    DSC00114.jpg
    56.7 KB · Views: 567
Thanks Pete,
The pleasure is mine! I'm really looking forward to your build and think you'll have a truly unique GT40 when your done that will be very drivable and bulletproof. rockonsmileIt is really wonderful to have a friend so close that shares the same interests and talents. Now I just need to hurry you along so we can go out for a road trip next Spring:drunk: This is one of the best parts of this hobby is meating and becoming friends with people that share the same passion. Rock on Pete!
 

Pete

Lifetime Supporter
Here is the new crossmember going over the blower. I'm also boxing the areas I needed to clear on the chassis. Those pictures will be up soon. This crossmember will also contain the glass panel. This whole unit will be removable to add more clearance when removing or servicing the engine.
 

Attachments

  • DSC00128.jpg
    DSC00128.jpg
    44.7 KB · Views: 591
  • DSC00126.jpg
    DSC00126.jpg
    35.2 KB · Views: 556

Pete

Lifetime Supporter
Well..I've been spending time boxing in the cleared chassis areas for the alternator, starter and Blower. The crossbeam over the blower will also contain the glass pane. the glass and crossbeam will be removable as a unit to provide plenty of clearance for removing the engine. I'll be fabbing a tranny mount then move on to mounting the rack and pinion.
 

Attachments

  • DSC00150.jpg
    DSC00150.jpg
    45 KB · Views: 484
  • DSC00167.jpg
    DSC00167.jpg
    47.1 KB · Views: 547
  • DSC00162.jpg
    DSC00162.jpg
    38.4 KB · Views: 525

Jim Craik

Lifetime Supporter
Your work looks great!

I do not know if it will fit but have you though about putting the cross member loop under the blower for better rear vision?
 
OMG! I have been in a modern GT where the pulley is right behind you, and that is awesome. It looks like you might have to pad this one, in case you are riding without a helmet, so you don't smack your noggin on it. Talk about strapping on an engine! :)
 

Pete

Lifetime Supporter
Okay...well I didn't want to post a picture of my ample beer belly but I must to show the relative position of the blower to driver. Looks worse until you sit in the cockpit. Jim, I tried and thought of every conceivable way to cross the blower. I would have to remove the blower belt to take out the crossbeam. When I sit in the car I can see just fine. I think no worse than with an 8 stack injection system.
 

Attachments

  • sitting.jpg
    sitting.jpg
    36.7 KB · Views: 726

Jack Houpe

GT40s Supporter
Nice work Pete, that is one monster of a motor.

You know I could be banded for saying this but that new LS9 motor would be sweet also.
 
That car looks big inside, you are almost sitting in there like in a truck.
With the seat in i guess your backside (a...) will be positioned much more forward and your torso will be leaning much more backwards with the legs probably stretched out a bit more.
Also this car will be a awsome sounding machine => max rockatensky in a GT 40
You need to think about an on off switch for the blower.

great work

TOM
 
Pete, if you put a little rubber tickler on that blower pully it'll give you a nice little back rub as you're going down the road. Of course, when you step on it hard you'll get a little more pressure than when just idling at the stop light....
 

Pete

Lifetime Supporter
Thanks for the comments gentlemen. The shoulder rest is a good idea Jim. I will probably mock something up to cover the hole over the holidays. I'll just add that to all the other things I think I'm going to do:)
 

Ron Earp

Admin
Since you're in full fab mode....

Eaton does have different drive snounts that go on the blower. Some are extremely short. You might could use a shorter front section on the blower and then drive the blower from the main accessory drive. This would eliminate the secondary pulley system and shorten the overall length probably by 3-4 inches.

Ron
 

Pete

Lifetime Supporter
Thanks Ron,

That will be something to look into.Thanks Mark, yes I am going to try to mix modern technology with classic looks.

Pete
 

Pete

Lifetime Supporter
If you happen to be building a DRB car here's a little trick that might help with adjusting caster when that time comes. The picture shows the rear reverse wishbone pivot bracket. The manual says "file 7/16 dia hole to allow bracket to be fitted approx. 3-4 degrees from horizontal to provide caster". So to make life easier when all is said and done and adjustments need to be fine tuned I welded a stud into the frame to act as a pivot for the bracket. That way I won't be chasing my tail while trying to readjust for caster.

Pete
 

Attachments

  • DSC00172.jpg
    DSC00172.jpg
    36 KB · Views: 487

Pete

Lifetime Supporter
Well, along with the thousand other things I'm doing I finally fabbed up the transaxle mount for the Ricardo. I am also dealing with the rack and pinion mounting. As you can see in one of the pics the starter bolt is going to be quite awkward if and when I need to pull he starter. I was thinking about simple putting a stud at the top since I think getting a nut on would be easier than trying to feed a bolt in. Any suggestions?
 

Attachments

  • DSC00174.jpg
    DSC00174.jpg
    56.3 KB · Views: 465
  • DSC00175.jpg
    DSC00175.jpg
    39.9 KB · Views: 456
  • DSC00177.jpg
    DSC00177.jpg
    43.1 KB · Views: 428
  • DSC00176.jpg
    DSC00176.jpg
    32.2 KB · Views: 443
Back
Top