What in the hell is wrong with my engine??

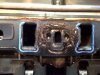
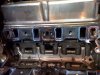
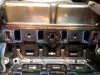
So, my little Ford Racing 302 seems to be having some difficulties after approximately 8,500 miles...

I started her up the other day from warm and heard a funny "pop"...which was followed by quite a bit of smoke coming from the exhaust. I believe it is steam/coolant rather than oil/fuel vapor.

I checked the compression and it's spon on in each cylinder - 170 +/- 2 on each cylinder (lowest of 168, highest of 172).

When using an electronic IR temp on each of the exhaust headers there are two cylinders (one on each bank) that read much less than the others....150 degrees v. ~350 degrees for the other six so I assume there's no fire in the pot on those cylinders.

After removing the muffler and the collectors, it is apparent that these two cylinders are indeed the two cylinders producing the exhaust smoke/steam.

I can't quite see/view the coolant through the top of the aluminium overflow tank (level is a bit low....) to see if there's some oil sludge in the coolant.

When the plugs were pulled on those two cylinders there was a lot of moisture on them that smelled (and tasted) like coolant. One of the plugs actually had oil/coolant across the electrode gap.

I assume that there's a cylinder head gasket leak, or something similar, which is causing the problem here. I'm surprised that there are two cylinders (one on either bank) that appear to have developed the same issues concurrently.

I think I'm to the point where I need to remove the heads and see what's going on in there. Sound about right?

Any advice is appreciated.


Ford Racing Performance Parts
 

Randy V

Moderator-Admin
Staff member
Admin
Lifetime Supporter
X2 on the intake leak....

Best way to install an SBF intake is to get 4 - 4" long bolts and cut the heads off of them - screw them into the corner intake bolt holes to use them as alignment dowels.. This way when you lower the intake down onto the heads, the gasket doesn't slip..
 

Pat Buckley

GT40s Supporter
The popping sound is interesting....perhaps the intake cracked? I've never seen that but pulling the intake will reveal all.

I use ARP studs to fasten the intake down.
 
Remove the rockers off on the two affected cyls & blow some 80 psi shop air into those two cyls, let the piston go to BDC as you do it , check for bubbles in the header tank, if it blows bubbles at that point, remove the air line, bring that piston to TDC, get a mate to put it in top gear & stand on the brake pedal while you apply the air pressure again, if it doesnt blow bubbles now with that piston at TDC you have a split bore, if it still blows bubbles its a cracked head or blown head gasket, if it didnt blow bubbles at all on either test its either in the ports or intake runners/manifold or gasket
 
Thanks fellas. I'll start with taking off the carb (Holley) and intake manifold and look for a blown gasket there.

Then, if the above doesn't reveal anything funky will move on to trying JacMac's diagnostic procedure. One question, if there was a split bore (or something similar) then wouldn't that be apparent with lower compression numbers in those two cylinders???

It is indeed the end cylinders - 1 & 8.

Thank you

Best you do the pressure test first before removing manifold unless you just want to check for bubbles at water passages at each end of cyl head, split in bore might be very small & if comp test was done with residual coolant in cyl might have masked or given false reading.
1 & 8 are diagonally opposite [ RF & LR corners] so if intake is 180° its unlikely coolant from crook cyl or manifold/head interface is being shared. If its an open plenum design then its possible.
 
So here's what a blown intake manifold gasket looks like....
 

Attachments

  • inlet gasket1.jpg
    inlet gasket1.jpg
    46.1 KB · Views: 403
  • inlet gasket2.jpg
    inlet gasket2.jpg
    50.4 KB · Views: 386
  • inlet gasket3.jpg
    inlet gasket3.jpg
    49.9 KB · Views: 364
So it's great that the installer used nice ARP fastners on the inlet manifold....but it would have been good to tighten them up with more than just a thumb and forefinger.....
 
Those look a bit like print o seal gaskets which have a bit of a reputation for this sort of thing, however with alloy intake manifolds its wise to check the manifold bolts at fairly frequent intervals & most recomendations suggest a lower torque value than the 20/25 ft lb that Ford use for the older cast iron intakes, especially if the ARP stud kit has a UNF thread at the nut end, dare I assume that you have checked these at regular intervals during the time the car has been in your stewardship Cliff:), or did it get the old fit & forget treatment...
 
Looks like the same engine I've got in my mustang. The GT40x 302 right? Anyways your gaskets look the same as mine. I recently tore the engine down (no problems at the time though) but I got the fel-pro intake gaskets with the steel sandwiched between the gasket material they are much better than the ones you have. I forget the number, but its one of the recommendations for the heads you have.
I also got a 3 foot piece of grade 8 5/16 coarse all-thread, then cut it into 3 inch pieces to make studs. It seems to have worked very well, whats more the gaskets are always in the right place.
 

Howard Jones

Supporter
I had issues with my Alum head 302 intake gaskets also. When I put it back together I studded all the intake manifold fasteners and got rid of the bolts. This way you can be certain to use all of the thread depth into the alum heads. A lot of the time the bolts that come with the intake are not long enought.

Now I use extra heavy duty thick washers and nuts to hold down the intake. Never leaked again.

Really easy fix once the intake is off and cheap insurance. Just what I like! Cheap, easy and effective!
 

Ron Earp

Admin
Those are some fooked up gasketed.

I have those exact same FelPro gaskets on the T70. I think I've used them on just about every SB build I've done and they have been just fine.

But, regardless of gasket type, every ally headed SB Ford I've fooled with needed the intake bolts tightened up a few times before they settled. Lola took about 4-5 hours of run time before they finally quit need a few lbs here and there of torque.

And the trick Randy mentioned is a must. Mine have the same cut down threaded rods to make studs. I'm surprised that ARP hasn't caught on to that and offered a $39.99 four stud kit for Ford intake manifolds.
 
Thanks guys. Started her today after re-fitting the intake and carb and various bits and she runs great. I have re-torqued the manifold bolts a couple of times now given there's been one or two heat cycles.

I used the fel-pro gaskets and, yup, they look much, much better. I did end up re-using the ARP bolts instead of studs but next time I'll change it over to studs.

Relieved I don't have a split bore or cracked head. Of course, that would mean I would have to immediately get on with my new engine project rather than arm chair it for the next few months....
 
Have taken the car for a couple drives now and she runs noticeably better. I believe the poor manifold gasket was drawing coolant into a least a couple of the cylinders, and probably more like three or four. I expect those cylinders are nicely steam cleaned in the cc!

I should have put two and two together before the gasket totally blew - I was having to top up the coolant quite frequently but there was no sign of leaks for example.

In any case, great to have the car running on all 8 and purring like a kitten.
 
I like to install the gaskets with a little weather strip adhesive, attaching them to the heads. I then position them, align the ports and then just set the intake manifold in place for an hour or two. Then remove the manifold, use a small amount of "The Right Stuff" around the water ports (Use this and you'll never go back to Silicone) and then carefully torque down the manifold following the correct bolt sequence.
 
Back
Top