
- Forums
- GT40 Replica Manufacturers' Corner
- RCR Forum - RCR40/SLC/917/Superlite Aero
- The SLC Clubhouse
You are using an out of date browser. It may not display this or other websites correctly.
You should upgrade or use an alternative browser.
You should upgrade or use an alternative browser.
SLC 36 Cam's Build
- Thread starter Cam MacIsaac
- Start date
This is funny: So my build is part way done. I'm considering a first drive like this one....
YouTube - mecanicul trasnit
YouTube - mecanicul trasnit
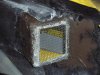
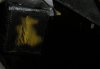
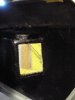
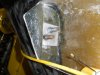
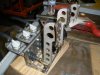
Went to the McMaster Carr site and got the expanded Al. the SS looked nice but had 50% flow or less. this stuff had around 80%. Took 3 coats of fiberglass to get it looking OK. Then sanded and painted with epoxy. i might come back and mount tranny cooler here.
Attachments
Dave Lindemann
Lifetime Supporter
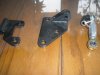
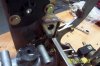
BTW, i got the tiny 1/4" clevis joints form mc master carr for the dbw to be hooked to the pedal box. i left extra Al onthe bracket so the pedal can't hit the gm harness
Cam - You've been busy! I've been curious as to how the dbw and pedal assembly work together (my car has the LS3). It appears the dbw is bolted to the chassis and the clevis joints/arm connected between the accelerator pedal and the dbw arm actuate the dbw? Did you do the install or did your car come that way from RCR? Do you happen to have a picture of the entire pedal arrangement?
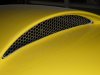
Your build is looking great. That's the same grill material I'm looking at using. I prefer the more open design as opposed to using the expanded type. Did you cut the vent openings? If so, any suggestions on how to get a clean, straight cut?
Regards,
Dave L
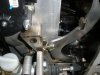
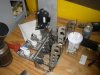
Dave; Here are a few more pics of the drive by wire in the pedal box. I like the idea of having it as one unit so if it needs to be moved, i can re-attach with the DBW. This is the way Tim did his, i copied! I'm trying to keep everything stock GM simple and not switch to a cable shifter.Cam - You've been busy! I've been curious as to how the dbw and pedal assembly work together (my car has the LS3). It appears the dbw is bolted to the chassis and the clevis joints/arm connected between the accelerator pedal and the dbw arm actuate the dbw? Did you do the install or did your car come that way from RCR? Do you happen to have a picture of the entire pedal arrangement?
Your build is looking great. That's the same grill material I'm looking at using. I prefer the more open design as opposed to using the expanded type. Did you cut the vent openings? If so, any suggestions on how to get a clean, straight cut?
Regards,
Dave L
I actually had RCR cut those openings but Mark at RCR said he makes a fat sharpie line and leaves the line with a thin wheel on a die grinder. then he comes back with the drum sander to take out the line. I tried it on the headlights and it work pretty well. Limit coffee intake before cutting?
I've probably got enough Al material to cover your vents. I think a 14" x 14" will cover the 3 vents? Just PM me an address...
Attachments
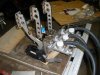
Dave, whoops, disregard those previous pedal pics, that was earlier in the build. Here is a pic with the 3/16" flat bar mounted. I didn't weld but used five 10-32 nylocked screws. I think a gorilla could stomp on the gas without the plate coming loose. Drilling thru the pedal box SS takes a ton of cutting oil. that stuff is stout.
I've got a pic of Tims adapter plate too on this post. looks like he used the same clevis joints as the clutch/brakes. The smaller clevis joint from McMaster gave a little more room for adjustment.
I've got a pic of Tims adapter plate too on this post. looks like he used the same clevis joints as the clutch/brakes. The smaller clevis joint from McMaster gave a little more room for adjustment.
Attachments
Dave Lindemann
Lifetime Supporter
Dave; Here are a few more pics of the drive by wire in the pedal box. I like the idea of having it as one unit so if it needs to be moved, i can re-attach with the DBW. This is the way Tim did his, i copied! I'm trying to keep everything stock GM simple and not switch to a cable shifter.
I actually had RCR cut those openings but Mark at RCR said he makes a fat sharpie line and leaves the line with a thin wheel on a die grinder. then he comes back with the drum sander to take out the line. I tried it on the headlights and it work pretty well. Limit coffee intake before cutting?
I've probably got enough Al material to cover your vents. I think a 14" x 14" will cover the 3 vents? Just PM me an address...
Cam - Thank you for the info and the pics - very helpful. PM on the way.
Dave L
Alex, do a google search for a hydraulic brake line switch, much neater & you won't break it!
Something like this?
Google Image Result for http://www.holden.co.uk/productimages/34765.jpg
Screws into the caliper?
edit: out of curiousity, if you have one that would screw into the caliper, could you just T the brake line somewhere and screw it into the T (assuming you adapted from 3/16'' IF to 1/8'' NPT somehow)?
Last edited:
found it
Pegasus - Hydraulic Brake Light Switch, 1/8 NPT
+
Pegasus - AN3 Tee with 1/8 NPT Female Branch
Now the only thing I don't know is the T is AN3 .... unless SLC uses brake lines that are different than what I'm used to, brake line nuts are 3/16 inverted flare ..... is 3/16 IF = -3 AN? (I mean, I know -3 is 3/16, but will IF mate with AN.....)