Cool thank you. I'll check them out.

You are using an out of date browser. It may not display this or other websites correctly.
You should upgrade or use an alternative browser.
You should upgrade or use an alternative browser.
Sean Starkey
Lifetime Supporter
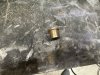
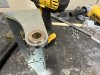
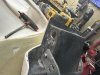
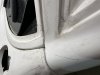
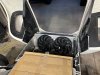
I decided to add bushings to the door hinges as seen in Randy’s build. I went with the bushings when I noticed a lot of slack in the hinge system. The bushings tightened everything up and makes for a smooth opening door.
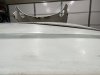
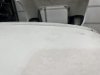
These doors are going to require quite a bit of patience to make fit properly. The driver door sets pretty good, but the passenger door doesn’t seem to line up with the spider properly. I’m going to check a few things on the spider and the door before moving forward with the doors.
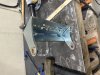
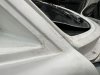
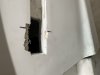
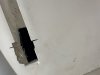
Unfortunately I found several air bubbles when cutting the hole for the handles. I’m going to look at reenforcing the handle pivots with some sort of angle iron. I don’t like the idea of fiberglass as a pivot point.
These doors are going to require quite a bit of patience to make fit properly. The driver door sets pretty good, but the passenger door doesn’t seem to line up with the spider properly. I’m going to check a few things on the spider and the door before moving forward with the doors.
Unfortunately I found several air bubbles when cutting the hole for the handles. I’m going to look at reenforcing the handle pivots with some sort of angle iron. I don’t like the idea of fiberglass as a pivot point.
Attachments
-
 E44D9B08-F1E7-4CE1-A518-A647D821D4D2.jpeg806.2 KB · Views: 505
 -
 1080DF33-E5E8-4E65-80FE-8D95B0655806.jpeg372 KB · Views: 542
 -
 142DC661-2BE4-410B-A08A-7A628F6D1CC1.jpeg372 KB · Views: 487
 -
 FF030C0D-30B1-416E-8F02-0D4E3CDAD377.jpeg416 KB · Views: 457
 -
 FD6A582B-0208-4118-88CE-3BC80B36DF51.jpeg394.2 KB · Views: 443
 -
 C52C97BD-B8FD-4DD2-AF84-026E1D92A0FB.jpeg212.4 KB · Views: 451
 -
 CF12455F-B6B2-44F8-BF56-09E5EE21CEF6.jpeg129.8 KB · Views: 453
 -
 E907F10A-36EC-4240-A660-D7646BB5E7A6.jpeg307.8 KB · Views: 436
 -
 5F359617-B08B-49FB-9E70-5BA768358FD6.jpeg293.5 KB · Views: 442
 -
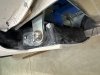 image.jpg367.9 KB · Views: 477
Sean Starkey
Lifetime Supporter

Looks good - with noted exception of the air bubbles…. I used a single long bolt for my top&bottom hinge points as my door surfaces where the hinge plates bolt on were not parallel And I had a bit of binding there. The single bolt forced the hinge point to be in the exact same plane top to bottom…. Door handle hinge point - yeah, someone did not have any sort of durability in mind by just anchring the door handle with a bolt glassed into the door. I found some channel iron that gave me an incredibly durable pivot point.
BTW - air pockets:
I found hundreds of air bubbles in my body. I literally took a small welding chipping hammer to open all them up that I could find. The Gelcoat cannot be trusted to not open up to expose a bubble.. You don’t want that to happen after it has been painted…
BTW - air pockets:
I found hundreds of air bubbles in my body. I literally took a small welding chipping hammer to open all them up that I could find. The Gelcoat cannot be trusted to not open up to expose a bubble.. You don’t want that to happen after it has been painted…
Sean Starkey
Lifetime Supporter
Looks good - with noted exception of the air bubbles…. I used a single long bolt for my top&bottom hinge points as my door surfaces where the hinge plates bolt on were not parallel And I had a bit of binding there. The single bolt forced the hinge point to be in the exact same plane top to bottom…. Door handle hinge point - yeah, someone did not have any sort of durability in mind by just anchring the door handle with a bolt glassed into the door. I found some channel iron that gave me an incredibly durable pivot point.
BTW - air pockets:
I found hundreds of air bubbles in my body. I literally took a small welding chipping hammer to open all them up that I could find. The Gelcoat cannot be trusted to not open up to expose a bubble.. You don’t want that to happen after it has been painted…
Thanks Randy,
I was debating on trying 1 long bolt as well. I was thinking it would beef the feel of the door up even more. I was also thinking this would allow me to install tubing inside the door at the hinge point. I could then tie that into the anti intrusion system I plan to add to the door. I would like the door to have some steel tieing it together from the hinge to the latch.
Sean
Exactly what I did for my anti-intrusion beams…Thanks Randy,
I was debating on trying 1 long bolt as well. I was thinking it would beef the feel of the door up even more. I was also thinking this would allow me to install tubing inside the door at the hinge point. I could then tie that into the anti intrusion system I plan to add to the door. I would like the door to have some steel tieing it together from the hinge to the latch.
Sean
link:: http://www.gt-forty.com/GT-Forty/DOORS/Pages/Doors-Anti-Intrusion.html
Take a look.. It really helped bring it all together. I won’t say that the doors were as solid as a late model sedan, but they were at least as solid as a Honda Civic or better. Door adjustment did not change either. You could slam it a hundred times (exaggerating) and they’d still close with a nice click-click…
I have this same exact problem in the same exact place. Passenger door rear part of the roof is too high .... trying to come up with a solution. let me know if you figure anything out.I decided to add bushings to the door hinges as seen in Randy’s build. I went with the bushings when I noticed a lot of slack in the hinge system. The bushings tightened everything up and makes for a smooth opening door.
These doors are going to require quite a bit of patience to make fit properly. The driver door sets pretty good, but the passenger door doesn’t seem to line up with the spider properly. I’m going to check a few things on the spider and the door before moving forward with the doors.
Unfortunately I found several air bubbles when cutting the hole for the handles. I’m going to look at reenforcing the handle pivots with some sort of angle iron. I don’t like the idea of fiberglass as a pivot point.
Sean Starkey
Lifetime Supporter
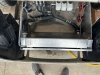
I decided to put the doors on hold a bit and play, it’s been a been a while since I started it. Exhaust pipes look pretty good.
edited the link. I messed up on the video clips
edited the link. I messed up on the video clips
Last edited:
Looking real goodI decided to put the doors on hold a bit and play, it’s been a been a while since I started it. Exhaust pipes look pretty good.
Sean Starkey
Lifetime Supporter
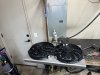
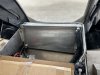
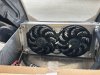
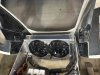
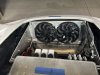
I decided to fabricate a radiator shroud to help air flow while idling. This allows the fan blades to be positioned 1 1/4” off the radiator fins. I had originally planned to make some rubber flaps that could open at high speed to improve air flow while driving, but I think I will hold off for now and see how the engine temps react.
Attachments
-
 88B160DC-1F00-4B8F-9E62-9E1FF771F096.jpeg473.9 KB · Views: 426
 -
 75F4D702-9658-4C39-9FB2-66400F2390C6.jpeg414.7 KB · Views: 415
 -
 A3207361-D015-4B43-B5DA-613DBE1BBE85.jpeg412 KB · Views: 418
 -
 8E785FC0-F8D5-48E6-B6C8-41A598B0D574.jpeg438.9 KB · Views: 410
 -
 8475C975-5F04-492B-BBDD-B611F3725C51.jpeg435 KB · Views: 399
 -
 DB85FD1E-68A9-4F97-AF9D-38BD780C2AEC.jpeg452.1 KB · Views: 398
 -
 FD9A1872-68E2-47E2-9FB9-F9D964B660B9.jpeg448.6 KB · Views: 389
 -
 461B5BE2-5FAC-4A9D-93E5-ECFA41E3F73E.jpeg436.2 KB · Views: 476

Sean Starkey
Lifetime Supporter
It’s the new low airflow design. Helps to warm the engine up on cold days.
Sean Starkey
Lifetime Supporter
Made a new video. Found a fouled plug causing the backfire. Sounds much better now.
Nice work Sean. That thing sounds great.
Are you planning to do the body work and paint? I always dread that part. Makes such a mess.
Are you planning to do the body work and paint? I always dread that part. Makes such a mess.
Sean Starkey
Lifetime Supporter
Thanks Rob.Nice work Sean. That thing sounds great.
Are you planning to do the body work and paint? I always dread that part. Makes such a mess.
I plan to do the body work. But I don’t think I have the paint job I want in me these days. I plan on having someone else paint it. I still have some research to do to find someone.
sean
Devin
Supporter
SeanMade a new video. Found a fouled plug causing the backfire. Sounds much better now.
What’s the specs on your wheels and tires? Brand?
Your build is coming along nicely keep up the great work.
Devin
Sean Starkey
Lifetime Supporter
Sean
What’s the specs on your wheels and tires? Brand?
Your build is coming along nicely keep up the great work.
Devin
Hi Devin
I’m not sure if the brand that RCR uses. But they are replica BRMs 17x10 on the rear with Toyo Proxes R888 315/35R17 rubber and 17x8 on the front with Toyo Proxes R888 225/45 r17 rubber. I will likely go a lower profile on the front to solve a rubbing issue, but I haven’t gotten to where I can research that yet.
Sean
Sean Starkey
Lifetime Supporter
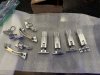
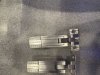
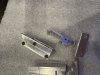
Just received my hartwell latches and window vent hardware from RCR. Very well made items for sure!
Attachments
Which size bushings worked out best for the door hinges?I decided to add bushings to the door hinges as seen in Randy’s build. I went with the bushings when I noticed a lot of slack in the hinge system. The bushings tightened everything up and makes for a smooth opening door.
These doors are going to require quite a bit of patience to make fit properly. The driver door sets pretty good, but the passenger door doesn’t seem to line up with the spider properly. I’m going to check a few things on the spider and the door before moving forward with the doors.
Unfortunately I found several air bubbles when cutting the hole for the handles. I’m going to look at reenforcing the handle pivots with some sort of angle iron. I don’t like the idea of fiberglass as a pivot point.
Similar threads
- Replies
- 0
- Views
- 316