Walter's RCR40 Build

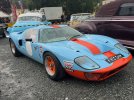
``From GT40 to GTV": I've spent the summer working on my 1974 Alfa GTV 2000, which I've owned for 30 years now. It's almost done and should be ready for the track again next spring.
Finally I found the time to drive the GT40 and ended up with erratic ignition (a problem in the low tension circuit).
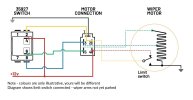
Uphill, I came to a stop, backed off the road and started looking for the cause (it was dark by then). After some wiggling under the dash current was back and I managed to get going. Back home (glad I made it ) I went into the limbo position underneath the steering column (well familiar to all you GT40 owners). Here the removable steering wheel shows its main advantage! I could trace the problem to a loose wire at one of the sockets. So I crimped a new pin for the connector. Seems it's all well and stable now.
I also had to recalibrate the speedo after installing the Driveshaft Shop's racing boots, finally, on all 4 ends. I find this remarkable because the number of pulses per shaft rotation should be determined by the number and shape of bolts. Sofar the boots have held up. They can be seen in the last foto in my previous update. None of the original ones lasted longer than about 1500 miles.
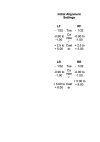
 
First few outings this year. Before, I had to reattach the signal wire to the starter motor. It is a simple push fit (using an insulating rubber plug).

Today I passed the annual inspection and am good to go for another year. I also mounted front wheels with new Avon tires. The old ones had considerable wear on their inside so I'll reduce negative camber a bit - next project up.
 
Also found a broken connector for the brake fluid sensor, easy fix, and then learned the the reservoir needed to be filled all up to the top for the warning light to switch off. Quite different than on my other cars.
 
-3 deg camber LHF was a bit much, -2 deg RHF maybe too for road use :). So I settled for about -1.5 deg. Also dialed in a slight toe-out as I do on most of my cars. It helps going into a turn. Took me quite some time since a wanted the steering wheel perfectly centered. Will see how it feels on the road. At the rear the Avons show little wear so for now I plan to run the old ones.
 

Randy V

Moderator-Admin
Staff member
Admin
Lifetime Supporter
Just a suggestion -
From my past experience, you’d be far happier with the performance of your car on the street with -.5 camber all the way around. Straight line braking performance is also greatly enhanced.
 
Just a suggestion -
From my past experience, you’d be far happier with the performance of your car on the street with -.5 camber all the way around. Straight line braking performance is also greatly enhanced.
Thank you for your interesting input. I may try your suggestion. RCR suggests -1deg for camber in their build manual. In autocross (with front-engined cars) we used -1.5 to -2deg (I guess braking is not important in this business :) ). I'll take it step by step - maybe try the -1 first.
 
New wheels mounted:
Fesh Avon tires all around using my spare set of rims. The latter were made by Image Wheels in England a few years ago when I started to prepare the car for road-worthyness and registration. Upon their arrival I only tested the front wheels for proper fitting. So only a few weeks ago I found out the rears had too much backspace (against my requested specs). Adding and securing a 12mm spacer did the trick.
Wiper motor puzzle:
Also I tinkered with the wiper:
it only runs at one speed (high position of the switch) and does not return to the starting position by itself when in off. Not sure if the wiper is supposed to run at two speeds since only 3 of the five arriving wires are used into the wiper motor. Of the 5 arriving wires one is ground and one is permanently positive (under ignition on). The 3 positions of the switch move plus between the remaining 3 connections. Some more testing will be needed to clarify.
 

Ian Anderson

Lifetime Supporter
New wheels mounted:
Fesh Avon tires all around using my spare set of rims. The latter were made by Image Wheels in England a few years ago when I started to prepare the car for road-worthyness and registration. Upon their arrival I only tested the front wheels for proper fitting. So only a few weeks ago I found out the rears had too much backspace (against my requested specs). Adding and securing a 12mm spacer did the trick.
Wiper motor puzzle:
Also I tinkered with the wiper:
it only runs at one speed (high position of the switch) and does not return to the starting position by itself when in off. Not sure if the wiper is supposed to run at two speeds since only 3 of the five arriving wires are used into the wiper motor. Of the 5 arriving wires one is ground and one is permanently positive (under ignition on). The 3 positions of the switch move plus between the remaining 3 connections. Some more testing will be needed to clarify.

Should give you the connections

Has
 
Thanks for the link.
I tested the wiper motor using a spare battery. Connecting neg. ground to pin 1 and positive to position 5 gives me, what I think is, high speed wiper operation. According to the diagram, pin 5 should be for slow speed however. Connecting neg. ground to 1 and positive to position 3 gives me no response from the wiper unless I help it along by hand when I moves at a crawling speed to stop again. There are 3 wires into the wiper indicating it's a 2 speed. But I get out of it single-speed operation (fast?) and no auto-return.
 

Attachments

  • wiper-circuit.jpg
    wiper-circuit.jpg
    94.1 KB · Views: 195
Thanks for the link.
I tested the wiper motor using a spare battery. Connecting neg. ground to pin 1 and positive to position 5 gives me, what I think is, high speed wiper operation. According to the diagram, pin 5 should be for slow speed however. Connecting neg. ground to 1 and positive to position 3 gives me no response from the wiper unless I help it along by hand when I moves at a crawling speed to stop again. There are 3 wires into the wiper indicating it's a 2 speed. But I get out of it single-speed operation (fast?) and no auto-return.
from what i can remeber....
you also need to connect in 2 more wires for the auto return.
its like a sliding contact switch that keeps power on to the motor until it reaches a dead point which is the park positoion.
Jerry
 
A small problem occurred: engine started to run rough. After some searching the source was identified as cracked vacuum hoses - the ones connecting the individual injection barrels to the vacuum signal junction. Apparently inferior material was used since all but one failed the same way, namely, by splitting at the ends with some eventually falling off. Hope that I can find 3mm ID high-temp ( up to at least 230C) silicon hoses within Europe.
The picture was taken by a relative at the Rollin Dudes Festival 2025, just after a brief but heavy rain shower.
 

Attachments

  • image03.jpeg
    image03.jpeg
    767.6 KB · Views: 151
I'm slowly getting the feel for driving the car - it is a blast! I'm very happy with the front-end setup now - steering has become much more responsive and the brakes work very well. Merely, the throttle has to be watched - it is a bit twitchy from off to on.
 

Attachments

  • IMG_9650.jpg
    IMG_9650.jpg
    189.1 KB · Views: 140
Hi Walter, happy to hear this, could you share what are the parameters you used to set up the suspension ? I should be at the step very soon, I already collected all the information I founded on the forum, but the best is the experience and the feeling of the ones that drove their car. By the way are the setup for street or strip ?
 
Hi Walter, happy to hear this, could you share what are the parameters you used to set up the suspension ? I should be at the step very soon, I already collected all the information I founded on the forum, but the best is the experience and the feeling of the ones that drove their car. By the way are the setup for street or strip ?
I think you can pretty much follow RCR's recommendation as attached. On a race car (front wheels) one can go for more neg. camber -1.5 to -2deg, and I like toe set to +1/32 per side. I use about -1.5 neg. camber and +1/32 toe on (all) my street car(s) for fun in turns. I do little highway driving. My car came with toe in and way too much neg. camber - it did not want to go into turns - it was scary. Looking forward to more photos from your car...
 

Attachments

  • alignment-specsRCR.jpg
    alignment-specsRCR.jpg
    45.4 KB · Views: 113
Strange sounds from the right bank of the LS7 were traced back to a failure of the rear coil (nr. 8). Coil was replaced and a thermal cover for it added since I think the heat from the nearby exhaust manifold killed it.

A throttle cable replacement mandated by a partially ripped cable revealed that the heat sleeve added to the cable previously was not sufficient to protect the cable near the manifold. I tried to mount the cable as far away as possible from the latter and added a second layer of insulation in that region.

I adjusted the (Tilton) throttle pedal for better shifting and to ensure that the throttle stops are set correctly.

No lights ( side and head) - I suspect a faulty switch or a fuse ... fault finding will have to wait until tomorrow.
 
... switch good, fuse good, fuse holder shaky. Next up is some heat shield (DEI ?) for the coils - primarily against the manifold. Throttle pedal neess slight adjustment.
 
A new problem came up - slight adjustment but big effect :

When I started the car Sunday afternoon it took a few tries to get the engine to fire (which is unusual). When it did the engine revved up to ~ 5500 rpm. It took me a bit to figure that the throttle cable was not set properly - visually the butterflies seemed closed and I thought there was some slack left in the cable. A foolish mistake on my part. In the process the outside half of the V-belt disintegrated (no idea if it had some small previous damage already). Apart from loose debris the outside of the tensioner's pulley got clogged massively with rubber. All other pulleys were clean, turning fine with virtually no play. I removed the tensioner and cleaned the grooved pulley. I could not find anything seriously wrong with it but replaced it anyway and installed a new belt. I carefully inspected the new pulley for ridges - which I found. It seems that the pulley is put together from two halves. So I sanded it carefully before installation. I’ll pay more attention to it to see if I missed something. I took the opportunity to go over the clamps of the water hoses.
I’m very grateful that RCR installed a removable inspection window/plate in the fire wall in front of the belt tensioner :) !

Now I was more careful with the throttle cable: I first set the front pedal stop near flush with its lock nut; then the cable for the butterflies to fully open with the pedal on the front stop bolt. Then I slacked the cable way up by turning the rear stop bolt outward, moving the throttle pedal all the way backward. I then started the engine and moved the pedal forward till revs picked up from idle, then moved back the pedal a bit to achieve idle rpm and tested for proper throttle response. Finally I tested proper position of throttle versus brake pedal. Road test will follow tomorrow. I hope the engine did not suffer too much ...
 
Back
Top