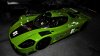
Aaron, why is the top of the fenders cut away for?

- Forums
- GT40 Replica Manufacturers' Corner
- RCR Forum - RCR40/SLC/917/Superlite Aero
- The SLC Clubhouse
You are using an out of date browser. It may not display this or other websites correctly.
You should upgrade or use an alternative browser.
You should upgrade or use an alternative browser.
Aaron's SL-C build...
- Thread starter Aaron Hamilton
- Start date
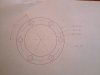
Fender louvres
Aaron, why are the top of the fenders cut away?
To vent air out from under them when going fast...
Attachments
")
Is there anything to stop the water and dirt from coming thru them? I get all kinds of dirt on the center section of the car from the wheels when you open the door. ITs like a dirt magnet, but I do have a gravel driveway, when it rains the holes are filled with water so Im sure that dont help.
Does anybody else have this problem?
Does anybody else have this problem?
That was a very good explanation. Thank you, my mirrors are there anyway, how fast is fast?
I only have 1 eye, right eye, and turning my head to see out on my left side is harder to do and I like the mirrors on the fenders. I just took the ones Fran sold me and made the bottoms match the fender and I can see pretty good with them without turning my head to far. Same thing getting on the freeway, but I still have to look out the window to make sure someone isn't beside me. Try covering up your left eye when getting on the freeway, you have to have a OWL neck to look left and back, but been that way since I was 12 so I'm use to it.
Is there anything to stop the water and dirt from coming thru them? I get all kinds of dirt on the center section of the car from the wheels when you open the door. ITs like a dirt magnet, but I do have a gravel driveway, when it rains the holes are filled with water so Im sure that dont help.
Does anybody else have this problem?
I don't think you can stop that - just cover up the sills inside the car or you'll be sorry - I tried to drive with them open twice and it was a constant tornado of dust and dirt inside the car before I just gave up.
I've been busy the past few days..
1) Fabricated a clutch alignment tool.
2) Removed the doors and shortened the threaded studs for the J hinges
3) Removed the clamshell body.
4) Removed engine and Trans.
5) Remved the roll bar. Needs modified.
6) Removed the bulkhead and modified ECU attachment.
7) Modified engine mount ( no good stand-off spacing). Doesn't match LS3 engine.
8) Flipped and modified the mid-engine mounts to eliminate the ugly spacers.
9) Test fit the clutch.
10) Cursed a few times.
11) Cursed a lot.
12) Laughed a bit about the average Joe building this car with only a few hand tools. Ha ha.
13) Removed the flywheel bolts that already exist in the crank of the crate engine. Wondered why I ordered the ARP bolts ??
Last edited:
I've been busy the past few days..
1) Fabricated a clutch alignment tool.
2) Removed the doors and shortened the threaded studs for the J hinges
3) Removed the clamshell body.
4) Removed engine and Trans.
5) Remved the roll bar. Needs modified.
6) Removed the bulkhead and modified ECU attachment.
7) Modified engine mount ( no good stand-off spacing). Doesn't match LS3 engine.
8) Flipped and modified the mid-engine mounts to eliminate the ugly spacers.
9) Test fit the clutch.
10) Cursed a few times.
11) Cursed a lot.
12) Laughed a bit about the average Joe building this car with only a few hand tools. Ha ha.
13) Removed the flywheel bolts that already exist in the crank of the crate engine. Wondered why I ordered the ARP bolts ??
#12 isn't funny....
Dave,
Dont panic...
Have a chat with Allan...he is on #9 and the most exotic thing he has is a small welder and that was only a recent acquisition...
Dont panic...
Have a chat with Allan...he is on #9 and the most exotic thing he has is a small welder and that was only a recent acquisition...
I'm not in a panic. It's my bank account in panic mode.
No need to be....wink.
I've been seriously busy on building the SL-C guys..
I found the answer to this comment...
13) Removed the flywheel bolts that already exist in the crank of the crate engine. Wondered why I ordered the ARP bolts ??
Maybe it's because the bolts that come in the GM crate engine don't fit in the RCR flywheel? :shocked:
Now on to other items...
I've been working on the body and chassis at both shops...
Today I worked on the following:
1) Cut out the door windows.
2) Removed the door hinges, latches, etc.
3) Block sanded one of the doors to 400 grit.
4) Re-installed the front engine mount.
5) Re-installed the roll bar.
6) Re-installed the upper bulkhead panel (after modification).
7) Test fit the roll cage down bars to the rear chassis. These need modified as well. I guess I'll use my lathe... I'm glad I'm an average Joe..:laugh:
8) Cleaned the oxidation near all the welds on the rear chassis.. Inspected all of the welds. Found a cracked weld in the chassis in front of the driver rear wheel. Glad I have TIG welded too Maybe cracked during transportation too or from Arizona.
9) Thought about how to modify the dash panel.. I may start on that tomorrow.
10) Confirmed that the Graziano starter bolts are indeed M12 x 1.5 by 30 ~ 40 mm long. You choose the length to your taste.
11) Built the oil cooler hose for the Graziano.
12) Installed flywheel to GM crate engine using ARP bolts for the LS engine. Kit purchased from Summit Racing.
13) Installed clutch to flywheel using M6 x 1 x 65 mm long (10.9 grade) bolts. Torque is 10 ft-lb.
14) Made CV joint cover plates to the stub axles and to the Graziano.
The photo of the hiem ends is to show that they were installed bottomed out (no adjustment) on my chassis.
I've also been changing many bolts on my chassis since many were just too long for my preference.
I found the answer to this comment...
13) Removed the flywheel bolts that already exist in the crank of the crate engine. Wondered why I ordered the ARP bolts ??
Maybe it's because the bolts that come in the GM crate engine don't fit in the RCR flywheel? :shocked:
Now on to other items...
I've been working on the body and chassis at both shops...
Today I worked on the following:
1) Cut out the door windows.
2) Removed the door hinges, latches, etc.
3) Block sanded one of the doors to 400 grit.
4) Re-installed the front engine mount.
5) Re-installed the roll bar.
6) Re-installed the upper bulkhead panel (after modification).
7) Test fit the roll cage down bars to the rear chassis. These need modified as well. I guess I'll use my lathe... I'm glad I'm an average Joe..:laugh:
8) Cleaned the oxidation near all the welds on the rear chassis.. Inspected all of the welds. Found a cracked weld in the chassis in front of the driver rear wheel. Glad I have TIG welded too
Maybe cracked during transportation too or from Arizona.9) Thought about how to modify the dash panel.. I may start on that tomorrow.
10) Confirmed that the Graziano starter bolts are indeed M12 x 1.5 by 30 ~ 40 mm long. You choose the length to your taste.
11) Built the oil cooler hose for the Graziano.
12) Installed flywheel to GM crate engine using ARP bolts for the LS engine. Kit purchased from Summit Racing.
13) Installed clutch to flywheel using M6 x 1 x 65 mm long (10.9 grade) bolts. Torque is 10 ft-lb.
14) Made CV joint cover plates to the stub axles and to the Graziano.
The photo of the hiem ends is to show that they were installed bottomed out (no adjustment) on my chassis.
I've also been changing many bolts on my chassis since many were just too long for my preference.
Attachments

Similar threads
- Replies
- 2
- Views
- 1K