
You are using an out of date browser. It may not display this or other websites correctly.
You should upgrade or use an alternative browser.
You should upgrade or use an alternative browser.
Biessman XLR-917
- Thread starter JackN2469E
- Start date
Hi Jack.......thanks for the photos they explain a lot, couple more question's. I see you then covered the mesh with what appears to be blue tape or plastic film wrap, is this to keep the glass seperate from the frame and so the frame gets removed when the glass has cured?? Also in an early photo I see your transaxle has the diff behind the Trans, I'm guessing with the 917 the wheel base is long enough to do this when your engine is shorter than the original flat 12. Is your wheel base close or are you slighty longer and is it a 928 trans or some thing else. This a fasinating build and you are doing amazing work. Cheers Leonmac
Hi Guys,
The blue plastic film was for a bond break from the mesh. It worked great!
The wheels are C6, Z06 chrome that I painted flat black to match the original.
I will paint red strips on the front spokes to match the #25 Long Tail from 1970.
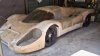
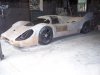
In a few days I will show you what I've been up to. Every time I look at the car I don't see a 917. I looked at every part of the car and compared it to photos and the 1:18 scale cars I'm using for scale and everything matches but I still couldn't see the 917. Then I realized the extra 3" in height were distroying the overall design. So I cut off the roof and chopped up the roll bar, and tilted it back like the real cars, and put it back together with a height of 37-1/4".
NOW IT LOOKS LIKE A FRIGGIN 917!!! I should be able to send some new photos in a couple of days.
Jack
The blue plastic film was for a bond break from the mesh. It worked great!
The wheels are C6, Z06 chrome that I painted flat black to match the original.
I will paint red strips on the front spokes to match the #25 Long Tail from 1970.
In a few days I will show you what I've been up to. Every time I look at the car I don't see a 917. I looked at every part of the car and compared it to photos and the 1:18 scale cars I'm using for scale and everything matches but I still couldn't see the 917. Then I realized the extra 3" in height were distroying the overall design. So I cut off the roof and chopped up the roll bar, and tilted it back like the real cars, and put it back together with a height of 37-1/4".
NOW IT LOOKS LIKE A FRIGGIN 917!!! I should be able to send some new photos in a couple of days.
Jack
Hey Jack.... don't entirely agree that you couldn't see a 917 when you looked at your car. its very much a 917. BUT I have to say that you had to either raise the rear deck or lower the roof line to make it that much closer and I'm glad you have cause this is one of my favoured builds and and can't wait to see the new look. Keep up the great work. Cheers Leonmac.
Jack,
If only I had half your talent....remarkable build! Can't wait to see the completed car. Not that it will ever happen but should you ever need an injection of adrenalin watch the movie "Lemans". Turn up the volume as McQueen sits in the cockpit waiting for the flag to drop and all you can hear is his heartbeat........fantastic stuff!! Certainly inspiring.....
If only I had half your talent....remarkable build! Can't wait to see the completed car. Not that it will ever happen but should you ever need an injection of adrenalin watch the movie "Lemans". Turn up the volume as McQueen sits in the cockpit waiting for the flag to drop and all you can hear is his heartbeat........fantastic stuff!! Certainly inspiring.....
John,
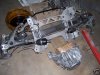
To answer your earlier question about wheelbase, I had to increase it by 11" because that diff is so far back. I stuffed the engine as far forward as I could and heavily modified the rear subframe to gain 2" more. I made the side pods 5" longer and left a 6" gap between the tire and the pod. With everything being black, it shouldn't be too noticable.
The transaxle is from the Cadillac XLR also. It is an automatic/manual so with a blip of the throttle here and there it will sound enough like a standard for me.
As far as the height, my head with helmet will be 1/2" from the door so I will fit. The real cars were very tight inside. Derek Bell seems to have a lot of room because I think he's a midget. :laugh:
Jack
Hi Jack
Im totally in awe of what you have achieved so far and log in everyday to see if your post has been updated. Keep up the great work its inspiring. I hope to do something similar in the future. What did you use as reference for the chassis or did you just design from scratch.
Cheers
Jase
PS Hi everyone, Im a noob and this is my first post")
Im totally in awe of what you have achieved so far and log in everyday to see if your post has been updated. Keep up the great work its inspiring. I hope to do something similar in the future. What did you use as reference for the chassis or did you just design from scratch.
Cheers
Jase
PS Hi everyone, Im a noob and this is my first post
Hi Guys,
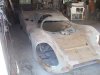
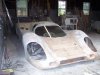
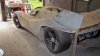
I've been working flat out on modifying the body to make it more accurate. I'm really getting tired of body filler and sanding. :evil: The car is now 37" off the ground with a 4" ride height.
Today I'm going to add two air scoops at the end of the buttresses, as seen on the #25 Long Tail, to break up the vast expance of the rear fenders. I can always use more air to cool the all aluminum engine. Actually, I'll probably need a transmission cooler. :huh: $$$
I finally got the headlight cut outs as close as they're going to be. Forgive me, but I'm going to install a set of XLR headlights under a tinted lens cover as I had already bought them when I had planned on building a Cadillac LMP car. The way I built this body makes it tuff to get things to match from side to side. In fact, because I don't have the coilovers and steering in yet, I have never been able to step back and see the right side of the car. I hope that's not a shocker when I can!!
Well, off to work.
See Ya,
Jack
Attachments

That is very cool. I am really impressed with your work so far. Just wondering, what engine and transaxle platform do you have in mind for this?
Let me know if I can be of any help at all with recommendations.
Warmest Regards,
Erik Johnson
GBox Sales Manager
(303) 440-8899 work
(303) 895-4828 cell
Let me know if I can be of any help at all with recommendations.
Warmest Regards,
Erik Johnson
GBox Sales Manager
(303) 440-8899 work
(303) 895-4828 cell
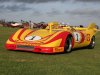
Big changes on my end. Construction is over for me due to the economy and that a company will hire a person half my age rather than me. I've recently stopped working on the "Prototype" and teaching car. Now I'm focusing my full attention on a production car to make money.
The new car will have a square and round steel frame that I can weld. A C6 Corvette front and rear suspension for now and a twelve (12) cylinder boxer engine :idea: with a SportShift transaxle. It will look like the yellow and red car.
See ya,
Jack
(I can't wait for the replys about the 12 cyl boxer!)
Attachments

Jim Craik
Lifetime Supporter
(I can't wait for the replys about the 12 cyl boxer!)
OK, tell us about the motor
I'm still figuring everything out but it will be two late model Subaru 6cyl, 3.0L engines joined at the crank with a piece I designed. Both engines will be bolted firmly to the chassis with other braces to make the engines one.
So far, I'm planning to run both engines off of one computer with the firing sequences perfectly aligned. I'm hoping a signal to cylinder #1 will fire off both #1"s. Keep in mind I'm not an auto mechanic and I'm only using common sence. I do have a Suburu service department and lead mechanic enthusiastically helping me so we should figure something out.
Jack
Attachments

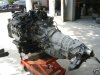
I'm still figuring everything out but it will be two late model Subaru 6cyl, 3.0L engines joined at the crank with a piece I designed. Both engines will be bolted firmly to the chassis with other braces to make the engines one.
Jack
VERY interested in how you accomplish this. Keep us up on the progress..
I would consider not a fix connection of the two crankshafts because you will never align the two cases 100% stiff and fix with the huge HP and torque load! That will kill the complete engines or minimum the bearings of the cranks. Check those connectors that are available in very different sizes:

Similar threads
- Replies
- 14
- Views
- 1K