You are using an out of date browser. It may not display this or other websites correctly.
You should upgrade or use an alternative browser.
You should upgrade or use an alternative browser.
CANAMSA - SA stratch build
- Thread starter Fred W B
- Start date
Thanks for the comments Guys
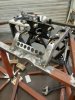
Most of the tubing has a 1.6 mm wall thickness, except for the members to which suspension brackets and damper mounts are welded, and the members around the engine adaptor plate, where I used 2 mm wall thickness. Tubing is mostly 25 mm and 19 mm square and round, with a few pieces in 50 x 25 and 38 x 19 mm.
Most of the tubing has a 1.6 mm wall thickness, except for the members to which suspension brackets and damper mounts are welded, and the members around the engine adaptor plate, where I used 2 mm wall thickness. Tubing is mostly 25 mm and 19 mm square and round, with a few pieces in 50 x 25 and 38 x 19 mm.
testing picture posting, apologies
test
Maybe this helps
Posting Pictures
Hi all - Recently I have forwarded instructions to help a few other forum members post pictures and it was suggested I post them here for others, so if it helps you - great. It's a bit 'long winded' so if you already post pics - please ignore. ****************************** POSTING PICTURE...
www.gt40s.com
Hi All
As is obvious I havent been posting many pictures, let me try and remedy that by showing some details of things that took up so much time.
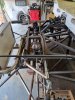
Steering column and pedal box.
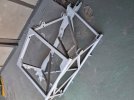
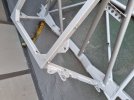
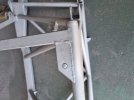
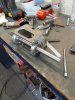
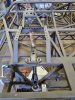
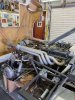
One of the challenges on a scratch build mid-engine chassis is packaging the pedals, steering column and rack, front suspension and your feet that all want to be in the same space. I decided to go with top hung pedals, as I want the seats to be formed in the centro section of the chassis mono style and that necessitated a movable pedal box. Top mounting means some structure is required and although I try to keep things simple they always seem to run away with me. The steering column was made up from various Toyota Corolla and Hiace parts, and mated to the Ford Cortina steering rack. The Toyota parts give a nice sliding section for length adjustabity and deflection case of an accident. I also built in some up and down adjustment for the steersmen wheel position. Hopefully the photos will explain.


As is obvious I havent been posting many pictures, let me try and remedy that by showing some details of things that took up so much time.
Steering column and pedal box.
One of the challenges on a scratch build mid-engine chassis is packaging the pedals, steering column and rack, front suspension and your feet that all want to be in the same space. I decided to go with top hung pedals, as I want the seats to be formed in the centro section of the chassis mono style and that necessitated a movable pedal box. Top mounting means some structure is required and although I try to keep things simple they always seem to run away with me. The steering column was made up from various Toyota Corolla and Hiace parts, and mated to the Ford Cortina steering rack. The Toyota parts give a nice sliding section for length adjustabity and deflection case of an accident. I also built in some up and down adjustment for the steersmen wheel position. Hopefully the photos will explain.
These are better, right?
Attachments
-
 20200222_125913.jpg239.9 KB · Views: 398
 -
 20200308_085808.jpg301.3 KB · Views: 388
 -
 20200308_102137.jpg304.4 KB · Views: 389
 -
 20200520_183249.jpg187.5 KB · Views: 363
 -
 20200522_185121.jpg185.2 KB · Views: 369
 -
 20200523_120935.jpg235.9 KB · Views: 397
 -
 20200601_162439.jpg239 KB · Views: 401
 -
 20210502_153023.jpg280.2 KB · Views: 393
 -
 20210502_153031.jpg370.8 KB · Views: 469
Hi all
It’s been a long time since I posted, but I have been making good (if slow) progress on my project. I have yet to find a convenient way to download photos from my phone, configure and upload them suitable for posting and as I’m trying to spend every bit of free time I have in the garage working on the project my posting has suffered.
I’m now well advanced with a dry build, things accomplished since I last posted:
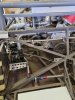
All wishbones made up.
Drive shafts made.
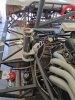
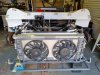
Engine cooling fitted and plumbed - Radiator, header tank, swirl pot, electric water pump mounted. 38 mm dia piping made up in aluminium and stainless steel and mounted in aluminum brackets.
Brake and clutch hydraulics run in flex braided right through.
Handbrake cables made and run.
Fuel tanks (2 off Left and right, and centre consolidation tank) made and mounted.
Fuel system pre filter, pump, regulator, post filter, connection valves, plumbed in -8 and -6 braided hose with AN fittings.
Oil cooler, thermostat, remote filter mounted and plumbed in hydraulic hose and BSP fittings.
Gearshift finalized (still mock up parts) and cables made and run.
All above systems require mounting brackets and pipes / cables securing with P clips. I don’t like to rivet on P clips so have added a lot of brackets to bolt to. Where brackets will be inaccessible once the chassis is panelled weld nuts are required to the back of the brackets.
Carburetor rebuilt.
Exhaust silencers mounted.
Body fit: Scuttle fit finalized.
All nose mounting points made and fitted.
Current focus is:
Making up accelerator pedal, carb linkage and cable.
Finalize tail mounting hinges and latches detail.
Door mounting hinges and latches parts being made.
Anti-roll bar parts being made (design and mounting is complete).
Once the above is done the only remaining system to fit and make brackets for is the full electrical and dashboard.
Then strip, paint chassis and the various subframes and then do final build. First step will be to panel the chassis.
I do intend to document and share the final build.
It’s been a long time since I posted, but I have been making good (if slow) progress on my project. I have yet to find a convenient way to download photos from my phone, configure and upload them suitable for posting and as I’m trying to spend every bit of free time I have in the garage working on the project my posting has suffered.
I’m now well advanced with a dry build, things accomplished since I last posted:
All wishbones made up.
Drive shafts made.
Engine cooling fitted and plumbed - Radiator, header tank, swirl pot, electric water pump mounted. 38 mm dia piping made up in aluminium and stainless steel and mounted in aluminum brackets.
Brake and clutch hydraulics run in flex braided right through.
Handbrake cables made and run.
Fuel tanks (2 off Left and right, and centre consolidation tank) made and mounted.
Fuel system pre filter, pump, regulator, post filter, connection valves, plumbed in -8 and -6 braided hose with AN fittings.
Oil cooler, thermostat, remote filter mounted and plumbed in hydraulic hose and BSP fittings.
Gearshift finalized (still mock up parts) and cables made and run.
All above systems require mounting brackets and pipes / cables securing with P clips. I don’t like to rivet on P clips so have added a lot of brackets to bolt to. Where brackets will be inaccessible once the chassis is panelled weld nuts are required to the back of the brackets.
Carburetor rebuilt.
Exhaust silencers mounted.
Body fit: Scuttle fit finalized.
All nose mounting points made and fitted.
Current focus is:
Making up accelerator pedal, carb linkage and cable.
Finalize tail mounting hinges and latches detail.
Door mounting hinges and latches parts being made.
Anti-roll bar parts being made (design and mounting is complete).
Once the above is done the only remaining system to fit and make brackets for is the full electrical and dashboard.
Then strip, paint chassis and the various subframes and then do final build. First step will be to panel the chassis.
I do intend to document and share the final build.
Attachments
-
 feb 23 - general view.jpg244.2 KB · Views: 339
 -
 feb 23 - tail open.jpg275.1 KB · Views: 361
 -
 feb 23 - fuel RHS.jpg244.8 KB · Views: 358
 -
 feb 23 - fuel detail.jpg190.5 KB · Views: 343
 -
 feb 23 - plumbing RHS.jpg243.3 KB · Views: 365
 -
 feb 23 - front open.jpg263.9 KB · Views: 369
 -
 feb 23 - front.jpg271 KB · Views: 330
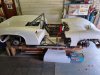
I have now 99 percent completed the dry build, the wiring is mostly laid in and the dash mocked up (real one still to be cut in one piece ). I splashed out on a set of Stack gauges.
Last week I had all 4 wheels on for the first time ever and I weighed the car as it stands now (excluding chassis and cockpit skin paneling, fluids, anti roll bars and seat belts). I'm still under 800 kg (1760 lbs) which I am happy about.
.jpg")
 (3).jpg")
 (2).jpg")
.jpg")
Last week I had all 4 wheels on for the first time ever and I weighed the car as it stands now (excluding chassis and cockpit skin paneling, fluids, anti roll bars and seat belts). I'm still under 800 kg (1760 lbs) which I am happy about.
Last edited:
Looking good as always Fred. Keep up the excellent work.
Regards Brian
Regards Brian
Bryan Koehler
Supporter
Really great progress you are making. I will be looking forward to seeing this one when complete!!
Ian Anderson
Lifetime Supporter
Great to see this progress
Thanks for the kind comments Guys
")
Quite a significant milestone for me now. I have stripped the car again and fully welded all the various brackets added during the dummy build. Once that was done I cut bits of threaded rod to plug all the inserts and weld nuts on the chassis and delivered it to a blasting and painting facility. View attachment 136728View attachment 136729View attachment 136732
Last edited by a moderator:
I'm trying to post pictures directly from my phone for the first time and I don't know why the pics are showing upside down


Last edited by a moderator: