ok if we are chipping in our opinions about the paint...
1 & 2, i dont like. they are a bit showy
4 is perfectly fine, but is a rather traditional layout i think.
3, i prefer. i really like how it adds a lot of curve, which i feel softens the very straight lower lines of the car.
i also like the side to side two tone. it really unusual and cool, but still refined and deceptively reserved. it is almost like the car would have this really clever little joke about it, which will at first confuse, then put a little smile on the face.
")
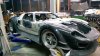
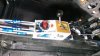
") Yes ,now we have all the forms and so. The second car would be lighter . But first we have to look how it drives. Maybe ist undriveble....
Yes ,now we have all the forms and so. The second car would be lighter . But first we have to look how it drives. Maybe ist undriveble....