Chuck and Ryan's RCR Build

Chuck

Supporter
GT40, Second Rebuild

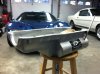
We thought the GT40 was finished. It drives great, everything works as intended, has been to
several car shows, and for more than a year we have done nothing other than routine maintenance. But we need a project. Our plans to build a Shelby Cobra 289 were cancelled when we learned that after waiting six months it would be several more before construction of the kit would begin. So what could we do to improve the GT?

Here is our list of possible updates:

1. Add separate fuel tanks within the side sponsons. This is not functionally necessary, but would add to the safety of the car. RCR has aluminum fuel tank inserts available for this purpose.

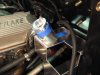
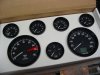
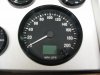
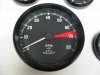
2. Replace the Classic Instruments gauges with original style Smith gauges.

3. Replace the BF Goodrich tires with Avons.

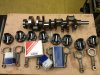
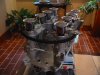
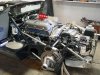
4. Replace the 302 with a larger displacement, perhaps a 347 engine. More power.

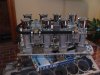
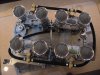
5. Return to Weber carbs, this time original style IDA.

6. Add the aluminum trim on the door jambs.

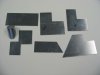
7. Add ribbed interior side sponson covers with the cover plate in place of carpeting.

8. Add ducting from the NACA vents to provide additional fresh air in the interior as per the original and as an alternative to air conditioning on mild days.

9. Add ducting to the brakes as per the original.

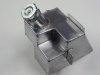
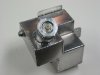
10. Fabricate an original style coolant expansion tank.

11. Add a Wimbeldon white racing stripe.

This should give us something to do for a while.
 

Randy V

Moderator-Admin
Staff member
Admin
Lifetime Supporter
Back in the saddle again!!!! :thumbsup:

I'll be particulary interested in the fuel tank process.. I had considered fuel cells for mine..
 
Dear Chuck,
Great to see that you keep the car and further developing it.

Would think twice about the 48 IDA, if you want the look and not the hassle, i rather would choose the 8 stack EFI stack system. Also on engine. Keith Crafts 408 is a very nice powerfull engine, with low maintenance and what i think good daily driving properties. Would choose it next time over my 331 , which is a trhilling engine, with a lot of power as well, but as you said a firebreathing race mill, which asks for maintainance and compromises in daily driving.

everything else are good things to add ( except the fake ribbed sponson thingis, which is realy good for nothing and for me is a thing everbody does, all the other things do have a functional advantage this one is just a gimmick, never liked it much)


TOM
 

Dwight

RCR GT 40 Gulf Livery 347 Eight Stack injection
I'll second the vote for a Keith Craft 408.
We have two of them in our group, 525 to 530 hp and very streetable. Easy to drive and no issues.
We have a couple of his FE also, 600 to 620 hp. Great street motor in Cobras.

Dwight
 

Chuck

Supporter
Dwight and Tom:

Thanks for the input on the Keith Craft engine. We are already well in to the new engine build with a local builder who has done excellent work for us. This is the third engine we have built with him in as many years.

I will shortly do a post detailing the specs.

I already have the Webers - and they are gorgeous. EFI is certainly a good option, but I am confortable with the Webers.

Ryan is putting the finishing touches on a replacement expansion tank. It will look original and hold nearly a gallon - unlike the Canton which holds only a quart. More power = more heat = need better cooling. Details coming.
 

Chuck

Supporter
The Engine Plans

We put together plans for an engine to be used in a 289 Shelby Cobra and had invested a rather tidy sum in parts when we decided not to build the Cobra. We were deep enough into the engine build that it would have been more problematic to stop then finish. So we opted to make some changes to use it in the GT. We really don’t need any more power (Ryan will disagree) but under the circumstances an engine swap is in the works.

The engine will be built on a new Boss block, stroked to 347 CI (3.250 stroke, 4.125 bore) with Air Flow Research (AFR) 185cc heads. A cam with 112 degree lobe separation will be used to keep the car compatible with Webers. We have not yet decided how aggressive the cam will be. Induction will be Weber 48 IDAs.

The displacement of 347 C.I. followed a bit of research. There are reports of the Boss block having reliability issues when stroked to 3.400 due to the short length of the cylinder sleeves. If stroked to 3.400 with a bore of 4.125 the displacement would be 363 C.I. Many have done that with success, but we prefer to take a more conservative approach and avoid any possible issues.

One could reach a 347 C.I. displacement in two different ways: bore of 4.030 and stroke of 3.400, or bore of 4.125 and stroke of 3.250. We chose the latter since the shorter stroke avoids the potential problems associated with the short skirts.

Mahle pistons and a Scat Crank are planned. Rods will be 5.40

We will likely keep the Guerny Weslake valve covers and use a MSD small distributor and ignition.

The oil pan will be an Aviad, GT40 type. What makes it a GT40 is a depth of 6 ½ inches rather than 7 ½ inches and a cut out for the standard type starter. The six quart rather than seven quart capacity will not have a practical effect on our usage of the car. It uses a 1/2” – 20 drain plug and a ½” NPT oil temperature sending unit fitting.

A short water pump will be used.
 

Attachments

  • June2012EngineParts.JPG
    June2012EngineParts.JPG
    237.9 KB · Views: 480
  • Aviaid2.JPG
    Aviaid2.JPG
    457.8 KB · Views: 545
HI CHuck

in terms of waterpump, check back to the thread of waterpump issues and the pcitures in there. THe Explorer front end with the fitting wp is the shortest one and the one with the nicest flow setup, would opt for that in combination with a underdrive of 80% ( wp slower than crank)

TOM
 

Chuck

Supporter
Weber's Arrive

Christmas in August! The Jim Inglese Weber's arrived today. Gorgeous.

We ordered a Weber set up from Jim for the Cobra 289 we had hoped to build. He built and forwarded the set up promptly back in February. When we cancelled the Cobra project, we sent the set up back so it could be rebuilt with a GT 40 intake manifold. Really great service and beautiful work.

Can't wait to get the new engine fininshed and running! In the meantime, they make a great coffee table decoration.
 

Attachments

  • WeberAug2012A.JPG
    WeberAug2012A.JPG
    413.2 KB · Views: 528
  • WeberAug2012B.JPG
    WeberAug2012B.JPG
    423.6 KB · Views: 506
  • WeberAug2012C.JPG
    WeberAug2012C.JPG
    503.2 KB · Views: 494

Chuck

Supporter
Tear down, August 2012

Ryan and I jacked up the car and removed all the fiberglass panels in less than an hour. So long to build, so quick to take apart.

The fuel tanks are almost installed. A new expansion tank is complete. The engine is ready to be pulled.

The Webers have arrived and the new engine is coming along.

More details to come.
 

Attachments

  • Aug25,2012.JPG
    Aug25,2012.JPG
    366.9 KB · Views: 589
  • August25,2012A.JPG
    August25,2012A.JPG
    402.1 KB · Views: 627

Chuck

Supporter
Expansion Tank: Design and Construction

Ryan undertook design and construction of the new expansion tank. The tank was specifically designed to fit between the suspension and the roll bar of the RCR, yet preserve the appearance of the original. This required a tank with several cut outs and bends. The front of the tank is angled so it sits flush on the angled fire wall.

Ryan made patterns for each section of the tank. Test sections of aluminum were cut and partially assembled so the relationship between the tank and the surrounding structures, particularly the suspension, could be checked. Once satisfied that the dimensions were satisfactory fit, the pieces were cut from 0.10, grade 3003 aluminum. This grade of aluminum was selected because two of the pieces needed to be folded 90 degrees: a difficult task with 6061. In this application we are quite confident that this material will work fine.

Two sections required the use of a metal bender. One of those required two bends. A 30” metal bender for under $100 did the job.

A TIG welder was used. The sections were tacked then welded, doing one seam at a time. Each weld was allowed to cool before moving to the next to minimize distortion. Before the last section was welded the hole for the filler was drilled to permit heat to escape from what would otherwise have been an air tight structure. The welding rod used was 4043, eighth inch.

Two bungs were used: one 1/2” bung (Canton 20-884A) for the return to the water pump and two 3/8” bungs (Canton 20-883A) for the vent line which connects to the top of the radiator, with an extra should another vent line be needed.

The aluminum fill neck is a Canton part, number 80-092. It is mounted on a section of 2 ¼ aluminum tube, 1/8 inch thick 6061. Since the neck is angled, the opening on the tank is oval rather than round. This was cut using a hole saw, cutting two overlapping holes, alternating between the two so that both punched through at the same rate. A bit of filing and the hole closely matched the opening of the angled filler tube.

A bit of Scotch Brite and billet polish finished the job. Installation will need to await the replacement of the engine.
 

Attachments

  • ExpansionTankParts.JPG
    ExpansionTankParts.JPG
    220.6 KB · Views: 420
  • ExpansionTankTestFit.JPG
    ExpansionTankTestFit.JPG
    388.6 KB · Views: 456
  • ExpansionTankComplete.JPG
    ExpansionTankComplete.JPG
    250.6 KB · Views: 435
  • ExpansionTankEComplete.JPG
    ExpansionTankEComplete.JPG
    248.6 KB · Views: 476

Chuck

Supporter
New Speed Hut gauges arrived. Very nice. I suspect the swap will be a big job.
 

Attachments

  • GaugesNewBox2.JPG
    GaugesNewBox2.JPG
    297.8 KB · Views: 361
  • GaugesNewSpeedo.JPG
    GaugesNewSpeedo.JPG
    238.1 KB · Views: 360
  • GaugesNewTach.JPG
    GaugesNewTach.JPG
    245.6 KB · Views: 318

Randy V

Moderator-Admin
Staff member
Admin
Lifetime Supporter
I'll be really curious about the gauge install.. The instructions that came with mine make almost zero sense to me.. The senders don't look like the illustrations, plus they were in a separate package from each gauge - so which sender is which?

I see you got the ones with the GPS speedo. Mine uses the hall effect sensor. I tried to get them to exchange the speedo and they wanted something rediculous like $250 exchanged.

Since my build is stalled, I am basically just waiting until I am once again ready for the dash and interior to go together, then try to make sense of it..
 

Chuck

Supporter
Randy:

Tonight I looked at the gauge parts a bit closer. Each gauges has its sender unit and wiring in a separate labeled package, so there should be no problem determining which sender goes with which gauge. It looks like a fairly straight forward plug - and - play set up.

The Classic gauges each had a single sender wire. Very simple. The Speed Hut gauges have multiple wires (Oil pressure has three, temp gauges have two, fuel level has two plus a 12 volt line). That means the dash gauge harness will have to be essentially rewired.

Also noticed that the pre cut wires will not be long enough to reach from front to rear, which means extensions will need to be spliced.

None of these are really issuers, just a bit more time and planning to get them installed.

When I ordered the gauges it took several phone calls to get the details all sorted out. There are so many options, like font, color of needles, color of background illumination, color of needle illumination, spacing of tic marks, location and shape of the 'red line', etc. I suspect that once a gauge is made they are reluctant to take them back, which may be why they did not want to do an exchange with your speedo.
 

Attachments

  • GaugesParts.JPG
    GaugesParts.JPG
    348.9 KB · Views: 379

Randy V

Moderator-Admin
Staff member
Admin
Lifetime Supporter
Hi Chuck,

All of my senders were in a single plastic bag and there was just two pages of directions. I'll probably need to give them a call and pay close attention to how yours goes together.
I'm planning on working on my GT over Thanksgiving weekend doing body work. If I'm really lucky, I'll get to work on it again at Christmas..
Thanks for the pictures!
 

Chris Kouba

Supporter
When I ordered the gauges it took several phone calls to get the details all sorted out. There are so many options, like font, color of needles, color of background illumination, color of needle illumination, spacing of tic marks, location and shape of the 'red line', etc. I suspect that once a gauge is made they are reluctant to take them back, which may be why they did not want to do an exchange with your speedo.

Chuck,

Your picture brings back some painful memories for me. Make sure your fuel level senders' output ranges match the ranges on your gauges. It turns out there are numerous (0-90, 33-240, others...) ohm ranges for the senders and obviously the gauges need to match. I made the assumption it was open (infinte ohms) to short (0 ohms) and installed mine directly.

I had the privilege of removing my bladders this summer to retrieve the senders and ship the gauges and senders back to Classic to get them matched. Moving those bladders (in or out) is not an appealing task, although you have rigid tanks so it should be easier. Once was enough for me. Twice just sucked.

If they're all from Speed Hut, party on and sorry to take up space on the thread. Mine were VDO and Classic, 0-70 & 33-240 ohms. Massive headache which could have been easily addressed prior to assembly.

Chris
 

Chuck

Supporter
Chris

Speed hut uses a 33 / 240 ohm sender with matched gauges. Senders are inductance rather than mechanical. Don't anticipate any problems.

I do recall installing the Classic units. Set everything up on the dining room table and discovered the gauges read backwards. Changing the wiring on the dining room table was much easier than it would have been in the car.
 

Jim Rosenthal

Supporter
But less fun, right? How many hp do you expect your new engine will make? Glad you went with Jim on Webers, he is THE source. 48IDAs look great, makes me want a set...
 

Chuck

Supporter
Jim:

We should have the engine in the next couple of weeks. Will know the dyno results soon.

Jim Inglese has been good to work with. Will know just how good when we light up the motor.
 
Back
Top