Chuck and Ryan's RCR Build

Chuck

Supporter
Fuel Tank Sponson Access Covers

The openings cut in the chassis for the filler hose and the rear sender / fuel line needed to be covered to keep stray parts and dirt from entering the area around the sponson. They could be cut out of aluminum, but we opted to use fiberglass.

The covers were cut from thick poster board. A layer of fiberglass cloth was glassed on the bottom side and on the top the board was brushed with fiberglass resin. This provided a smooth surface which was painted with Fusion semi gloss black. There is no need to screw these covers down since the fuel lines will hold them in place and since they are fiberglass rattles are not an issue. Grommets were added to the rear cover plates to protect the fuel line and the wires from the sending unit. These covers will keep dirt and stray parts from falling into the fuel tank area.

This project is now complete.
 

Attachments

  • FuelFillerCoverConstruction.JPG
    FuelFillerCoverConstruction.JPG
    371.7 KB · Views: 385
  • FuelFillerCoverA.JPG
    FuelFillerCoverA.JPG
    202.1 KB · Views: 419
  • FuelFillerCover.JPG
    FuelFillerCover.JPG
    380.3 KB · Views: 523

Chuck

Supporter
Fuel Tanks, Tools

We had no real experience with air tools, although a set of basic tools had been sitting on the shelf for a couple of years. Never really had the need. Until we tackled the fuel tank swap.

For 90% of those reading this post, this information may be old hat. But for the remaining 10% it hopefully will be useful.

The fuel tank swap required cutting in tight spaces where a jig saw or electric grinder really don’t fit well. The air tools are much more compact.

A couple of die grinders were picked up at a Harbor Freight store. Both cost less than $20 each. One was right angle, the other straight. Both served their intended purposes just fine. A burr bit made removal of aluminum not necessarily quick or easy, but doable.

We also wanted an air saw to reach inside the tanks to cut away the baffles. We wanted better quality than Harbor Freight’s selection afforded, so looked elsewhere. A Chicago Pneumatics saw got good reviews and retails around $120 from several suppliers, including Summit Racing. It worked really well. We ordered extra blades, both 33 TPI and 24 TPI. We used several.
 

Attachments

  • Tools1.JPG
    Tools1.JPG
    262.8 KB · Views: 380
  • Tools3.JPG
    Tools3.JPG
    207.9 KB · Views: 331
  • Tools2.JPG
    Tools2.JPG
    298.6 KB · Views: 362
Fuel Tanks, Tools

We had no real experience with air tools, although a set of basic tools had been sitting on the shelf for a couple of years. Never really had the need. Until we tackled the fuel tank swap.

For 90% of those reading this post, this information may be old hat. But for the remaining 10% it hopefully will be useful.

The fuel tank swap required cutting in tight spaces where a jig saw or electric grinder really don’t fit well. The air tools are much more compact.

A couple of die grinders were picked up at a Harbor Freight store. Both cost less than $20 each. One was right angle, the other straight. Both served their intended purposes just fine. A burr bit made removal of aluminum not necessarily quick or easy, but doable.

We also wanted an air saw to reach inside the tanks to cut away the baffles. We wanted better quality than Harbor Freight’s selection afforded, so looked elsewhere. A Chicago Pneumatics saw got good reviews and retails around $120 from several suppliers, including Summit Racing. It worked really well. We ordered extra blades, both 33 TPI and 24 TPI. We used several.

Hi Chuck
Good job on the tanks install, ive just started this job myself, its not easy
and work is still getting in the way, be glad to get this job sorted, Andy
 

Chuck

Supporter
Andy:

Keep us posted. I am curious to see if any other techniques are used to secure the fuel tank inside the sponson.

Chuck
 

Chuck

Supporter
"Hope it has enough power" (Ryan)
 

Attachments

  • EngineOct12C.JPG
    EngineOct12C.JPG
    375.9 KB · Views: 484
  • EngineOct12I.JPG
    EngineOct12I.JPG
    461.9 KB · Views: 541
  • IMG_8659.JPG
    IMG_8659.JPG
    314.6 KB · Views: 487

Randy V

Moderator-Admin
Staff member
Admin
Lifetime Supporter
Very nice... I'd like to install throttle linkage like that on my IDA setup...

Mine made 415 hp and 430 tq (10.5:1, 331, Inglese designed cam, dart Pro1 heads) and should be plenty of power for spirited driving and some track time if desired.
 

Chris Kouba

Supporter
And also, do you know what the capacity is if you use the bladders?

~8 gal/side (16 gal total for the arithmetically challenged).

I would recommend the ally tank option unless you specifically need the bladder. Trying to install the bladder is like trying to push a rope through the eye of a needle.

Chris
 

Chuck

Supporter
Brake / Clutch Reservoir

The Wilwood reservoirs have been on our GT for five years. During that time they have seeped fluid intermittently. When we removed the body three months ago the reservoirs were dry – no leaks. A couple of weeks ago, just sitting in the garage on jack stands, one started seeping fluid for no apparent reason. Time for a change.

Tilton makes a reservoir that combines all three in one package. It is available with either push on hose fittings (like the Wilwood) or threaded fittings. We opted for the push on fittings, Summit part number TIL-72-576.

The Tilton is a nearly exact size replacement for the three Wilwoods. (Note the picture of the old and new side by side). The hoses connect directly and it fits in the same location. Two holes were drilled and 3” bolts were used to secure the Tilton reservoir. The screw holes from the Wilwoods were filled with black gasket sealer and disappear from view below the new reservoir.

The chambers are different sizes: front brake in the center is the largest, rear brake on the passenger side smaller, and clutch on the driver side is the smallest. The chambers just happened to line up with the existing hose arrangement.

This is a simple and quick swap which should eliminate the seepage problem.
 

Attachments

  • BrakeFluid1.JPG
    BrakeFluid1.JPG
    345.1 KB · Views: 2,753
  • BrakeFluid2.JPG
    BrakeFluid2.JPG
    387.9 KB · Views: 383
  • BrakeFluid3.JPG
    BrakeFluid3.JPG
    267.6 KB · Views: 460
  • BrakeFluid4.JPG
    BrakeFluid4.JPG
    337.9 KB · Views: 446

Larry L.

Lifetime Supporter
Brake / Clutch Reservoir


This is a simple and quick swap which should eliminate the seepage problem.


I believe you've installed the same setup MHNCO did some months ago. For him, the swap did solve the leak issues.
 
Last edited:

Chuck

Supporter
I believe you've installed the same setup MHNCO did some months ago. For him, the swap did solve the leak issues.

Excellent news. The two part container with the O ring used by Wilwood seems to me to be a poor design destined to fail. The Tilton uses a single container and the fluid level is below the level of the top half. I don't see anyway it will seep fluid.
 
Brake / Clutch Reservoir

The Wilwood reservoirs have been on our GT for five years. During that time they have seeped fluid intermittently. When we removed the body three months ago the reservoirs were dry – no leaks. A couple of weeks ago, just sitting in the garage on jack stands, one started seeping fluid for no apparent reason. Time for a change.

Tilton makes a reservoir that combines all three in one package. It is available with either push on hose fittings (like the Wilwood) or threaded fittings. We opted for the push on fittings, Summit part number TIL-72-576.

The Tilton is a nearly exact size replacement for the three Wilwoods. (Note the picture of the old and new side by side). The hoses connect directly and it fits in the same location. Two holes were drilled and 3” bolts were used to secure the Tilton reservoir. The screw holes from the Wilwoods were filled with black gasket sealer and disappear from view below the new reservoir.

The chambers are different sizes: front brake in the center is the largest, rear brake on the passenger side smaller, and clutch on the driver side is the smallest. The chambers just happened to line up with the existing hose arrangement.

This is a simple and quick swap which should eliminate the seepage problem.

I do like that a lot Chuck!
 

Chuck

Supporter
New Gauges

Fuel tanks done. Engine ready to install. Time to tackle the gauges.

We decided to swap out the Classic gauges that came with the GT five years ago with the Speed Hut gauges. The Classic gauges have been reliable with no issues. Nonetheless the Speed Hut gauges offered some features that we found interesting: 270 degree rotation; GPS speedometer; variable lighting control; and most significantly, an appearance that looks vintage. One can custom order the gauges with most any format that does not violate copyright issues (like “Smith” logo). The idea of a GPS speedo is appealing because it eliminates the need for a sensor hookup and it is absolutely accurate. (I find myself using the GPS speedo on the IPhone to check the speedometers in various cars to check accuracy. It is amazing how inaccurate production speedometers can be).
 

Attachments

  • GaugesNewBox2.JPG
    GaugesNewBox2.JPG
    297.8 KB · Views: 380
  • GaugesNewTach.JPG
    GaugesNewTach.JPG
    245.6 KB · Views: 313
  • GaugesParts.JPG
    GaugesParts.JPG
    348.9 KB · Views: 281
attachment.php

in my experience the issue with seeping wilwood reservoirs is only the supplied "wire clamp" , replace it with a decent width (1/2") stainless steel "band clamp" like this one
$(KGrHqN,!iUE9k8tVW79BPs7Zj87Ig~~60_35.JPG


Locate at exact height directly above to put pressure on inner seal O ring , and the problem should be solved

The Tilton one looks to modern for my taste

Thanks
TOM
 

Chuck

Supporter
Thanks Tom. Good tip.

I probably would have done the swap regardless. I like the designa and look of the Tilton. Purely subjective.
 

Chuck

Supporter
Gauges, dash preparation

The original plan was to remove the Classic and install the Speed Hut gauges without removing the dash board. Indeed we were able to remove all the Classic gauges by reaching behind and through the switch panel openings. But a brief inspection of the new gauges made it apparent that the dash would have to be removed. The fitting and wiring cannot be done by simply reaching behind the dash.

The tach and speedometer are a larger diameter than the Classic gauges. The openings had to be enlarged a quarter inch. Some careful grinding of the adjacent surfaces around the opening was needed to achieve a good fit.

The Speed Hut gauges are held in place with a threaded ring while the Classic gauges were held in place with a bracket. This is not an issue for the tach and speedometer, but is an issue for the four gauges angled toward the driver. This requires that the front and rear mating surfaces be parallel. Strips of cardstock 3/8 inch wide and 6 ½ inches long were cut and epoxied into each opening. Body filler was placed on the back side to build up the surface around the opening to provide a good surface for the threaded ring to abut against. This resulted in a good, solid support for the gauges.

While the dash was out it was sanded, imperfections addressed, and repainted with Fusion Flat Black paint. This paint is designed to adhere to plastics, as well as other materials and produces a very nice, durable, finish. It has become our general purpose paint of choice.
 

Attachments

  • GaugesRings3.JPG
    GaugesRings3.JPG
    288.8 KB · Views: 345
  • GaugesRings2.JPG
    GaugesRings2.JPG
    266.2 KB · Views: 322
  • GaugesRings4.JPG
    GaugesRings4.JPG
    318.6 KB · Views: 360

Chuck

Supporter
Gauges, Installation and Wiring

This post probably won’t make much sense unless you have a set of Speed Hut gauges sitting in front of you waiting to be installed. Sorry.

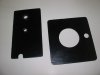
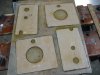
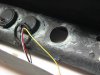
Fuel Gauges. The fuel senders use inductance rather than floats. This eliminates mechanical problems and simplifies installation. The senders use the same size cover plate as the Classic gauges, so retrofitting the senders would not be an issue. The supplied sender wire is shielded with two conductors, one of which is a ground. (The shield is not grounded). We cut off the supplied wire from the plug that connects to the gauge, leaving about four inches to work with, grounded the black wire at the dash, and connected the white wire to the existing sender wire. At the tank, the existing sending wire and ground were connected to the new sending unit. Note that the inductive sender requires a 12 volt power source. Rather than run another wire from the dashboard, the MSD ignition wire (switched with the ignition) was tapped, which greatly simplified the wiring.

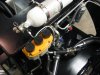
Temperature and Pressure Gauges. The Speed Hut gauges come with the electrical senders for water temperature, oil temperature, and oil pressure. The temperature gauges use two conductors (sender and ground) with a non-grounded shield. Since we had previously wired the car with a single sending unit wire, we simply cut the supplied wire about four inched from the plug that connects to the gauge, grounded the black wire at the dash, and connected the white wire to the existing sender wire. The supplied wire would not be long enough to reach from the dash to the engine regardless. We will use the supplied wire with the shield in the engine compartment and then add the splice where it won’t be seen.

The oil pressure gauge uses three connectors, one of which provides a low voltage source to the sender. The original single sender wire used with the Classic gauge was not used. A splice will be needed to reach the engine compartment.

A call to Speed Hut confirmed that shielding is not required for the temperature and oil pressure sender wires, so splicing in an extension is not an issue. Nonetheless the shielded plug ends will be used in the engine compartment.

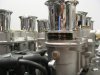
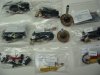
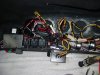
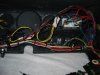
Wiring. The Classic gauges used screw terminals for most connections. When the dash was originally wired, all the gauge wires were carefully laid out and wire tied neatly directly behind the gauges. The Speed Hut gauges use plugs to which all the wires are connected with pre cut harnesses. The old wire harness was no longer necessary and most of the old wiring was simply removed and replaced, connecting the existing sensor wiring to the new Speed Hut wires.

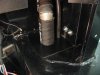
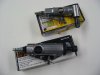
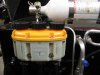
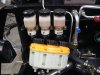
The Speed Hut gauges use a small ‘inverter’ which powers the lights and includes a rheostat to control the brightness of the lights. This was held in place with double sided tape on top of the fuse box. The rheostat was located under the dash just to the right of the steering column where is it out of the way be easily reached.

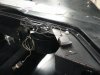
The Speedometer has a small GPS antenna. Since it will easily pick up a signal through fiberglass it was placed under the dash near the gauge in a location where it could be reached from behind the dashboard. A small section of metal was screwed to the aluminum just behind the speedometer since the antenna has a magnetic attachment.

One can wire the GPS so that it will maintain its last position decreasing the time needed to obtain a fix when powered up. We took advantage of this feature, but included a small SPST switch so that it could be disabled. For typical summer use, it will likely be left on, but when driven less frequently over the winter months it will be switched off to avoid battery drain.
 

Attachments

  • DashWire2.JPG
    DashWire2.JPG
    435.3 KB · Views: 325
  • DashWire5.JPG
    DashWire5.JPG
    381.6 KB · Views: 362
  • DashWire6.JPG
    DashWire6.JPG
    347.5 KB · Views: 330

Randy V

Moderator-Admin
Staff member
Admin
Lifetime Supporter
Chuck and Ryan, in that I will be installing the very same guages in my car, your efforts and documentation are VERY much appreciated...

Thank you!
 

Chuck

Supporter
Randy

The one frustration with the Speed Hut gauges is the pre-cut connections between the gauges. With simple screw terminals as used on the Classic gauges one can layout a very neat harness. With the multiple plugs and pre determined length of the inter gauge connections it is more difficult to keep it all neatly organized. Of course the plug connections makes a wiring error much less likely and seems to be the trend these days. Each gauge has three separate plugs: sender, power, and lights. The wiring may not look as "pretty" but it does go together easily.
 
Back
Top