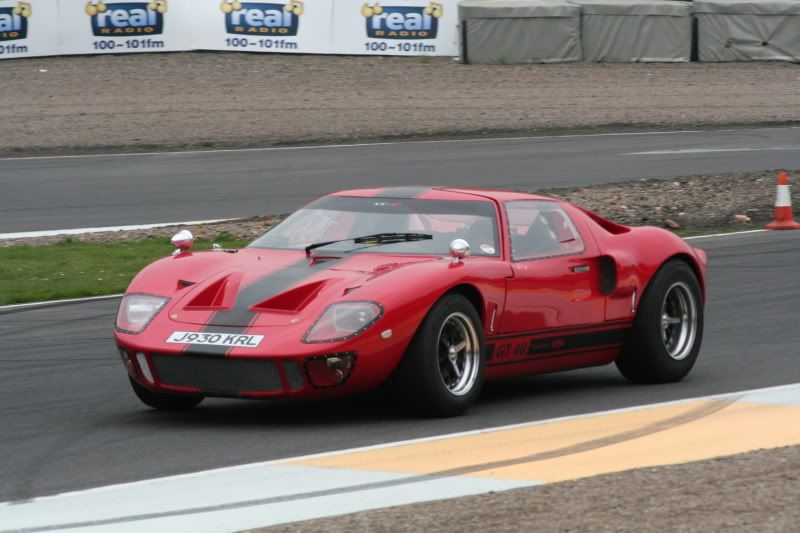
DAX40 Return to the Road

Dave,
I agree with Ian. The shoulder mountings should be just below the rear window, so the straps become near to horizontal as your weight pulls against them.
One point to watch out for is the mounting(s) for the crutch strap(s). Don't use one bolt in the centre of the seat, otherwise you will end up sitting on the head of it - excrutiating at every bump! Instead get a 2-point crutch strap which you can mount either side of the rear of the seat.
Cheers,
Tony
 

Dave Bilyk

Dave Bilyk
Supporter
Thanks for the input guys,

Ian, agree the mounts do look a little low at present, my plan is to create a wooden mock up to finalise the dimensions first and make sure that the angle is right, then to cut the metal. Also, since I don't have that much faith in my own welding, I will get some qualified help.

Steve, never better thanks, I tried to email your video btw but it was too big, please pm me so I can post a disc.

Jim, thanks for the link, I'll have a look at home.

Tony, I wondered why you walked that way:laugh: no, it's a two point mount and each strap will go through the seat to separate mounting points at the rear.

Now I have the trim out, I can transfer the existing mounts to drawing so all will become clear.

regards
Dave
 
Dave
I go along with Ian and Tony, but I do fall into the camp of enthusiast amateur. I converted my Dax for 4 point harnesses, and have put a bar across the chassis, just below the rear window. I attach a photo which hopefully gives you an idea. You may just be able to make out the bar below the window, and the additional strengthening attached to the chassis. The car is currently being sprayed, otherwise I would take a few more photos of this section and post them.

I also want to fit a 6 point harness, just for the driver. Tony, your comments are most welcome.

Regards

Stephen
 

Attachments

  • Feb08-S6001090.jpg
    Feb08-S6001090.jpg
    63.8 KB · Views: 530
Dave

Have now got my car back from the sprayers. I have posted some photos regarding top harness point fixings. May be of interest to you.
 

Attachments

  • HarnessS6001117.jpg
    HarnessS6001117.jpg
    31.7 KB · Views: 507
  • HarnessS6001118.jpg
    HarnessS6001118.jpg
    64.8 KB · Views: 494
  • HarnessS6001119.jpg
    HarnessS6001119.jpg
    58 KB · Views: 499

Dave Bilyk

Dave Bilyk
Supporter
Stephen,
thanks for the pics, I see your mounting points are on the cross bar below the window. On mine, the crossbar is a smaller section, I have to replace it anyway.
My shoulders come to about 2" below the crossbar, well above the back of the seat, so to give the 20deg downward angle, the mountings need to be about 3.5" lower than the crossbar as shown in the picture.

Guys, yesterday I mocked up with a piece of wood to trial fit the belt. What I found was that the belts are designed to cross (through the retainer) behind the neck. However, with the bulkhead being so close behind the seat, this doesn't work, the retainer pushes against the back of my neck and wont go any further back.
I see no reason why I cant remove this retainer so that the belts can come directly over my shoulders. Does anyone see a reason why not?

regards
Dave
 

Attachments

  • GT40 001w.jpg
    GT40 001w.jpg
    100.7 KB · Views: 457
Dave, if you mount these straight ahead from each bracket,on a severe impact your body will contort and squeeze through the space between the belts( there's enough gap so your shoulders will slip between the belts) letting the torso go forward.You would need a cross strap to hold them from spreading.And just crossing them by using the opposite mounting tab is not good either.I'd check the build logs of some of the ones used for racing to see what they did.
 

Ian Anderson

Lifetime Supporter
Dave

I have 4 point belts on my Dax and they are fixed to a single mounting bolt on that cross member.

I was considering moving to 2 mounting bolts about 6 inches apart but on reading Al's post above would think that the single mount would be preferable in a shunt - though not more comfortable as they do chaffe on my neck (if in a t shirt - normal/ utton shirt is fine).

I have also read of people mounting the straps up to 8 inches apart on mounting points

Ian
 
If anyone is thinking of competing under MSA regulations, they have this year changed the requirements for the fixing of the shoulder straps on full harness seat belts. They now require each shoulder strap to be fixed by itself not with the other one.

Ian
 

Dave Bilyk

Dave Bilyk
Supporter
A.J thanks for that, I will see if I can work this through, maybe if I can move the support beam back an inch, I will check.

Tony, :laugh:

Ian, hope your crossmember is a larger one like Stephens, mine is too small to take two fixings let alone one concentrated load. Presumably the MSA rule has been changed (bmwian) as two load points gives lower stresses than one.

The main reason I am going to all this trouble is that the crossbeam is too small, but it is also too high, with the belt sloping down to the shoulder, there is no upward restraint, so in the (albeit unlikely) event of a bumpy ride or inversion god forbid, one can ride up the seat. The recommendation is for the belt to be somewhere between horizontal and a 20deg upward slope to the shoulder so that there is some restraint.

regards
Dave
 
Just something that I noticed from your photo, Dave. You want to move the bar back an inch or too, but if you think about how it's mocked up and how it will be when finished it's different.

I assume that when you weld the crossbeam in it will be flush with the other bars? In the mock up you just clamped a one inch squared bar to the outside of the bulkhead. If you want to try move the mount back an inch you needn't worry because the finished product would be an inch back any way. Did that come out right at all? Was that comprehensible?
 

Dave Bilyk

Dave Bilyk
Supporter
Hi Molleur,
interesting lateral thinking approach. I will bear that in mind as a possibility.

Paul, yes I understand your point, and I preferred the mounting point in front as it will then also support the bulkhead, and have less intrusion into the engine compartment. As it is mocked up it is already 1/2" further back I have drawn up some alternative solutions, I will definitely be able to move it back flush with the other bars, any further back and I will have issues with engine dress etc. Working on it.


regards
Dave
 

Dave Bilyk

Dave Bilyk
Supporter
Well, the more I looked at this, the more difficult it got, for instance it seems impossible to arrange things so that pulleys and water pipes dont foul, which means I am now considering plan D.
This means having a very slight upward angle on the shoulder belts, so I am backtracking on my principles a little here, but I will mock up again before making a decision. Here it is in solidworks, with bracing tubes coming from the back.

regards
Dave
 

Attachments

  • assembly with seats.jpg
    assembly with seats.jpg
    31.2 KB · Views: 527
Is this your Dax? A work colleague took his Subaru up to Knockhill for a track day and knowing my interest snapped a couple of pics. PM me your email and I'll send the full size ones over if you like!

IMG_8112.jpg


Cheers

Craig
 

Dave Bilyk

Dave Bilyk
Supporter
Hi Craig, yes thats my Dax, I think at the Scottish Motorfair in 2008, had a good time although I missed a session. Would love the pics, PM on its way.

regards
Dave
 

Dave Bilyk

Dave Bilyk
Supporter
Seat belt mountings for 6 point are now welded in, views from front and back. I will paint today, then proceed to replace the bulkhead and make additional holes for the eyebolts / straps.
 

Attachments

  • 007w.jpg
    007w.jpg
    106.6 KB · Views: 524
  • 008w.jpg
    008w.jpg
    107.6 KB · Views: 486

Ian Anderson

Lifetime Supporter
Dave

Looking great - very thick cross beam there and nice additional triangulation from the roll hoop

One question though why the holes through the square tube as opposed to welding on an inch and half threaded "bobbin" on the outside. Reason I ask is that from memory SVA would not allow that type of fix - I don't know the reasoning - presumably some engineering tensile test or something

Are you still considering coming down for the RWYB day at Santa Pod? Hell of a long run for a "less than" 15 second run

Ian
 

Dave Bilyk

Dave Bilyk
Supporter
Hi Ian,
if the beam is thin, and the bobbin is much smaller than the beam width, it will tend to pull through under high loading. Provided the beam has some meat, in this case 3mm thick, and the bobbin is nearly as big, and welded both ends it should be ok. With a bobbin on the outside, there is a larger shear area due to more weld deposit over a wider area, so it can be stronger in the final analysis. I guess that will be the reasoning. The existing bobbins on the car were done that way, so maybe I missed a trick there.

I used to spectate at Santa Pod when I was at college, loved it, so going back and actually running there will be a blast. Continue to count me in, I'll let you know if I have second thoughts.

regards
Dave
 

Dave Bilyk

Dave Bilyk
Supporter
Update,
While working I found that the water pump belt had been rubbing on the top of one of the main cooling water hose elbow and started to wear through the reinforcement, so lucky I found it. There is only about 5mm clearance, so engine movement and belt vibration must be enough to cause a touch. This would have been a disaster on the road as it a major job to replace the hoses because things are so tight down there, with both cooling water pipes, the handbrake quadrant and engine jammed together where main chassis members join.
Ian and other Dax owners, better check yours, you should be able to check with removeable bulkhead bump out.

regards
Dave
 
Back
Top