
- Forums
- GT40 Replica Manufacturers' Corner
- RCR Forum - RCR40/SLC/917/Superlite Aero
- The SLC Clubhouse
You are using an out of date browser. It may not display this or other websites correctly.
You should upgrade or use an alternative browser.
You should upgrade or use an alternative browser.
Dean's SLC build thread
- Thread starter Dlampe
- Start date
I hate the German's and their attention to detail!:furious:
You are not the only one. Ask Fran :thumbsup:
Looks much better now, goal achieved !
TOM
Great looking car Dean and very detailed build thread you have going. I really like these RCR cars and actually been thinking about selling the Cobra and doing another GT40 and their car looks like the one to consider. I heard you are planning on doing the Tulsa track weekend event in early June, but I don't see the drive train coming together. Where's the engine at???
Deans engine is sitting on a pallet ready to ship to him with all necessary mods made for midengine installation.....which are very few in reality
Howard Jones
Supporter
Dean, how about one more slot in the seat bottom for the crotch strap. If you go all the way to the front of the seat it will allow you to slide forward too much before the crotch strap arrests the forward motion of your hips as they slide forward under the waste belt. This will cause internal injurys.
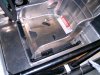
Here's a picture of my seat.
Here's a picture of my seat.
Attachments
Last edited:
Final seat pictures on the way. They turned out great but I'm not quite ready to share the finished product yet.:lipsrsealed: I think they will meet the highest track day standards.
I had to return one set of belts. I ordered the passenger harnesses just like the drivers harness but I realized that it didn't need to accomidate a Hans device. RJS is sending me a standeard belt. They have been very easy to work with.
I had to return one set of belts. I ordered the passenger harnesses just like the drivers harness but I realized that it didn't need to accomidate a Hans device. RJS is sending me a standeard belt. They have been very easy to work with.
Will be fun watching you in this one........can't wait to see it! Great to see a USA manufacturer (RCR) there for support in these builds!
I am happy to say that I am done with the seats. Who would have thought we would spend 2 pages on something as simple as seat installation. I guess there is a right way and a wrong way to do things. When it comes to a track car, there is only one way to do some things and that is the safest way for the drive.
I had to alter the mounts to accommodate the seat belts and the room they needed to pass thought the sides of the seat. The seat has the two front mounts, one floor mount and two rear mount locations created with steel nut rivets.

I used a grip edging to create a smooth surface for the seat belt to pass over.

The sub hole was cut and the belts were test fitted. It is much tighter and I think it will work perfectly with the Hans device.

Cooling pipes this weekend!
I had to alter the mounts to accommodate the seat belts and the room they needed to pass thought the sides of the seat. The seat has the two front mounts, one floor mount and two rear mount locations created with steel nut rivets.
I used a grip edging to create a smooth surface for the seat belt to pass over.
The sub hole was cut and the belts were test fitted. It is much tighter and I think it will work perfectly with the Hans device.
Cooling pipes this weekend!
My fuel sending unit came in from Centroid. It is a very nice piece. When I ordered it I had to tell them the ohm range I needed and I spoke to the engineer to determine what the ideal sending unit would be. The first thing I had to do was determine the range of the Digidash sending unit. This is done with your electrical tester set to ohms in the 2000 range. I clipped the positive lead to the sending unit stud and the other end to the sending unit plate.
This is the reading when I replicated a full tank.

This is the reading with the tank empty.

That gave me the numbers full and empty. Autometer has a similar range of 40 to 260. I just went with that as a standard.
I had the unit built with an alarm sender when the tank hits 18%. I also had them dampen the signal from the unit to account for fuel slosh. That way the gauge won't bounce around.

The five hole pattern from Centroid matches the RCR pattern but you must establish the correct orientation as the holes are spaced unevenly as a standard for fuel tanks.

Here is the finished install. Very easy and much better that the "float" type sender. Those of you with the Koso units get this standard but the Digidash doesn't come with it as part of the kit. I think that was mentioned in an earlier thread.

This is the reading when I replicated a full tank.
This is the reading with the tank empty.
That gave me the numbers full and empty. Autometer has a similar range of 40 to 260. I just went with that as a standard.
I had the unit built with an alarm sender when the tank hits 18%. I also had them dampen the signal from the unit to account for fuel slosh. That way the gauge won't bounce around.
The five hole pattern from Centroid matches the RCR pattern but you must establish the correct orientation as the holes are spaced unevenly as a standard for fuel tanks.
Here is the finished install. Very easy and much better that the "float" type sender. Those of you with the Koso units get this standard but the Digidash doesn't come with it as part of the kit. I think that was mentioned in an earlier thread.
I started the cooling lines yesterday. I ordered a box of 1.5in mandrel bends and a stick of 1.5 tubing from the steel shop. I cut the bends into 45's and started in the front. I have a "Lowbuck" tubing bender that I used on the VW roll cage and it was good enough to get me from the radiator to the first 45 deg. bend behind the front tires. That saves me 8 butt joint welds right there!:thumbsup:
I cut, welded, ground down, saw imperfections, welded again so many times but I think I have it. I'll pressure test it later. It seems like the welder set on "a" with about a 2 line speed worked well. It is just a Lincoln 100 weldpak, nothing special.


Thanks to a couple of the SLC guys, I was able to put a few bends into the engine compartment. I couldn't go to far because I don't have the engine but I went far enough that all the connections would be easy to get to. Here is a shot of the pipes painted in high heat Rustoleum.

I cut, welded, ground down, saw imperfections, welded again so many times but I think I have it. I'll pressure test it later. It seems like the welder set on "a" with about a 2 line speed worked well. It is just a Lincoln 100 weldpak, nothing special.
Thanks to a couple of the SLC guys, I was able to put a few bends into the engine compartment. I couldn't go to far because I don't have the engine but I went far enough that all the connections would be easy to get to. Here is a shot of the pipes painted in high heat Rustoleum.
Dave Lindemann
Lifetime Supporter
Dean -
Very nice work on the cooling pipes. I especially appreciate the info on the Centroid unit. I need to make the time to give them a call. Keep up the great work!
Dave L
Very nice work on the cooling pipes. I especially appreciate the info on the Centroid unit. I need to make the time to give them a call. Keep up the great work!
Dave L
Hello Dean, not sure if you are using carbon pipe but if you are here's something you might like to read.
Galvanic corrosion - Wikipedia, the free encyclopedia
Cheers,
Galvanic corrosion - Wikipedia, the free encyclopedia
Cheers,
I read it but I can't say that I understand 100%. My aluminum pipes are not in contact with the steel and I will run the corrosion additives. Because it's a race car, it will be flushed regularly as part of a regular maintenance program. Can you elaborate or better yet, give me some advice if you see a problem heading my way. I am using uncoated carbon steel.
I don't want the thread to get off track so if we need to start a thread just for this topic, thats cool too. Go ahead and post here if you can clear it up for me.
Thanks,
Dean
I don't want the thread to get off track so if we need to start a thread just for this topic, thats cool too. Go ahead and post here if you can clear it up for me.
Thanks,
Dean
Hello Dean, I am just repeating something I have been told. You should confirm this with a professional to be sure as they would know better then I, but I was told using uncoated carbon steel for coolent lines in a closed circuit system could cause problems. Most systems are non ferrous, Being that you are flushing regularly you could be fine. Again you should ask a professional.
Cheers,
Cheers,
Last edited:
I mounted the fans today for a quick little project. Nothing to complicated. I used the hardware provided and used 2, 1/4in nut and bolt assemblies to hold the 2 fans together.


I worked on some other stuff too. More to come.
I worked on some other stuff too. More to come.
Nice work Dean. Moving along.
Go ahead and post here if you can clear it up for me.
Dean
Short answer: if you are flushing your coolant often (once a year is more than enough), galvanic corrosion will not be a problem.
Longer answer: basically, two different metals separated by an electrolyte create a battery. Aluminum and steel (or just about any two dissimilar metals) with coolant between them create a battery as the coolant ages and becomes acidic. This has always been an issue with cars and still is. You can see this effect by using a voltmeter with one probe touching the metal radiator neck and the other probe suspended in the coolant (not touching metal). If you read about a half volt or more, time to change the coolant. With all the electronics in today's cars, I believe the OEs want to see this reading lower than around 0.3v, but don't quote me on that. Changing the coolant removes the electrolyte (acid) from the equation.
Eric
Thanks Eric, that's real good information. I have a lot of time in these pipes and I would hate to hang them in the garage with the rest of the past DIY projects that don't work as intended that are not called "art"!
I've read that they typically are worthless - if you have that serious a problem, by the time you realize it the anode's eaten away and you're back at square 1 anyways (unless you're checking the coolant every week basically)?
Similar threads
- Replies
- 5
- Views
- 750