Del's Build: SLC IR/8

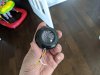
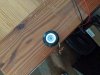
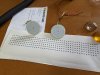
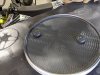
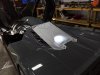
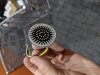
Boards finally arrived so was able to get the depth needed and finish up the drawing to send to ShapeWays. I really need to consider getting a 3D resin printer in the future.

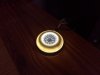
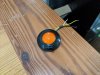
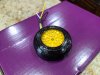
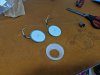
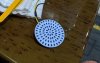
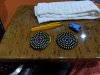
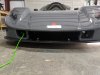
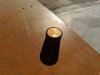
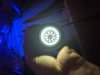
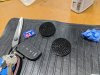
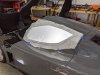
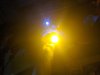
Some of the white LEDs will be covered by the shroud, I thought about adding a provision in it so they wouldn't be. Decided to leave as is to see how it looks, may end up sanding that part down if it looks funky as the running light.
 

Attachments

  • Capture1.JPG
    Capture1.JPG
    26.1 KB · Views: 294
  • Capture2.JPG
    Capture2.JPG
    77.9 KB · Views: 277
  • Capture3.JPG
    Capture3.JPG
    42.2 KB · Views: 223
  • Capture4.JPG
    Capture4.JPG
    50 KB · Views: 228
Just catching up on a few things in your thread -
2800 pounds, that gives me a data point for comparison, my blower and much wider rear tires are at least half of the difference between our cars.

Those side by side pics are great. Your little girl is going to be the most popular in her High School with a Dad like you. All the boys will be envious of her ride whatever it grows up to be.
I like the twin turbos behind the rear panel! What boost is it running :)
 
Thanks Mesa! Just hope I don't have to beat up any of her future boyfriends, lol. I am already curious what she'll end up driving, all I know is I won't be giving the keys to the SLC her homecoming or prom date!

Had no clue the following these ride-on cars have, it's unreal what people do to them. I have a feeling down the road in a couple of years, it'll to get upgraded so it'll feel like those turbos are spinning.
 
3D resin printed shrouds should show up Friday so I can verify fitment, prep and spray Grigio Telesto.

Over the weekend, I printed it out on mine in PLA since I was curious how it'd look lit up. Silver PLA is translucent so ended up spraying it black. I wasn't thinking and made the mistake and painted inside shroud black as well, on the real ones I'll spray chrome or something shiny to reflect the parking light better instead of absorbing alot of the light.

I didn't like how the white boards and LEDs could be seen so tinted the lens which looked better. Also tried translucent and transparent orange vinyl I had laying around, but made it look cheesy. Probably will end up masking the LEDs and spraying the board black, maybe adding tint to the lens, will see how it turns out.

Also setup an appointment for December 7th to make a day trip with the family to Houston to get my windows tinted 35% and shopping for the wife. I'm considering getting the rear window done in 50% (or lighter if they have it) with the idea it'll make it blend in with the paint. I also ordered a roll of paper so I can trace the window and the fiberglass frit (not sure if I used this correctly). I'll scan it in, trace in CAD and get a vinyl frit cut out that I'll use behind the tint so I can use silicone around the perimeter of the 3 windows to seal them from water when I wash the car.
 

Attachments

  • IMG_20191115_192442.jpg
    IMG_20191115_192442.jpg
    148.4 KB · Views: 213
  • IMG_20191115_192450.jpg
    IMG_20191115_192450.jpg
    135.2 KB · Views: 204
  • IMG_20191115_192504.jpg
    IMG_20191115_192504.jpg
    142.8 KB · Views: 205
  • IMG_20191115_192609.jpg
    IMG_20191115_192609.jpg
    91.1 KB · Views: 212
  • IMG_20191115_192630.jpg
    IMG_20191115_192630.jpg
    112.7 KB · Views: 203
  • IMG_20191116_141648.jpg
    IMG_20191116_141648.jpg
    137.7 KB · Views: 217
  • IMG_20191116_141649.jpg
    IMG_20191116_141649.jpg
    201.9 KB · Views: 220
  • IMG_20191116_145711.jpg
    IMG_20191116_145711.jpg
    183.2 KB · Views: 217
  • IMG_20191116_145712.jpg
    IMG_20191116_145712.jpg
    147.1 KB · Views: 220
  • IMG_20191116_150711.jpg
    IMG_20191116_150711.jpg
    183.8 KB · Views: 231
Hey Del

How do you plan to secure your windows, urethane or mechanical or both?

What tint product have you found that will stick to poly?
 
Hey Del

How do you plan to secure your windows, urethane or mechanical or both?

What tint product have you found that will stick to poly?

They'll remain mechanically secured with the typical bolts, as far as sealing just regular silicone but open to other ideas.

As for the tint, they will install PPF first and the tint them afterwards. From what I was told, with the PPF as the barrier, there is no conflict between the tint and Lexan. Both are XPEL brand. They were open to the idea of me shipping my windows to them and just including a return label to ship back. Assuming all is good after my install, this could be an option to other owners that would like tint if they don't have a local place willing to tackle it.
 

Joel K

Supporter
They'll remain mechanically secured with the typical bolts, as far as sealing just regular silicone but open to other ideas.

As for the tint, they will install PPF first and the tint them afterwards. From what I was told, with the PPF as the barrier, there is no conflict between the tint and Lexan. Both are XPEL brand. They were open to the idea of me shipping my windows to them and just including a return label to ship back. Assuming all is good after my install, this could be an option to other owners that would like tint if they don't have a local place willing to tackle it.

Very interested to see how this works. Thanks for keeping us posted.
 
The license plate cover is something I really liked how it looked, but never really happy with the constant glare it produces when trying to take a picture. In Louisiana, we don't get the option of cool plates like Texas has so I'm stuck with a bright white plate against the gray so it stands out. I attempted to tint it myself with Vivvid air-release light smoke vinyl, but failed miserably.....way more complex to wrap than I expected. Hit up a local guy to see if he was willing to tint it, experience pays off for sure.
 

Attachments

  • IMG_20191119_134743.jpg
    IMG_20191119_134743.jpg
    485 KB · Views: 251
Very interested to see how this works. Thanks for keeping us posted.

Same here, I'm hopeful all will work out. I sent them pictures of the profile of the window as well as dimensions and they are confident they can get it done. They had just finished a Porsche GT3 (I think) that had Lexan windows when I first contacted them, although I'm sure they are nearly as contoured. My fingers are crossed!
 
Random idea to tint the license plate since we don't get cool options like Texas, not to mention the personalized plates have no background like the regular plates so they're just ridiculously bright white (especially against the gray paint). Never was crazy about the light smoke plate cover, always a glare when snapping pictures. I also had to trim the bottom since there is only room for a bare plate. I attempted to tint it myself with Vivvid air-release vinyl, but it is deceiving and way more difficult than I expected so I had it wrapped for $35. Of course it still retains it's reflective appearance at night.

When I went to go put on the plate last night, had a random idea to snap some pictures. Turned all the lights off, put a flood light on my work bench or in front of the car and got these pretty decent pics. They do have a filter on them from my phone, but I really want to toss originals into Photoshop and see how they turn out. This really makes me want to learn how to properly shoot and edit vehicle pics.

With all this darkening of things on the car from headlights, tails, signals and now plate, I think it may be time to dip wheels a shade darker or suck it up and get them powdercoated.
 

Attachments

  • IMG_20191120_192135_721.jpg
    IMG_20191120_192135_721.jpg
    156.6 KB · Views: 227
  • IMG_20191120_194313_291.jpg
    IMG_20191120_194313_291.jpg
    200.4 KB · Views: 223
  • IMG_20191119_134743.jpg
    IMG_20191119_134743.jpg
    220.6 KB · Views: 236
  • IMG_20191120_184845.jpg
    IMG_20191120_184845.jpg
    190.4 KB · Views: 234
Got my resin printed signal shrouds in the mail and mocked them up to make sure everything fit as intended. Had some rattle can chrome so I sprayed the insides, then outside in Grigio Telesto and cleared. Also wasted an hour masking and unmasking all 76 LEDs (per board) so I could spray the background black. Hope to assemble them soon, curious to see how they look together and on the car.
 

Attachments

  • IMG_20191124_125851.jpg
    IMG_20191124_125851.jpg
    172.6 KB · Views: 231
  • IMG_20191124_125852.jpg
    IMG_20191124_125852.jpg
    174.8 KB · Views: 207
  • IMG_20191124_125853.jpg
    IMG_20191124_125853.jpg
    175 KB · Views: 207
  • IMG_20191124_125854.jpg
    IMG_20191124_125854.jpg
    159.6 KB · Views: 194
  • IMG_20191124_125855.jpg
    IMG_20191124_125855.jpg
    285.2 KB · Views: 198
  • IMG_20191124_125856.jpg
    IMG_20191124_125856.jpg
    190 KB · Views: 199
  • IMG_20191124_125857.jpg
    IMG_20191124_125857.jpg
    264.8 KB · Views: 224
  • IMG_20191124_125858.jpg
    IMG_20191124_125858.jpg
    193.3 KB · Views: 228
Traced my windows. I'll scan them in this week and trace in CAD so I can get a vinyl frit cutout and apply after they get tinted. Planning to get side windows in 35% and I think I may go ahead and let them do the rear window in 50%. Only reason for tinting the rear window is so the window matches the body color and blends in a bit.

Tinted the covers for the InfinityBox cells. While I haven't driven in complete darkness, figured the passenger side cell may get annoying to see it flashing out of the corner of my eye.

Been wanting to hide the AC line in front of the radiator so covered it with some split braided loom. I didn't notice the other line in the corner, will have to do it another day.

When my buddy sent me the orange anodized VIN tags, he made a few extra things for me (like hood emblem). I wasn't sure what to do with the little emblems, but was curious how they fit on the HVAC knobs so had to see. I won't use them, don't need anymore logos in the car but are cool looking nonetheless. The picture with 2 emblems, top is in generic light smoke, bottom is Vivvid air release light smoke. I like how the Vivvid makes the lasered part more gray so will retint nose emblem at some point.
 

Attachments

  • IMG_20191124_153629.jpg
    IMG_20191124_153629.jpg
    203 KB · Views: 217
  • IMG_20191124_161110.jpg
    IMG_20191124_161110.jpg
    155 KB · Views: 228
  • IMG_20191125_144445.jpg
    IMG_20191125_144445.jpg
    231.1 KB · Views: 207
  • IMG_20191125_150042.jpg
    IMG_20191125_150042.jpg
    233.7 KB · Views: 208
  • IMG_20191125_150044.jpg
    IMG_20191125_150044.jpg
    196.9 KB · Views: 211
  • IMG_20191125_170105.jpg
    IMG_20191125_170105.jpg
    172.7 KB · Views: 205
  • IMG_20191125_170106.jpg
    IMG_20191125_170106.jpg
    161.4 KB · Views: 211
  • IMG_20191125_170107.jpg
    IMG_20191125_170107.jpg
    228.3 KB · Views: 239
Had to print a spacer out to put between the LED board and lens so it could distribute the parking light ring. Ignore the dirt and finger prints on the lens, just a test fit.

Seems I'm trying to see how many components I have to make a stupid turn signal, lol. In my defense while my wife is finishing up her semester I don't get much shop time since I have the kid, so with something like this I can do little here and there.... Just it gives me way too much time to think. Class ends Friday so next week I'll be able to get back on the SLC and install these, new android headunit and few other things I have been wanting to do.

I didn't original like any Forgestar design so went with the F14 thinking I'd eventually change them out, but after getting the car back and dipping them silver I've grown quite fond of them compared to other options out there. They're a SOB to clean, even harder since they're dipped. While thinking about a darker color to re-dip them, got a quote to get them powdercoated so seriously thinking about doing it being done. I'm not 100% confident this style wheel will look good with the color I have in mind, but I know I don't want silver or black . Having a gray car makes it hard to pick a color between silver and black because it may look like I attempted (and failed) to match them to the body color.
 

Attachments

  • IMG_20191203_181023.jpg
    IMG_20191203_181023.jpg
    174.1 KB · Views: 185
  • IMG_20191203_181027.jpg
    IMG_20191203_181027.jpg
    161.1 KB · Views: 173
  • IMG_20191203_181509.jpg
    IMG_20191203_181509.jpg
    160 KB · Views: 218
  • IMG_20191203_181541.jpg
    IMG_20191203_181541.jpg
    105.4 KB · Views: 186
Well..... tinting didn't go as hoped. They were not able to get the pre-tint (their term) to contour enough to cover the window, just doesn't have much stretch in it. He was able to test and is confident he could do it with only tint. I was timid about using just tint on the Lexan, but have to give thanks to CamT for being the pioneer and getting his done first. Still a little gamble, but I really want/need tint so it's worth a shot. I was ready to make the 2hr drive back home so I left the windows with them and they'll be shipped back to me after they're done and fully dried.

They were able to do the pre-tint on the rear window plus the tint Saturday, I went 55% on it. I left it with them as well, just to make sure no issues. As far as the pre-tint goes, the stuff looks and feels like clear headlight tint, good bit thicker. From what they told me, it's made for the polycarbonate Gorilla Glass.

The owner and installer are both great people to deal with as well, my fingers are crossed.
 
Fixing to peel the silver dip off the wheels to get them powdercoated a more normal color. I had a few cans of lime green dip sitting on the shelf and the idea to see how it looks on the SLC wheels became too much to resist....
 

Attachments

  • IMG_20191214_162622.jpg
    IMG_20191214_162622.jpg
    232.6 KB · Views: 192
  • IMG_20191214_170351.jpg
    IMG_20191214_170351.jpg
    203.6 KB · Views: 208
  • IMG_20191214_170427.jpg
    IMG_20191214_170427.jpg
    215.4 KB · Views: 182
  • IMG_20191214_170428.jpg
    IMG_20191214_170428.jpg
    221.4 KB · Views: 218
  • IMG_20191214_170443.jpg
    IMG_20191214_170443.jpg
    219.4 KB · Views: 218
  • IMG_20191214_170515.jpg
    IMG_20191214_170515.jpg
    203.3 KB · Views: 179
  • IMG_20191214_170523.jpg
    IMG_20191214_170523.jpg
    183 KB · Views: 175
  • IMG_20191214_170544.jpg
    IMG_20191214_170544.jpg
    213.5 KB · Views: 189
  • IMG_20191214_170610.jpg
    IMG_20191214_170610.jpg
    202.3 KB · Views: 212
  • IMG_20191215_163723.jpg
    IMG_20191215_163723.jpg
    201 KB · Views: 187
I like the look. Reminds me of the Mazda 787b le mans car, orange + green.

I'm kind of digging the look. Don't know if I could do it permanently, but is cool. The orange and green doesn't clash as much as I expected.

Uploaded a quick video of silver vs green

 
I like it.
Did you prep the tires or did the dip just peel off??

I did put the stuff on that makes it peel off the tires easier. I didn't clean or prep the silver dip when I sprayed them green, just quickly wiped it down and went to town spraying. Didn't really care about the quality since it was just for fun. I did peel a center cap just to see how easy it would be when I peel it all off, surprisingly the colors didn't come off together.

Not really looking forward to peeling all the dip off, seems like it'll be a pain. Pressure washer and GooGone will be waiting to help.
 

Attachments

  • IMG_20191215_163556.jpg
    IMG_20191215_163556.jpg
    145.6 KB · Views: 179
Back
Top