
- Forums
- GT40 Replica Manufacturers' Corner
- RCR Forum - RCR40/SLC/917/Superlite Aero
- The SLC Clubhouse
You are using an out of date browser. It may not display this or other websites correctly.
You should upgrade or use an alternative browser.
You should upgrade or use an alternative browser.
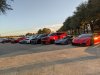
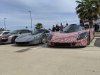
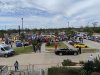
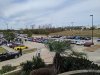
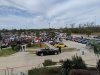
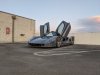
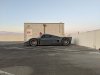
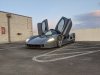
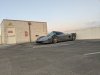
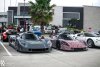
Few pictures from the Race Armada Texas Poker Run 2020. Was a blast and no doubt will be doing this again. Waaaayyyyy cool cars and people participating!
Was wild cops blocked I-45 from Webster, TX to I-10 in Houston. We all lined up on an on ramp while they stopped traffic and when they let us look onto I-45, it was wide open throttle for 20 miles.
Was wild cops blocked I-45 from Webster, TX to I-10 in Houston. We all lined up on an on ramp while they stopped traffic and when they let us look onto I-45, it was wide open throttle for 20 miles.
Attachments
-
 IMG_20200228_175123.jpg241.9 KB · Views: 839
 -
 IMG_20200229_010142.jpg226.5 KB · Views: 833
 -
 IMG_20200229_010144.jpg204.4 KB · Views: 791
 -
 IMG_20200229_005910.jpg200.5 KB · Views: 850
 -
 IMG_20200229_085331.jpg309.7 KB · Views: 783
 -
 IMG_20200229_103434.jpg233.3 KB · Views: 787
 -
 IMG_20200229_104517.jpg235.4 KB · Views: 743
 -
 IMG_20200229_104522.jpg231.7 KB · Views: 702
 -
 IMG_20200229_104524.jpg229.6 KB · Views: 777
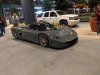
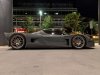
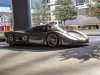
Few more. 370 miles of driving, SLC did great. Rode better than expected, drove better than expected, more comfortable than expected. Only had one bolt that self clearanced and that was because I put nose down too soon (for pics) and apparently had one more crest to make before officially was on top of the L'Auberge Casino parking garage. Live and learn, lol.
Attachments
-
 IMG_20200229_104624.jpg188.1 KB · Views: 772
 -
 IMG_20200229_104625.jpg162.1 KB · Views: 746
 -
 IMG_20200229_104626.jpg198.5 KB · Views: 734
 -
 IMG_20200229_104627.jpg182.2 KB · Views: 771
 -
 IMG_20200301_164651.jpg222.3 KB · Views: 694
 -
 88237708_2858365930951713_5897308844110905344_o.jpg57.2 KB · Views: 723
 -
 88228508_10162940392930697_1377200749729021952_o.jpg111.6 KB · Views: 739
 -
 88347081_2854507844670855_2420152009018572800_o.jpg74.1 KB · Views: 771
Del, where did you get the front hood hinges?

That's Cody, local Houston guy. He's on here I believe. Granville was there as well, but he was in luxury aka his wife's Lamborghini. ")
WOT for me was max of 105. Was first weekend I've had it triple digits so timid as per usual with me. I have no clue how I held it together and didn't just WOT. Next poker run will be another story, talk is they're setting up another before the heat hits TX/LA... I can't wait!
WOT for me was max of 105. Was first weekend I've had it triple digits so timid as per usual with me. I have no clue how I held it together and didn't just WOT. Next poker run will be another story, talk is they're setting up another before the heat hits TX/LA... I can't wait!
Doing this poker run made the whole SLC ownership completely worth it! And it's just starting, many more of these type of events will be in my future.
I need to drive the car to work one day before I peel the K&J decal off. My favorite part of the trip was when we pulled into Top Golf and people in front of me were trying to get someone to pull up the flagging so they didn't have to go all the way around. They gave up and proceeded on, so I just drove right under it. We were inside the car laughing at ourselves, people outside seemed to find the humor in it too.
I need to drive the car to work one day before I peel the K&J decal off. My favorite part of the trip was when we pulled into Top Golf and people in front of me were trying to get someone to pull up the flagging so they didn't have to go all the way around. They gave up and proceeded on, so I just drove right under it. We were inside the car laughing at ourselves, people outside seemed to find the humor in it too.
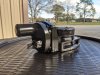
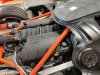
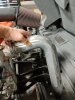
Satin throttle body with Superlite logo. I half-assed the measurements and didn't account for the hill so it came up short. Also forgot about tinting it but can do that still. I have t-bolt clamps for the silicone hose that I'll scuff and spray same satin black.
Also got some black heat reflective wire protectors (lack of better word) to swap out for the shiny versions. At some point before it gets too hot, I plan to replace the GM plastic loom with braided and see if I can clean up the engine area.
Also got some black heat reflective wire protectors (lack of better word) to swap out for the shiny versions. At some point before it gets too hot, I plan to replace the GM plastic loom with braided and see if I can clean up the engine area.
Attachments
-
 IMG_20200221_175707.jpg299.3 KB · Views: 692
 -
 IMG_20200222_161518.jpg454.1 KB · Views: 739
 -
 IMG_20200222_161539.jpg399 KB · Views: 705
 -
 IMG_20200225_075142.jpg329.4 KB · Views: 708
 -
 IMG_20200225_084000.jpg447.3 KB · Views: 675
 -
 IMG_20200225_084021.jpg407.6 KB · Views: 715
 -
 IMG_20200225_084037.jpg400.8 KB · Views: 733
Del I love your build. Amazing attention to detail. I have to ask how come you have left the Corvette coil covers on the engine? It seems out of place on such a fantastic car. If you addressed this somewhere in the forum and I missed it I apologize. Everything is so well thought out on the build that the covers have me curious.
Del I love your build. Amazing attention to detail. I have to ask how come you have left the Corvette coil covers on the engine? It seems out of place on such a fantastic car. If you addressed this somewhere in the forum and I missed it I apologize. Everything is so well thought out on the build that the covers have me curious.
No worries at all and thank you!
As far as the Corvette covers, just personal preference. They didn't come with the engine, it's something I added since Christmas. I've always had the covers on all my LS engines (LS1s, LS2s and now LS3) so looks naked without it although I didn't want something that covered entire engine. They're just them OEM at the moment, but the plan in near future is to fill in Corvette, smooth out and paint cover Grigio Telesto (body color). Then 3D print either SLC IR/8 or Superlite emblems to put on top. Been also kicking around idea to literally cut rectangle out where Corvette logo is now and 3D print something to replace it with one of the above logos and mold the print into the cover so it's OEM looking, just different logo (and add colored inlay to said logo).
Grigio Telesto (body color) FRC inserts. More subtle than expected, but good to know when I modify them Grigio Telesto should be a good color choice to paint whole cover.
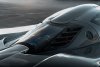
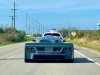
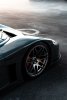
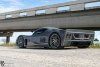
Couple pictures taken by RATX from the poker run. 6/13/20 can't get here soon enough and hopefully this Coronavirus stuff is over with for good.
Couple pictures taken by RATX from the poker run. 6/13/20 can't get here soon enough and hopefully this Coronavirus stuff is over with for good.
Attachments
I was a fun time for sure, always great seeing other people's builds.
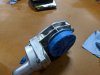
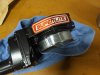
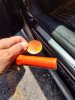
Been having issues with my Sparco gas cap and had to get another one. Partly due to powdercoating it, but it also slips when locking/unlocking it and tried several things to fix it with no luck. Chose to wrap this one in gloss black, just need to install it.
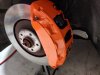
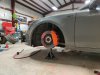
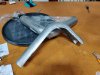
Sorta SLC related... Knowing the SLC had orange calipers and car was going to be gray, when I ended up buying a dark gray wrapped Audi I had a feeling it'd only be a matter of time before the big Brembos on it would get some orange... With this Coronavirus stuff going on, car doesn't need to be driven so perfect time to paint and get a proper cure. Brighter than I wanted, but after a few thousand miles they'll be darker after getting a layer of road grime and brake dust.
Sorta SLC related... Knowing the SLC had orange calipers and car was going to be gray, when I ended up buying a dark gray wrapped Audi I had a feeling it'd only be a matter of time before the big Brembos on it would get some orange... With this Coronavirus stuff going on, car doesn't need to be driven so perfect time to paint and get a proper cure. Brighter than I wanted, but after a few thousand miles they'll be darker after getting a layer of road grime and brake dust.
Attachments
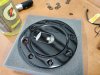
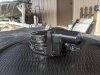
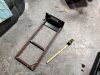
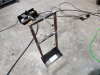
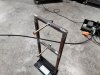
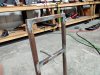
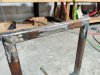
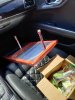
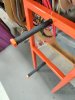
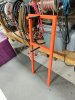
I wanted a way to remember to unplug my onboard charge, had square tubing on hand and wanted to learn to weld. So built this extension cord holder that I can see from driver's seat of the car. I had no intention on powdercoating it, otherwise I'd made a few more passes with the MIG. Just happen to be bringing other parts to get PC so grabbed it on the way out, as well lug key (yeah should have told them to tape off end socket goes on. Base is leftover mount for a Horn Blaster train horn compressor, I'll scuff and paint it body color
Attachments
-
 IMG_20200412_121550.jpg244.2 KB · Views: 594
 -
 IMG_20200412_172522.jpg262.6 KB · Views: 556
 -
 IMG_20200412_172536.jpg209.4 KB · Views: 593
 -
 IMG_20200412_172548.jpg243.7 KB · Views: 556
 -
 IMG_20200415_233738.jpg229.3 KB · Views: 561
 -
 IMG_20200415_233803.jpg131.9 KB · Views: 586
 -
 IMG_20200427_113602.jpg205 KB · Views: 611
 -
 IMG_20200427_125132.jpg139.8 KB · Views: 610
 -
 IMG_20200429_204023.jpg108.1 KB · Views: 623
 -
 IMG_20200429_204030.jpg211.6 KB · Views: 588
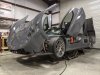
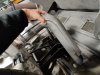
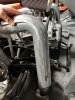
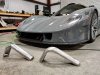
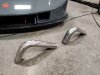
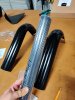
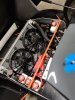
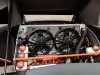
Had this idea stewing for a while in the effort to change shiny stuff to black while SLC is all closed up. I honestly dig seeing the silver ceramic coated 90deg turn downs through the tail grill, but wanted to mess with skinning carbon fiber again. I've painted them with high temp paint, I need to get need to drill holes for mounting. I have some 2.5" t-bolt clamps I'll weld nuts on so can attach them.
Still not 100% sure I'll end up using them, but is fun to make them and hope to skin over next couple of weeks.
Still not 100% sure I'll end up using them, but is fun to make them and hope to skin over next couple of weeks.
Attachments
-
 IMG_20200415_212419.jpg191.9 KB · Views: 622
 -
 IMG_20200415_215230.jpg175.9 KB · Views: 660
 -
 IMG_20200415_235427.jpg193.3 KB · Views: 617
 -
 IMG_20200415_235438.jpg181 KB · Views: 587
 -
 IMG_20200416_000309.jpg150.2 KB · Views: 589
 -
 IMG_20200416_000506.jpg205.8 KB · Views: 601
 -
 IMG_20200416_000441.jpg209.8 KB · Views: 565
 -
 IMG_20200418_200358.jpg169.4 KB · Views: 571
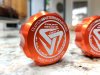
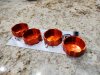
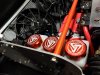
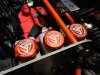
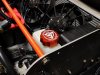
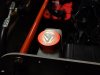
This will likely be last bit of orange on the car. Fitment is perfect and since they reuse the Wilwood caps, no sealing issues. $40 each and I did laser etching for free, I provided the file (drew in CAD).
Also discovered they fit the Tilton reservoir for the RamLift, so if I ever used the Tilton triple reservoir.
www.clutchmasters.com/wilwood-billet-aluminum-reservoir-cap/
Also discovered they fit the Tilton reservoir for the RamLift, so if I ever used the Tilton triple reservoir.
www.clutchmasters.com/wilwood-billet-aluminum-reservoir-cap/
Attachments
-
 IMG_20200429_200611.jpg147.8 KB · Views: 570
 -
 IMG_20200429_201555.jpg205.9 KB · Views: 597
 -
 IMG_20200429_204045.jpg179.2 KB · Views: 593
 -
 IMG_20200429_204050.jpg165.9 KB · Views: 560
 -
 IMG_20200429_204129.jpg115.9 KB · Views: 545
 -
 IMG_20200429_204250.jpg225.4 KB · Views: 596
 -
 IMG_20200429_204258.jpg205.6 KB · Views: 639
 -
 IMG_20200429_204349.jpg158.6 KB · Views: 665
 -
 IMG_20200429_204403.jpg94.1 KB · Views: 554
 -
 IMG_20200429_204428.jpg107.6 KB · Views: 605

Had this idea stewing for a while in the effort to change shiny stuff to black while SLC is all closed up. I honestly dig seeing the silver ceramic coated 90deg turn downs through the tail grill, but wanted to mess with skinning carbon fiber again. I've painted them with high temp paint, I need to get need to drill holes for mounting. I have some 2.5" t-bolt clamps I'll weld nuts on so can attach them.
Still not 100% sure I'll end up using them, but is fun to make them and hope to skin over next couple of weeks.
Del.
Can't wait to see how this turns out for you. I have not started my engine yet but my carbon fiber coil covers have been getting cloudy as they sit. It is the epoxy under the clearcoat that I sprayed on top. I believe I should have use West Systems Epoxy, I used another brand and it looks like I am paying later (as the old saying goes, pay me now or pay me later). Debating about sanding it all off and starting over or painting them to match the future exterior color (House of Kolor Kosmos Red).