
You are using an out of date browser. It may not display this or other websites correctly.
You should upgrade or use an alternative browser.
You should upgrade or use an alternative browser.
Don's Mk IV Build
- Thread starter Don Nye
- Start date
- Status
- Not open for further replies.
Nice job Don.
"The only thing that is holding me back from installing the engine is the RBT transaxle. I’m not someone that complains much but I placed my order last May 1st with my deposit and as of today still waiting for a delivery date."
Demand for RBT's is up since GT40 orders have increased. I had to wait 1 year for mine in 2007. You could buy them off the shelf in 2010 and there's a waiting list again now. I believe Quaife recently started another ZFQ batch due to demand.
I'm having the same experience with RBT. It was 3 months ago that the deposit was given with the delivery promised in "6 to 8 weeks". I've tried repeatedly to contact Lloyd, even stopping by his office many times, for an update with no luck. Maybe I'll get it by next Spring(?). Glad I'm not in a hurry. :worried:
D. Nye
Lifetime Supporter
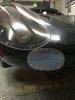
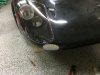
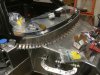
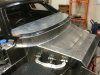
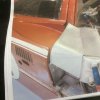
Over the holiday I got some time to work on the Mk IV. I installed the front air intake covers, see attached pictures and made the front spider hold down. The aluminum angle had to be bent to the shape of the front spider nose which was a task. I learned all about a stretcher and how hard it is to make this piece without pulling the aluminum apart by going too fast. Slow process and it only took me four pieces of angle before I got one that would work. Because the the spider is not supported on the corners by the chassis I made some simple aluminum supports, see pictures.
My clutch is scheduled to be delivered today so I plan on installing it this week. I decided to go with a twin disk setup good for 800 HP which I think should be more than I will ever need. I have to solve the pilot bearing issue first. Just something more I need to research.
Once I have that task done I think I will move on to installing the AC / Heater system, painting the dash and installing all the dash gauges and switch panel again painted. This will take a while.
No update on the ZF other than they tell me RBT is working hard to completing the box.
Happy New Year everyone!
Attachments

Hello Don, just took the time read through you build log and very nice work so far. The transaxle seems to be a real issue with these cars but it is pleasing to hear the demand for GT40s is up (good economic indicator) if you think 200 rivets is a lot try a fully riveted mono chassis 2000 and counting on my M20 and as you say the drilling / deburing I do have an air rivet gun. That BBFE with those carbs and 180 headers is a sight to behold and your attention to detail is impressive. Love your work
Cheers Leon
Cheers Leon
D. Nye
Lifetime Supporter
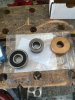
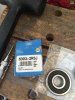
After doing some research on the best pilot bearing for the Ford FE I came up with the following.
It really comes down to three options, a solid brass like bushing, nettle bearing or a sealed roller bearing. The bushing is simple but not sealed from the clutch dust and I found a number of bad stories that they don't last long. Granted most of the bad stories were from drag racers but they had some good points why not to use it. The nettle bearing is the same one most small block Ford guys use but its outside diameter is smaller than the FE requires so this option would require me to make an adapter sleeve to fit the crank shaft and bearing. It also is not sealed from the clutch dust. The last option I found was a sealed roller bearing like used in the front of alternators. My thought was although the bearing is not doing anything when the transmission is in gear and the clutch out, it is working hard setting at a stop sign while in gear and between gears.
I decided to use the sealed bearing and have included pictures of the options and the part number of the bearing I used. I'm writing all this in the hope this may help someone like me in the future and just to document what I did so I can come back to this if I ever need to replace the bearing.
As an update on the AC install I'm still working out the best location for the unit. There is not much room if any under the dash and I have been looking at cutting holes to give me access the void under the flat section of the dash, part of the spider, and the mono. The dash, gauges, switch panel and AC grilles are in just and just looking at routing options for the AC air ducting.
Will share more pictures when I get the location problem solved.
Don
Attachments
Hi Don,
Bronze input shaft / pilot bushings have been around since the stone ages and are still in service on many cars and trucks. I can count on two fingers, the number that I have seen gone totally bad. One went terribly wrong and seized to the input shaft and was an absolute bugger to get apart. That said, it had never been lubricated with heavy axle grease as it should have been to begin with.
Centrifugal force being what it is, I have found very little clutch dust in the pilot bearing areas - even on cars and trucks with 100k miles or more on them.
One area that I think gets very little attention is in the indexing of the bellhousing on the engine blocks.
IE, is the transmission input shaft sharing a perfect centerline with the crankshaft?
A bushing will be far more tolerant of a misalignment than will be a bearing in my opinion..
D. Nye
Lifetime Supporter
Randy, I agree with you on the importance of indexing the bell housing. Something normally not worried about when working with original parts however there is not many original parts on these special cars. I will be checking the the alignment before placing it in the car.
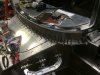
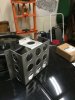
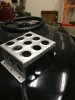
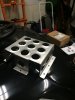
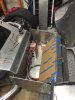
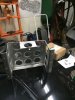
Got my racing battery and decided to make a battery box to save $100. Turned out to be something special and follows the theme of lots of holes. Made out of 1/8” aluminum for strength and fits like a glove to hold it in place. Battery weight is 15 LBs so I want to mount it up front behind the radiator and air deflector. I ordered all the radiator hoses and looking at brake cooling ductwork that all needs to fit in this small space with the battery, starter solenoid, brake and clutch fluid reservoirs, heater hoses, wiring etc. A lot going on in this part of the car.
Enjoy the pictures,
Attachments

Hi Don, sorry for the late post but really nice job on fitting the headlight covers. The MKIV covers are some of my favorite pieces to make.
D. Nye
Lifetime Supporter
Mark, Thanks I'll make a note you make these covers in case I need a replacement.
Yes Ray I truly love the car. I wanted to make a copy of J7 when I started this project but technology has made some big steps forward so a smaller battery is the way to go.
Randy, I will let you know if this battery works well with this FE at 10 to 1 compression. Over sized starter cable should help.
Don
D. Nye
Lifetime Supporter
Over the last few weeks since my post I have continued to work on small details on the car. Pictures are always good and help understand what has changed.
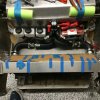
The front area behind the radiator is almost finished with all the stuff needed in this area. It’s a tight fit under the front air scoop but I have gotten it all in there. During this process I removed the front clam shell to make it easier to work on. When reinstalling I noticed I had originally installed the front body shell to high making the front air opening not lining up with the bottom of the car. After reinstalling and adjusting it was clear I’m going to have problems with speed bumps, this car is low!
What I have done is use 1/0 wire running back to the starter from the front mounted starter solenoid and 4 gauge back for the alternator, both over sized but bigger is better in Texas right? AC/heater has been installed and removed while some of the dash is being painted, final wiring and AC hoses routed. My only remaining task inside the car is to mount the seats to verify everything fits together. Other things that have been completed are, pedals and master cylinders installed, AC defroster wholes cut, battery cut-off switch installed and shifter installed. I will try and take some pictures this weekend to share.
There are many body differences between the J cars prepared by Shelby and Holman Moody and my body molds must have been taken from a Shelby car. The air vents on the top of the spider is an example and because I want my car to look like J7 before the 1967 race the vents have been removed and body filler has been started. The reason I said “before the race” is there are lots of changes that were done when the car was rebuilt after the 1967 crash. I’m not putting the rebuild down, the car just had little changes made. The J7 car is a great example of the race cars built and the present car setting in Colorado is something special and that’s why I’m trying to copy it. On HM cars the air vents were on the doors so the location has been marked, see attached picture. My present problem is finding someone to make me eight two inch louvers on two 8” by 3” straight aluminum sheets. Anyone know someone that has a 2” louver die which could make me some louvers?
My sanding blocks arrived and I have started the body work this week. My Cobra’s body work was all done by a professional and cost big dollars, I would like to do some of this work this time around. Learning new skills.
No word on the transmission so I continue to wait and build. If it does not come soon I’m going to send the body off for paint before its final assemble.
Later,
Attachments
D. Nye
Lifetime Supporter
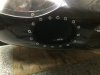
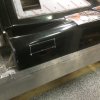
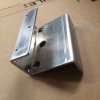
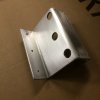
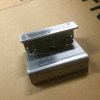
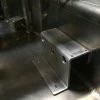
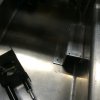
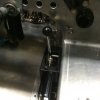
Made the shifter support, made from ¼” aluminum plate as can be seen in the pictures. Bolted through the floor and side pod making a very solid support for the shifter. Only one problem.
The seat RCR provided is 17” wide and with the shifter support installed I only have 16 ½” of space, bummer. So off to the internet to find a seat that is no more than 16 ½” wide. If your butt is wider than 15” you’re not going to fit in the driver’s seat however the passenger seat is 17” wide. By the way I measured before I ordered the seat.
The driver seat arrived and now is installed. Working on the passenger seat now.
Will share more pictures later.
Don
Attachments
-
 Shidter Support 006.JPG163.5 KB · Views: 334
 -
 Shifter Support 004.JPG143.6 KB · Views: 297
 -
 Shifter Support 005.JPG154.4 KB · Views: 318
 -
 Shifter Support 007.JPG150.1 KB · Views: 304
 -
 Shifter Support 008.JPG142.9 KB · Views: 300
 -
 Shifter Support 009.JPG164.6 KB · Views: 372
 -
 Shifter Support 010.JPG166.9 KB · Views: 355
Terry Oxandale
Skinny Man
That reminded me of a funny situation I had to deal with on my previous project. My wife required a 2" wider seat (passenger side) than I needed, so I purchased that width just for her. It was a poor decision on my part to share that information with her :lipsrsealed: . It was well enough that she didn't know they were different widths. :furious:
Howard Jones
Supporter
Don I see you are using the RCR peddle set. I still have mine in my SLC but I made a lot of mods you might be interested in before you get the brake system full of oil. Look at posts 636-643 on my SLC build log.
Mk4's is the one I would build today if I was going to do a "GT40" again.
Mk4's is the one I would build today if I was going to do a "GT40" again.
- Status
- Not open for further replies.
Similar threads
- Replies
- 12
- Views
- 965