Here is my process for the foam.
Materials.
1-foam
Urethane Foam , Expanding Marine Polyurethane Foam
Personally I like the 4lb foam. It expands well and is quick and easy to work with.
2-Gloves- lots of gloves. This stuff is so sticky and it does not come off easy from skin.
3-Clothes- old clothes, it will get on there and never ever come off.
4-plastic drinking cups, I like the red ones. I use these to mix it.
5-Big garbage can with new thick trash bag. As you use the cuts you throw them in there before they get on everything! It expands so leave some room in there.
6- Cardboard
7- Blue tape, others will work, but I like the blue as it sticks less.
Here is my process.
1- Sand fiberglass that you plan to cover with like 36 grit so the foam will stick nice.
2- make cardboard walls where you want the foam to not go.
3- Tape it off well as the foam is liquid and will want to run away from you. You will not do it as good as need the first time and say F%$ and figure it out.
4- Make teh cardboard walls taller than you think the foam will go as it goes higher than you think.
5- Make sure you keep the foam in a good warmish place, like 70-80 degrees. If not it will not expand well at all and take forever. Trust me on this.
6- I get all suited up and ready with my area taped and ready for the pour, gloves on and stand by gloves ready just in case the ones on rip.
7- I use two of the plastic drinking cups. I fill cup one 1/3 of the way with part A foam liquid.
8- I then fill cup two 1/3 way with part B foam liquid.
9- I then pour them back and forth to mix them up. I do it back and forth fast. It will get on the sides of the cup a bit, but not worries you have gloves and old clothes on so just go with it.
10- I pour then back and forth from cup to cup for about 45-60 seconds. You will see it starting to get bigger and the cups should start to warm up a little bit. This is the time you pour the liquid into the mold area.
11- Think about how the liquid will flow and where you want it to go.
12- When done wait a bit and see how high it goes. If you want more then go back to step 7 and do it again. You can layer it up all you want. You want the foam to be getting a bit hard and still be a little sticky then the next layer of foam will bond with it well.
13- When it is good and dry pull away the cardboard and tape. Now it can be more fragile than you think so be careful as you can rip the entire foam piece off the car if not done right. Trust me on this one, but it is still easy.
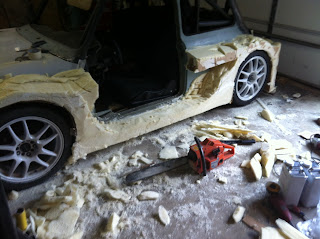
14- Now you are ready to start cutting. I used a big cutting knife at times to get the big stuff away. For really big stuff I actually used a chainsaw it and worked great, like those guys who use them to cut ice. I felt like an artist.
15- Now you are cutting and ready make sure you have the air hose ready as that foam goes everywhere and I mean everywhere. When done take off clothes before entering the house and take a shower right away. The foam in your ears and eyes are the most fun.
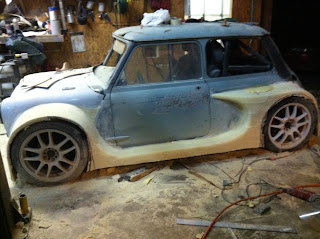
16- Sand away with 36 grit sand paper.
17- Now, remember to sand more than you think as you will add fiberglass and resin and body filler when done.
18- Now she is sanded and looking pretty. I add a nice thick layer of resin on it. The fiberglass resin from lowes that is like $20 a gallon works fine.
19- Once the first layer starts to tack up and is good then add a second layer and put the fiberglass mat on it and a nice few layers will do. Remember the more resin you use is not the better as you want the mat to be wet and soaked through, but not dripping. The strength is in the mat and not resin.
20- Once the last fiberglass mat is done you can add a quick last layer of resin to smooth it out a bit to make it easier later.
21- When all dry sand it down a bit with 36 grit of what you feel is needed.
21- Add body filler as need to smooth it out.
22- Sand away to make the final shape smooth and ready for prime and paint.
23- See, all done and nice.
Here are some crazy pictures for you of the process I did.
Right after I pulled the cardboard off. You can see the chainsaw, yes I really did that.
Sanding done and ready for resin.
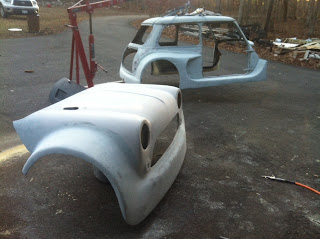
Resin and like 5 layers of fiberglass on it. I let it overhand and just use a 4.5" metal cutting wheel in my angle grinder to trim it.
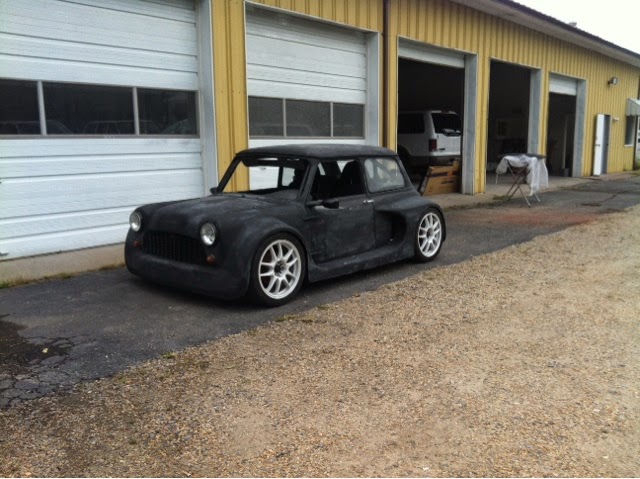
I added body filler and sanded and sanded and sanded. I was so done with sanding at this point.
Almost done here. She is at the body shop and they will do a final body filler coat and glaze to make it all nice and smooth with no waves. This is when it got to the expert level that I was not at and I handed it off. I should have her back around the begining of March.
BTW- I ordered of set of lights off ebay today and one rear C7 vette taillight to see how it will fit. I will have to do some of this foam process to get them to fit, but that is part of the fun of making the car my own. Thanks again for the idea on the lights.


")