Fling SLC Build Thread

Michael, did Shorai give you a blessing on the battery? I considered using one until they poo,poo'd the idea. They are really light batteries, just got one for a MC build I am helping on. I hope it works out.

Like the work on the headlights, it will be great not to have to deal with cleaning the underside of the lens constantly.
 
Fling. Great work and an inspiration to me and my soon to be build. When I see things done I glad I have not done my build yet and love taking all these amazing ideas.

Now if you could figure out something really cool for the tail lights I might sign you up for the exotic beer of the month club.
 
I look at OEM tail lights all the time and turn them 90 degrees, flip them, rotate them..... I have found a few that have possibilities of being pretty cool. From what I see is that most tail lights incorporate side markers into them so they just don't fit with the flat back. Im still digging the newer Mustang sequential tails. Looking forward to seeing the completed package.
 
I'm curious as to why you decided not to go with the Shorai battery?

I have used Shorai for other projects and was thinking of using their larger one (LFX36) for the SLC. . .
 

Michael Fling

Supporter
To be honest... Craig came up from Dallas last weekend and with his help, we got the car started. I could not find battery post that were workable on the Shorai. He questioned (that while it has 850 cranking amps), if it would carry the load long enough? So, in the necessity to get the car started, I changed to a red top. If I could find the battery post for the small battery, I would consider reverting back to see if it was enough.
 
I look at OEM tail lights all the time and turn them 90 degrees, flip them, rotate them..... I have found a few that have possibilities of being pretty cool. From what I see is that most tail lights incorporate side markers into them so they just don't fit with the flat back. Im still digging the newer Mustang sequential tails. Looking forward to seeing the completed package.

I see the same thing driving around. I did check out the new corvette C7 lights and that might work. The out portions that go down are not part of the lights. The only question is so we want corvette lights that are very distinctive now on our SLC. hmmm. What other ones have you seen Troy? Not to derail Flings thread.
 

Michael Fling

Supporter
The lights you saw in my earlier post were for mock up. Here is a picture of the final units and the tail lights.

IMG_6279-1.jpg

IMG_6280.jpg

IMG_6289.jpg


I will post pictures of them later after the bodywork is complete. I have also been working on ram air/cold air induction. I started by making a lower box from foam board. This is being duplicated in aluminum. I then shaped foam on the inside of the rear bonnet. Fiberglass is laid over the foam. When the rear bonnet is closed, the vents seal nicely to the lower box. Fiberglass sanding and final shaping tomorrrow.

IMG_6271-1.jpg

IMG_6274.jpg

IMG_6277.jpg

IMG_6286-1.jpg
 

Michael Fling

Supporter
Bill,
Take a look at post #221. The arm is 3/4" chrome molly. It fits perfectly behind the front piece that separates the brake vent and radiator vent. It is as far forward as possible... so that the bottom edge of the splitter does hit the ground when opening the bonnet. The radiator had to be modified.

If that post doesn't show you what you need, I will post more pics as soon as I get my computer back. Hard drive crash last night. :thumbsdown:
 
Michael,
Really nice thinking and execution on the cold air intake. What is your methodology for laying up the glass? It looks like you are using garden variety foam for the form, then covering with aluminum (?), then glass? I have found that the vapors coming off the polyester resin deforms the foam (or are you using epoxy?). Just curious as I am always looking for an easier quicker way.
 

Michael Fling

Supporter
The fenders were laid up in clay... then Saran wrapped. These ducts were shaped with foam then covered with AC tape. Boxing tape can be used too. I layed up fiberglass over the Saran wrap and aluminum tape with a quick cure fiberglass... technically it is SMC (Sheet molded compound- like on modern Corvettes) mixed with a paste hardener. I have yet o find an easy way.. It all takes sooooooo much grinding.. shaping... smoothing etc.
 
Fling. When I did my miniMR2 I used the two part foam mix that is sandable and you can just lay the resin and fiberglass on top when done. The foam weights nothing, adds strength and is stupid easy to sand, but it goes everywhere (ears and eyes are the worst). When I saw your lights I thought I am going to use them and do the foam method to get the shape I want. For one off projects is makes it fast and easy. The foam is ready to sand in like 15-30 minutes depending on how hot it is outside. I also started to bid on C7 vette taillights and will redo the rear to fit and make them look the way I want. If you want more tips on the foam let me know.
 
I also used the method Troy outlined to make the plugs for my rear fenders. Works well. I bought the 2K foam from TAP Plastics (I don't know if they are a national chain). Make a rough form from cardboard (or whatever), fill in the void with the mixed liquid foam, stand back and watch it expand...sometimes way more than desired! But with practice you will get used to it.

Form with a knife, cheese grater, 40 grit sand paper, depending on what stage you are on.
 
Here is my process for the foam.

Materials.
1-foam Urethane Foam , Expanding Marine Polyurethane Foam
Personally I like the 4lb foam. It expands well and is quick and easy to work with.
2-Gloves- lots of gloves. This stuff is so sticky and it does not come off easy from skin.
3-Clothes- old clothes, it will get on there and never ever come off.
4-plastic drinking cups, I like the red ones. I use these to mix it.
5-Big garbage can with new thick trash bag. As you use the cuts you throw them in there before they get on everything! It expands so leave some room in there.
6- Cardboard
7- Blue tape, others will work, but I like the blue as it sticks less.

Here is my process.
1- Sand fiberglass that you plan to cover with like 36 grit so the foam will stick nice.
2- make cardboard walls where you want the foam to not go.
3- Tape it off well as the foam is liquid and will want to run away from you. You will not do it as good as need the first time and say F%$ and figure it out.
4- Make teh cardboard walls taller than you think the foam will go as it goes higher than you think.
5- Make sure you keep the foam in a good warmish place, like 70-80 degrees. If not it will not expand well at all and take forever. Trust me on this.
6- I get all suited up and ready with my area taped and ready for the pour, gloves on and stand by gloves ready just in case the ones on rip.
7- I use two of the plastic drinking cups. I fill cup one 1/3 of the way with part A foam liquid.
8- I then fill cup two 1/3 way with part B foam liquid.
9- I then pour them back and forth to mix them up. I do it back and forth fast. It will get on the sides of the cup a bit, but not worries you have gloves and old clothes on so just go with it.
10- I pour then back and forth from cup to cup for about 45-60 seconds. You will see it starting to get bigger and the cups should start to warm up a little bit. This is the time you pour the liquid into the mold area.
11- Think about how the liquid will flow and where you want it to go.
12- When done wait a bit and see how high it goes. If you want more then go back to step 7 and do it again. You can layer it up all you want. You want the foam to be getting a bit hard and still be a little sticky then the next layer of foam will bond with it well.

13- When it is good and dry pull away the cardboard and tape. Now it can be more fragile than you think so be careful as you can rip the entire foam piece off the car if not done right. Trust me on this one, but it is still easy.
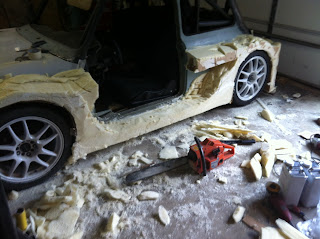
14- Now you are ready to start cutting. I used a big cutting knife at times to get the big stuff away. For really big stuff I actually used a chainsaw it and worked great, like those guys who use them to cut ice. I felt like an artist.
15- Now you are cutting and ready make sure you have the air hose ready as that foam goes everywhere and I mean everywhere. When done take off clothes before entering the house and take a shower right away. The foam in your ears and eyes are the most fun.
16- Sand away with 36 grit sand paper.
17- Now, remember to sand more than you think as you will add fiberglass and resin and body filler when done.
18- Now she is sanded and looking pretty. I add a nice thick layer of resin on it. The fiberglass resin from lowes that is like $20 a gallon works fine.
19- Once the first layer starts to tack up and is good then add a second layer and put the fiberglass mat on it and a nice few layers will do. Remember the more resin you use is not the better as you want the mat to be wet and soaked through, but not dripping. The strength is in the mat and not resin.
20- Once the last fiberglass mat is done you can add a quick last layer of resin to smooth it out a bit to make it easier later.
21- When all dry sand it down a bit with 36 grit of what you feel is needed.
21- Add body filler as need to smooth it out.
22- Sand away to make the final shape smooth and ready for prime and paint.
23- See, all done and nice.
Here are some crazy pictures for you of the process I did.

Right after I pulled the cardboard off. You can see the chainsaw, yes I really did that.
minifoam02.jpg


Sanding done and ready for resin.
mini013.JPG


Resin and like 5 layers of fiberglass on it. I let it overhand and just use a 4.5" metal cutting wheel in my angle grinder to trim it.
mini2.JPG


I added body filler and sanded and sanded and sanded. I was so done with sanding at this point.
mini0304.JPG


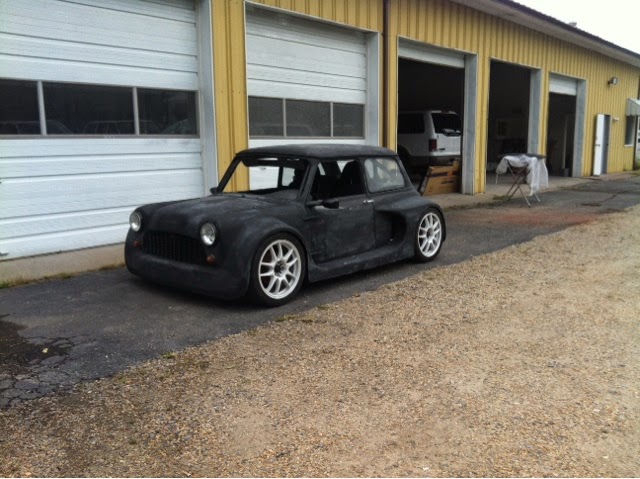
Almost done here. She is at the body shop and they will do a final body filler coat and glaze to make it all nice and smooth with no waves. This is when it got to the expert level that I was not at and I handed it off. I should have her back around the begining of March.
blogger-image--1456275184.jpg


BTW- I ordered of set of lights off ebay today and one rear C7 vette taillight to see how it will fit. I will have to do some of this foam process to get them to fit, but that is part of the fun of making the car my own. Thanks again for the idea on the lights.
 
Back
Top