GTD40 Restoration

oops, double post, and 3mn late after Mike... Could somebody delete my 2 posts above, to clean Andy's build log (seems that I could not myself). Thanks...
 
Yes, Mick from Southern GT is very helpful and might be able to help you.
Has anyone a suggestion how to solve the chassis topic below ? :idea:
 
Andy,

Just an additionnal question... does your chassis have that "forward" gap only at the left middle beam level (where you put your ruler for the picture), or does that same gap exist also at the bottom of the chassis (at the floor level, at the foot of the vertical steel tube supporting the door strikers).

I'm asking that, cause I've seen a GTD chassis with that kind of problem (but on RH side !) : the outer steel vertical tube was ok at the bottom, welded square at the perfect place, but only too much backwards on the main beam level...
Solution was obvious (for the body shop guy working on it !) : strip the thing, firmly immobilize some of the main chassis tubes by bolting two steel tubes to keep it square, and put a hydraulic cylinder gently pushing on the right tube... The initial gap (around 1,5-1,7mm) just disappeared and everything lined up perfect !
 
Hi Pierre,
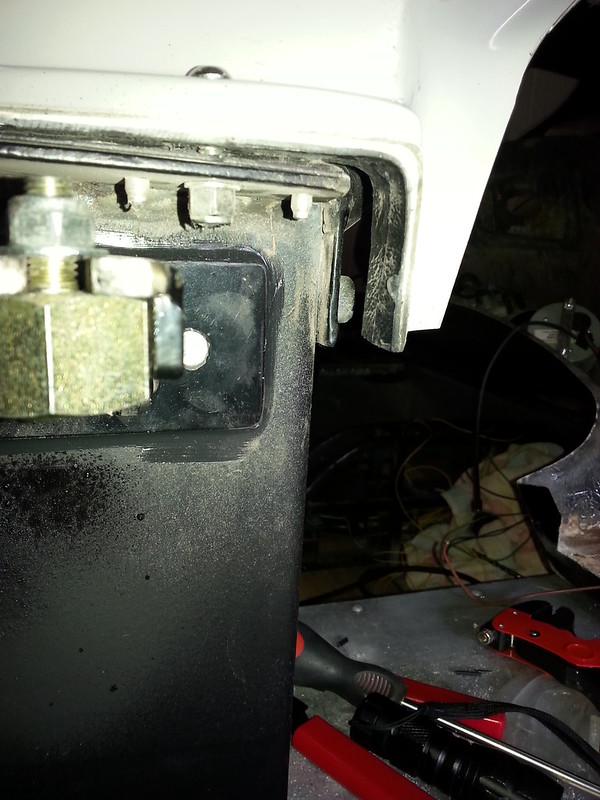
The gap is only at the top section, the main beams look okay.
My gap is actually 25 mm at the outer part. Easiest way is to bend it but the small outer vertical tube will not like this.
Welding at this stage is dangerous, one hot metal flake can start a fire on the polyesther.
I was thinking to grind the plate with those 2 holes off the small outer vertical tube, bend it straight and screw a 25 mm square tube over the diagonal small tube to fill the gap. And then TIG weld the plate to this filler tube. At the end, the whole section will be covered with an aluminium plate. But I have some time so perhaps other ideas appear.
Completely dismantling is the best way but to rigurous for me.
In that case a complete new chassis from Southern GT is not far away and I try to stick with the GTD chassis.
I like to discuss neat and simple ideas with different builders :thumbsup:
 
BTW, logically, this gap "forward" should have an impact on the cockpit side, which be one inch forward on the left than on the right ? The left door striker must not have the same shape than the right one ! (i.e. one inch shorter ?) Is it noticeable ?

While doing some welding, and since you already have dismantle many things, why not just go little bit further and cut the odd tube and reweld it in proper square position ? (yes, that'll need to clear the way, and remove some more parts, but...)

Bon courage...:thumbsup:
 
Last edited:

Terry Oxandale

Skinny Man
Enjoying the thread, especially what was found when dismantling the car. It's fascinating to see what was "acceptable" by the original builders/owners when these types of cars are repurchased. You'll have a very nice car when finished.
 
The left door striker is indeed 25 mm shorter which isolates the problem to this corner.
The glassfibre rear wall behind the steel tubes is connected with the complete inner part of the car. It is like a bathtube in the car. This means the complete car has to come apart if I would try to weld in this area. I will need to figure out another way :rolleyes:
 
Hi Frank,
The pictures are in post #38 or are you looking for a picture showing the different lengths of door strickers (The U-shaped things where the door locks in) ?
Regards,
Andy
 
No Andy, I had intended to post pics of my version including side roll over protection , but site is reticent in letting me, try again! Nope, site won't let me !
 

Randy V

Moderator-Admin
Staff member
Admin
Lifetime Supporter
Frank - how are you trying to post the picture(s)?? Via URL to an image hosting service or uploading the image to GT40s.com ?
 
Hi Andy,
these cars were never built symetrical. My Tornado (GTD clone) has a longer door striker pin on the LHS by 15mm. I know it's not the bulkhead, as I cut it out to replace the main tubes with the rear roll hoop
Regards,
Andy
 
Small update for today.
Made some brackets to compensate for the chassis "deviation" on the left rear corner. The brackets are quite stiff and made from a strong aluminium alloy.

The rollbar struts are in production @ Southern GT. When they are ready, I can finish off this area.

Also was able to solve the wipermotor location and lack of room for the airco.
(moved the pedalbox more to the middle to give my right foot room to peddle the trottle.
Was an easy fix actually. Rotated the wipermotor with 90 degree (now hovering above the pedals but plenty of room) making space for the 16" wide airco evaporator unit. Small dance around the car :pepper:
 

Attachments

  • IMG_1729.jpg
    IMG_1729.jpg
    113.2 KB · Views: 506
The left door hinges are cleaned, painted and back in place.
The holes on the chassis are bigger for better alignment and now the door gaps are all aligned. The top of the door still stick out but only minor but with the help of the inner roof clips, it will be fine.
Speaking off...the screws holding those inner clips are not crabbing enough anymore...the holes in the polyester became too big. Planning to fill the holes with new epoxy and retap them. I guess there are other solutions used in the past ?

Removed the other door aswell since I noticed the bracket looked bit sad.
Wondering if those door ball bearings holders are standard parts of specific GTD parts.
The bearing itself is a
ELGES GE 12-ZO ball bearing
Inner diameter 0.5000"
Outer diameter 0.8750"
Width 0.4375"​
Anyone an idea if the holder of the bearing (cylinder with the screwthread on) is a custom GTD part or an off the shelve part ?
 

Attachments

  • brackets door.jpg
    brackets door.jpg
    91 KB · Views: 363
They are custom as far as I am aware. Though I recommend if you need to replace talking to Mick.

He has done an update, so the spherical bearing is pressed into a piece that is hex shappe rather than round. That allows you to do up the nut on the top far easier and makes it easier to adjust the doors as well.
 
Thanks for the picture, that makes it very clear.
Looks like it has been chromated to protect it against the elements.
Noticed also that you sealed the gaps of hinges. Good idea.
 
Lots of hours but slow progress.
Fixed the sheet metal panels at the fuel cap locations except for the edges. Looking for nice trim.
Made some panels for the front inner section (see picture). Took me 6 hours :stunned: time flies when having fun.

Mounted the right door - hinges are newly painted - but noticed some play between the inner shaft and the door :cry: (see movie)
This makes it difficult to proper align the door since this small movement at the hinge has big effect on the ends of the door.

Orientating now for the best routing of the airco hoses in a GTD (another thread).

Change of plans, want to have the car back on the road before end of this year so going to revive the old engine. Next year a self assembled 347 stroker is on the planning. The pressure is on :thumbsup:
 

Attachments

  • IMG_1779.jpg
    IMG_1779.jpg
    133.7 KB · Views: 513
  • IMG_1754.MOV
    637.7 KB · Views: 224
Quick update on the sheet metal plating.

Made the 2 rear bulkhead cover plates from Titanium. Mainly for heat reflection but also for the looks. It has a nice glow to it.
These panels are only 0.45 mm thick so folding is quite easy.
Don't like chrome, nor like polishing :laugh:

Also a front panel before the steering rack is done in 2 mm 6061 Aluminium.

Next step was to make a battery box.
Checked the battery position which came with the car but it is too high to clear for the front torsion bar. It measures 200 mm in height (without the + and - pole). Looking for a smaller battery and its footprint to start fabricating the box.
 

Attachments

  • titanium.jpg
    titanium.jpg
    65.1 KB · Views: 373
  • frontplate.jpg
    frontplate.jpg
    73.3 KB · Views: 345
  • 2 platen.jpg
    2 platen.jpg
    90.5 KB · Views: 325
  • battery.JPG
    battery.JPG
    318 KB · Views: 367
Back
Top