Howard B's RCR 40

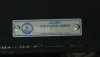
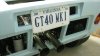
I have had a busy spring with travel to quite a few places for work and car shows. It has slowed work on the car. I have gotten my paper work in to the state for a VIN tag and license plates. That's a good thing.

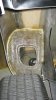
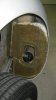
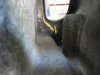
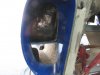
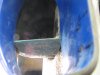
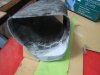
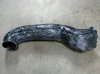
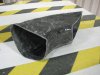
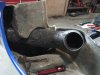
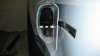
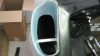
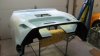
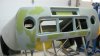
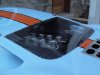
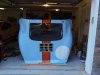
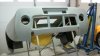
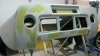
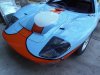
I have also molded inner fenders out of fiberglass and tacked them into the wheel wells. See pics... I will coat them with truck bed liner for rock protection and put in access panels to reach the tail lights.

I have ordered the rear brake vent cooling tubes from Bill Hough, which feels like progress even though I am not putting them in yet.
 

Attachments

  • Inner fenders 002B.jpg
    Inner fenders 002B.jpg
    103.5 KB · Views: 491
  • Inner fenders 003B.jpg
    Inner fenders 003B.jpg
    132.4 KB · Views: 429

Randy V

Moderator-Admin
Staff member
Admin
Lifetime Supporter
Nice bit of work Howard! You've offered yet another project for me to take on...

RE: Brake Ducts and oil coolers from Bill... I have them and am currently installing them in my rear clip. A good deal of work to get them to come together properly inside the scoop on the side of the clip. But then I also had to cut the clip away from the inner support structure to pull the body in and make it fit the lines of the sill and Spider more closely too.. The large duct tube is a bugger to get into position - but you need to do a lot of twisting, shoving and cajoling (to the point where you think you might break it)..

I'll get another thread going at some point to show the rest of how I did this - but these pictures ought to give you some idea.. I had to heat and reform the lower duct (oil cooler) and then also had to add material (kitty-hair) to get it to fit somewhat close. I also used some scrap flat fiberglass material that I had cut out of the rear clip to create a divider between the brake duct and oil cooler duct.
 

Attachments

  • IMG_6395.jpg
    IMG_6395.jpg
    109 KB · Views: 406
  • IMG_6402.jpg
    IMG_6402.jpg
    122.4 KB · Views: 421
  • IMG_6403.jpg
    IMG_6403.jpg
    103.6 KB · Views: 379
  • IMG_6409.jpg
    IMG_6409.jpg
    111.1 KB · Views: 409
Hey Randy,

It won't be the first time something doesn't fit out of the box! I guess that's why it's a kit! :shocked:

Thanks for giving me something to looh forward to. LOL

I guess it doesn't come with the separator wall?

I am getting better working with fiberglass daily.

H
 

Randy V

Moderator-Admin
Staff member
Admin
Lifetime Supporter
I wish it was a kit... Kit's generally have all the parts you need!

Instead - we're working with a pile of parts..

I made the separator out of a piece of scrap. I've got some other pictuers of the ducts I'll try to get uploaded tonight.
 

Randy V

Moderator-Admin
Staff member
Admin
Lifetime Supporter
Some more Duct pics
 

Attachments

  • IMG_1020.JPG
    IMG_1020.JPG
    819.3 KB · Views: 387
  • IMG_1033.jpg
    IMG_1033.jpg
    148.7 KB · Views: 337
  • IMG_1021.jpg
    IMG_1021.jpg
    237.3 KB · Views: 335
  • IMG_0907.jpg
    IMG_0907.jpg
    216.1 KB · Views: 382
Hey Randy,

Thanks for posting those pics and telling about breaking the rear clip loose to align the clip with the rockers. I will need to do something of that nature as well since the rear clip needs to be spread out further. The reverse of your challenge. I also had to add about 1/2 inch to the spyder B pillar to get the right height for the door and the rear clip to align closely. Was this your challenge as well?

I spent Sunday cutting open the NACA ducts and building molds to run the ducts into the passenger compartment. I didn't get them finished because I had to get ready for a trip to South Dakota this week. (went through your town to change flights). I'll post some pictures when I return.

Maybe I will have received my brake ducts while I'm away.

Cheers,
Howard
 
Thanks Tom, I had seen your post before, they are well done of course. I "short cut" it and determined it was more time and cost effective to buy them already molded and they were a good fit...thanks to Bill Hough.
The set came with four pieces and I fabricated some plastic wood dividers which are now covered in fiber glass and will be painted black.

See pics below:
 
ooops some how the pics didn't attach correctly...I'll try again :laugh:
 

Attachments

  • Vent Left.jpg
    Vent Left.jpg
    99.4 KB · Views: 387
  • Vent Rt.jpg
    Vent Rt.jpg
    79.2 KB · Views: 367
  • Vent center clamp.jpg
    Vent center clamp.jpg
    69.8 KB · Views: 365
Oh yea, we got a couple of neat surprises in the mail the past several weeks...registration and a VIN.

Fran will identify with the VIN it's RCR0040 and the tag nothing else of course would do...
 

Attachments

  • VIN RCR 027.jpg
    VIN RCR 027.jpg
    26.3 KB · Views: 424
  • New tag VA.jpg
    New tag VA.jpg
    99.8 KB · Views: 429

Michael Holmes

Lifetime Supporter
Oh yea, we got a couple of neat surprises in the mail the past several weeks...registration and a VIN.

Fran will identify with the VIN it's RCR0040 and the tag nothing else of course would do...

For my information, how did you get #40 as the VIN? Is that what your MSO stated as the number or is that an arbitrary number given to you by your state?
 
Michael,

That was my MSO number, the state of Virginia used it straight off the MSO.
Nice coincidence, it must have been RCR's 40th car.

What number is yours Michael?

Howard
 
Body prep for painting...

What a tedious job!

Thanks to my buddy Bill T. he gave me some stands to work from...saves bending over and I can elevate the panels easly to work on them without getting too fatigued from standing in weird postions. :thinking:
 

Attachments

  • Body prep 001b.jpg
    Body prep 001b.jpg
    94.2 KB · Views: 382
  • Body prep 002B.jpg
    Body prep 002B.jpg
    103.4 KB · Views: 405
  • Body prep 003B.jpg
    Body prep 003B.jpg
    101 KB · Views: 383
  • Body prep 004B.jpg
    Body prep 004B.jpg
    97.6 KB · Views: 373

Chris Kouba

Supporter
Howard,

Thanks for the visit! It was nice to finally put a face with the name and go through your 40 with you- even more inspirational to hear it run.

Best of luck with the bodywork. You appear off to a good start, just keep at it- it's definitely a game of persistence, and take your time with it. You only want to do it once.

Chris
 
Time to post an update.

I have been quite busy at work with frequent travel but I haven't stopped working on my car. I decided it paint it myself so I have spent a considerable amount of free time prepping the body. Lots of dust, sanding, Rage, fiberglassing in the brake cooling ducts, extending the dash for a cleaner fit, cleaning the garage to keep everything under control, travel, more travel, well I am maybe a little over half way to getting the paint on it!

Maybe I should have just sprung for a paint job....naww! I am doing this myself.

I am off to Dunedin, New Zealand to check out my new grandson! What a great diversion! Hope to check in on Jac Mac when I pass through Gore in a couple of weeks!

The paint job has got to wait for now...
Cheers, from Dunedin, NZ
Howard
 

Terry Oxandale

Skinny Man
Bravo on painting it yourself. It may not be perfect (most likely won't), but you'll be quite proud of an accomplishment not taken on by many. I built a small paint booth in my garage using 3/4" PVC pipe and plastic sheeting. Cut holes in front and back for two induced and two forced draft fans with filters. No overspray anywhere, and with the current clear-coat options available, just about any error can be fixed to make the final look perfect.

standard.jpg
 
Last edited:

Chris Kouba

Supporter
Hey Howard,

Congrats and enjoy the trip... Let the sandpaper wishes and clear coat dreams fade for a while. They'll be there for you when you're back.

And yeah, it won't be perfect, and mine isn't, but I'll be proud of it anyway and I bet you will too.

All the best,
Chris
 
Live the dream,

It's been a couple of years since I posted. I haven't given up on my build!
Many things have changed in the past two years but the car I have continued to chip away on.

I built a paint booth in my garage and painted the car myself. I am almost done putting the car back together. So I thought I would post some updated photos of the progress.

You will not have to ask many questions of what the color scheme is.

I will attempt to get the windshield back in this weekend.

I still have the wheels left to paint. Never give up on the dream!
 

Attachments

  • GT40 Comes together 075.jpg
    GT40 Comes together 075.jpg
    186.3 KB · Views: 384
  • GT40 Comes together 083.jpg
    GT40 Comes together 083.jpg
    248.1 KB · Views: 386
  • GT40 Comes together 087.jpg
    GT40 Comes together 087.jpg
    226.8 KB · Views: 348
  • GT40 Comes together 073.jpg
    GT40 Comes together 073.jpg
    237 KB · Views: 332
  • GT40 Comes together 100.jpg
    GT40 Comes together 100.jpg
    137.7 KB · Views: 354
That's looking very well done Howard! Nice to see someone choosing to do a complete
DIY paint job. Lots of work...Congrats on a beautiful car.
 

Chris Kouba

Supporter
Finally some pics!!! Looks great on the web but I got to see it first hand two weeks ago and it's a beaut.

Excellent work Howard!

Chris
 
Back
Top