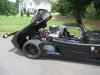
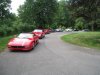
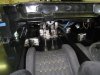
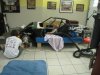
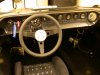
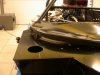
J. Salmon RCR-40 Build

Tom,
The EFI is a FAST XFI. Kinsler was more familiar with it, so I thought it best to use something they could help me with. I have a few more sensors to sort out, but I can see a faint light at the end of the tunnel.
I look forward to seeing your custom kit, that sounds fantastic!
 
Inspiration!

As many of you building know, sometimes you need inspiration to keep up the pace when things seem to be slow. I had been spending a fair bit of time prepping for my first race in Vintage (Gold Cup at VIR) only to be denied by a blown engine in the second run of practice. On thursday I ran the rebuilt car (Lola FF) for what will probably be the last time for a few months.

Then today we had a great rally here, small but a ton of fun. Included in the cars was a good friend's Ultima GTR. It was great to see it up close, to compare it to my car and to the SLC demo that we have. The car took 3 years to finish, and then had near to a year in upgrades including a swap to dry sump and other small improvements.

This particular Ultima weighs just 2030 pounds wet and is powered by a 600ish hp Dart block chevy mated to a G50-52 from California Motor Sports with their shifter kit.

The Ultima's owner was extremely impressed by the RCR chassis, both in my car and the SLC. The Ultima is a tube frame with riveted aluminum panels. This car is very, very well done though, and it was inspirational to see what you can accomplish with pateince and persistence.

My favorite feature is actually the view out the front. The nose slopes off so much that you can see the ground about 4 or 5 feet in front of the car. It really makes it feel like a go-kart!

I really cannot wait to get mine put together.... so back in the garage!
 

Attachments

  • JR09a.jpg
    JR09a.jpg
    55.1 KB · Views: 618
  • JR09b.jpg
    JR09b.jpg
    53 KB · Views: 634
  • JR09c.jpg
    JR09c.jpg
    53.3 KB · Views: 1,122
  • JR09d.jpg
    JR09d.jpg
    57 KB · Views: 953
  • JR09e.jpg
    JR09e.jpg
    42.5 KB · Views: 628
Seats mounted

I got the seats bolted in. I plan to mount EFI and possibly some fuses behind the seats, so I am going to make brackets that can be quickly unbolted allowing the seat backs to be either tilted forward or unbolted at the bottom and removed. Much easier than fooling with the bolts in the floor the hold the lower half of the seats, several of which require 2 people to get to, or the reach of an orangutan.

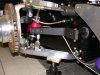
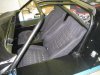
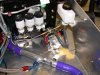
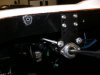
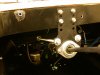
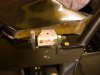
I also mounted the pedals. On the second try (dammit). I thought I had them perfect, then I realized my foot would not slide easily between the brake and the center console onto the gas. So now I have some holes to plug.

Ultimately, I angled them slightly. I took a page out of the Lamborghini Murcielago, which angles both the driver and passenger slightly inward. The passenger is straight ahead, because there is not any room for anything else. But I had to get the drivers's seat edge as far left as possible to make room for the shifter, and then I wanted it aligned straight on with the wheel. So I tilted the pedals a smidge too. It is all very comfy, actually. I will have to trim the top of the clutch pedal as it contacts the steering rack joint. I considered moving it to clear, but decided that trimming the pedal and having everything in the perfect place was the better approach. I have gobs of stretch out room for my left foot, possibly a dead pedal.
 

Attachments

  • Seats1.jpg
    Seats1.jpg
    47.2 KB · Views: 714
  • Seats2.jpg
    Seats2.jpg
    43.9 KB · Views: 860
Been working hard, but not many pictures lately. I'll try to take more soon.

Motor is plumbed and wired. Firewall fit. Dash holes cut and the dash has been positioned. It is getting tuned up with the edges blocked in around the roll hoops.

I got the front sway bar installed, and I have marked the arms for cutting and drilling. I used a step drill for the holes, which was much more time consuming than a hole saw, but more precise. Cutting oil is a huge help, especially if you are using a crappy step bit. When the bit is spinning and that aluminum chassis gets to singing, it is LOUD! It came out pretty nice, snug and smooth. I had some great help and encouragement!

I also ordered the Isis wiring harness. It will be three weeks or so, but there is still much to do before it arrives.
 

Attachments

  • Daddy'sHelper.jpg
    Daddy'sHelper.jpg
    43.4 KB · Views: 668
A few photos:
Pump for the front end lift.
Front anti-sway completed.
Mechanical line lock installed in the front brake circuit. This will be my parking brake.
 

Attachments

  • Lift pump.jpg
    Lift pump.jpg
    48.6 KB · Views: 730
  • Front antisway.jpg
    Front antisway.jpg
    47.3 KB · Views: 722
  • Line lock.jpg
    Line lock.jpg
    31.7 KB · Views: 656
Been working, but haven't done anything particularly novel. I had brackets welded on to the radiator to mount the fans. I slipped bolts into the slots and used some JB weld to permanently hold them. I was afraid the plastic might give out if they were over tightened. It snugged down really well.

I finished plumbing the fire suppression. I found it tricky to get a good location to mount the pull. The first 3 inches of the T-lever is solid, so you cannot easily mount it on the switch panel due to the angle. I put it just left of the wheel. Even then I could not mount it in the center of the gauges or it hit the chassis behind the dash in the wrong place. I put it low, but it looks good. I am please with the final result.

I rough mounted the dash and test fit the gauges and vents. I am ready to do the final bolts, but I want to really take my time with that.

The in-cabin nozzle for the fire system is also a toss up. It would be nice to know ahead of time where the fire is going to be, but obviously you cannot do that. I placed it far enough forward in the footwelll that it will help protect legs. It will also spray the back of the dash, in case it is an electrical fire back there. I can also just see the sprayer from my seat, so it covers my torso and most of my head. Of course, I hope it never needs to be used.

I am really in need of my front springs. They have been back-ordered for what seems like years. I need 4 inch 400 pounds spings, 2.5 inch ID. If anyone knows where to get custom springs, please let me know!
 

Attachments

  • Final front plumbing.jpg
    Final front plumbing.jpg
    50.1 KB · Views: 559
  • Fire supression.jpg
    Fire supression.jpg
    54.8 KB · Views: 500
  • Driver footwell a.jpg
    Driver footwell a.jpg
    36.1 KB · Views: 476
  • Dash test.jpg
    Dash test.jpg
    38.1 KB · Views: 577
Steering rack stiffener

I did the Chuck and Ryan threaded rod steering rack stiffener. I think it should be considered a necessity, it makes a huge improvement and is easy. I will also brace the upper aluminum dash front to back. I had to cut a lot of material away when I fit the dash vents, and I lost some stiffness.

In the upper left corner is a hose that I zip-tied and siliconed in place. The cable for the fire suppression pull handle slips through that hose.
 

Attachments

  • CR rack flash.jpg
    CR rack flash.jpg
    25.4 KB · Views: 500
  • C-R rack stiffener.jpg
    C-R rack stiffener.jpg
    31.1 KB · Views: 532
Dash fitment

Others (again, like Chuck and Ryan) have had to deal with the fitment of the dash with the roll bars. I also was having trouble getting my head around cutting the dash in the way the RCR manual suggests to allow it to go in and out independent of the roll bar.

After a lot of thought, I decided that I didn't care if it was super easy to pull the dash, but I did want to be able to get the ROLL BAR out. Because of the way my AC compressor and alternator fit, it is almost a necessity to remove the spider and roll bar to pull the engine. Since this will be a much more common event, I decided to trim the dash to allow access to the roll bar bolts and to remove the bar. I had my fingers crossed that I might be able to pull the dash too, but that is not the case. The roll bar still has to lift about and inch in the front to get the dash in and out.

I cut the corners with a hack saw to keep a very straight line. My neighbor glassed in the ends of the dash for me (thanks Ron!). I then mounted the dash and got it all where I wanted.

The trick was to fix the corner covers. I bet there are easier ways, and I will end up with two small bolt heads showing. But most of all I want the trim pieces to fit snuggly and securely, and a few small bolts don't bother me.

I used hex rod. I drilled and threaded the under side of each rod and bolted them solidly to the aluminum plate. I then did my best to locate them under the tabs and drill holes. These were tapped so that the bolt would hold the tabs in place. I then filed them to get good fit. These alone locate the tabs pretty well, but I wanted to fix the seam exactly.

I mounted two tabs on each edge of the main dash panel. The inner angle bracket (lower one) is to secure the dash. Then another tab slips under the bolt. After bending it a bit for a good fit, I used velcro to hold the inner lip of the trim piece in place. I use some small o-rings under the bolts to provide a softer interface.

It is not very tidy underneath, but once set in place the tabs are rock solid. They should finish with near perfect surface alignment. Now it is time to mount the gauges and wire the dash. (Just typing that makes me feel a bit ill).
 

Attachments

  • Driver tab a.jpg
    Driver tab a.jpg
    32.4 KB · Views: 558
  • Driver tab b.jpg
    Driver tab b.jpg
    33.2 KB · Views: 518
  • Driver tab c.jpg
    Driver tab c.jpg
    31.1 KB · Views: 523
  • Passenger tab a.jpg
    Passenger tab a.jpg
    32.9 KB · Views: 520
  • Passenger tab b.jpg
    Passenger tab b.jpg
    39 KB · Views: 529
Thanks Randy. Fran finally received an email saying the springs are on the way. I should know soon whether that is true or not. You would think with the economy that people would be itching to move stuff, but it seems suppliers are bogged down. If they aren't here next week, I'll be ordering some of those.
 

Randy V

Moderator-Admin
Staff member
Admin
Lifetime Supporter
Jay - It seems that many manufacturers are shutting down lines and waiting until they have enough orders for a particular line to start them back up again.. Certainly not RCRs fault but they get caught in the middle.. Not very many manufacturers here are stocking up on product these days at all...

4" springs are pretty short - Why do you need them?
 
Randy, I'll butt in here. Likely using the 4" springs with the hydraulic lift kit.
J. Correct me if I'm mistaken..
 
That's right, the lift takes up about 2 inches or so of spring. Here is the best pic I have of the lift in place (red). I thought this was crazy but the ones on the front of the SLC we had were even shorter and it worked just fine. I will actually use 4 inch main springs with 1 inch "helpers" that are really light and serve to keep the springs seated during full sag, you know when you get the thing airborne :).
 

Attachments

  • Front antisway.jpg
    Front antisway.jpg
    47.3 KB · Views: 591

Randy V

Moderator-Admin
Staff member
Admin
Lifetime Supporter
Ah yes.. That makes sense... Hmmm... Might be a 2010 budget item for my build...
 
I think you would be crazy NOT to use the lift. We are all used to seeing these cars in race trim, which means a really low nose. Luckily, the way the front is shaped you can approach things at an angle and get a pretty good approach angle for driveways. But I intend to run some stupid low front ride height, like 3.5 inches. With the lift, no worries.
 
I think you would be crazy NOT to use the lift. We are all used to seeing these cars in race trim, which means a really low nose. Luckily, the way the front is shaped you can approach things at an angle and get a pretty good approach angle for driveways. But I intend to run some stupid low front ride height, like 3.5 inches. With the lift, no worries.

Are you guys trying to creep over speed bumps or are your roads really that bad? Lowest point on my cobra is 3 3/4'' and I don't scrape anything.

My z06 is about 1.5'' to the front splitter (plastic) which scrapes all the time, but my longtubes hang down to about 2.5'' and as long as i don't try anything silly like driving over speedbumps, I never whack them. ...... I learned my lesson when I dented them the first time i was convinced I could make it over a speedbump....I couldn't:laugh:

Only time I could think of that being handy here is if you run into road construction (when they're ripping up the road) - however, in those cases I immediately straddle both lanes and when I come to humps in the road construction I slow down to like 3mph (from 50mph) and crab-walk across the humps .... it sure pisses people off behind me, but I usually just flip them off anyways and protect my baby at all costs :laugh::laugh::laugh:
 
Keep in mind how short the overhang is on the Cobra. It has the approach angle of a Land Rover. The SLC has a much longer and low nose. With sub 4 inches ride height, any driveway entrance will leave carbon splitter pieces littering the ground. Getting in and out of a trailer is also a problem. But with the lift, no problems. Speedbumps? Who cares?

I am not sure where you live, but it is hilly here, with lots of drives and entrances that change elevation. Someplace flat (like Detroit) I think you could set the car at an inch and not care.

I have owned a car or two that was really tricky to get around in, and it is a PITA. I hate having to plan ahead thinking about ramps and entrances. The lift completely negates that. I was very impressed with it on the demo SLC we had, and this one is even better. I had the good fortune to drive a Murcielago equipped with the Lambo front lift (another car that needs it). This one is much better, faster in both directions and with more travel.

I don't think I would use it on a track car or race car, it would be just extra unsprung weight. But my car will be primarily a road car.
 
J,

It looks that you are making some very good progress and the VA weather should be keeping you in the garage more so I am sure that it will be picking up. I sent you a PM with a question:2thumbsup:.

Jeremy
 
I have been struggling with brake fittings. Every fitting that I used "Russell's pipe thread sealant" which is supposed to replace teflon tape is seeping. I could just kick myself for being such an idiot. I typically swear by teflon tape, and anything I assembled with it is snug and dry. I will say the chassis powdercoating appears immune to the gallons of brake fluid it has now seen. One more night bathing in Pentosin...
 
J,

i never heard of using sealing adds in brake applications. Having everything on my racebikes in stainless steel fittings and braided teflon hoses, i know with even the slightest leak it is almost impossible to achieve a nice pressure point, don´t even talk about safety. My opinion: If the fittings are not selfsealing it would change them for ones they are. I wouldn´t rely on any sealing adds in this application.

Besides this i remember a discussion in Chucks thread about seaping brake lines and as far i can rember it was due to a mismatch of fittings. May be check there.
Where are your leaks ? There are just a few connection on the RCR setup. I took out the resudial valves because i have my reservoirs mounted higher than the caliper and don´t want to have anything inbetween the brake cylinder and the caliper piston. This takes out 2 additional points for a leak per line.
lets see we have :
cylinder to adaptor = seal with aluminium washer
adaptor to braided hose = selfsealing cone
braided hose to bulkhead fitting ( T port) = selfsealing cone
bulkhead fitting to stainless pipe line =selfsealing pipe cone
stainless pipe line to bulkhead fitting = selfsealing pipe cone
bulkhead fitting to braided hose = selfsealing cone
braided hose to adaptor = selfsealing cone
adaptor to caliper = aluminium washer

I don´t see where to use pipe thread sealant or teflon tape except on the adaptors to cylinders and calipers, but as said here i would use a aluminium washer ( replace them after every use)

Should work

TOM
 
Back
Top