David, thank you for the info. I was using the Astro rivnut tool today in a tight spot and could have use the tool from Pegasus. Time to order this tool.

You are using an out of date browser. It may not display this or other websites correctly.
You should upgrade or use an alternative browser.
You should upgrade or use an alternative browser.
For the E-Brake Bracket Install
Suggested Bolts: M10-1.5, 35mm (4 each, Shoulder Bolt), M10-1.5, 30mm (4 each, Cap Screw)
Washers: M10 (2 each for bolts and as needed for spacing)
Drill Bit: Size R
Tap: M10-1.5
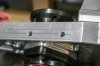
With rotor installed, bolt bracket to e-brake caliper and place over rotor at forward edge of spindle. Locate the e-brake caliper centered over the rotor and mark the bracket location.
The spindle is big and heavy and easily nicked so handle with care. Locate spindle web and mark the spindle edge accordingly. Measure and draw a line indicating the center of the web. Locate the bracket on the spindle at the marked location with the bolt holes centered on the web. Use a transfer punch to mark the drill location.
Clamp the spindle in an angle vise and use a drill press to drill two holes to R size drill bit perpendicular to the spindle for the bracket bolts to a depth of 1.25”. Tap the holes to M10-1.5.
Fit check the e-brake bracket and determine the number of washers or spacer size needed to center the caliper over the rotor.
Suggested Bolts: M10-1.5, 35mm (4 each, Shoulder Bolt), M10-1.5, 30mm (4 each, Cap Screw)
Washers: M10 (2 each for bolts and as needed for spacing)
Drill Bit: Size R
Tap: M10-1.5
With rotor installed, bolt bracket to e-brake caliper and place over rotor at forward edge of spindle. Locate the e-brake caliper centered over the rotor and mark the bracket location.
The spindle is big and heavy and easily nicked so handle with care. Locate spindle web and mark the spindle edge accordingly. Measure and draw a line indicating the center of the web. Locate the bracket on the spindle at the marked location with the bolt holes centered on the web. Use a transfer punch to mark the drill location.
Clamp the spindle in an angle vise and use a drill press to drill two holes to R size drill bit perpendicular to the spindle for the bracket bolts to a depth of 1.25”. Tap the holes to M10-1.5.
Fit check the e-brake bracket and determine the number of washers or spacer size needed to center the caliper over the rotor.
Attachments
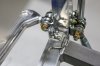
The fuel tank is located in the center of the car directly above the radiator and heater coolant lines. Insulation is needed to keep the radiant heat from frying the occupants. I lined the bottom of the fuel tank with Sticky Shield from Heatshield Products and covered the radiator and heater lines with heat-dissipating sleeving (fiberglass sleeve covered with silicone rubber from McMaster Carr).
What did you use to bead your stainless coolant pipes?
Hi Aj,
The two beaded stainless radiator coolant line are 1-1/2" diameter and came with the car. I also purchased two 3/4" diameter stainless heater lines (.035" wall thickness). I used the JEGS Performance Products 80083 Tube Bead tool on those.
The two beaded stainless radiator coolant line are 1-1/2" diameter and came with the car. I also purchased two 3/4" diameter stainless heater lines (.035" wall thickness). I used the JEGS Performance Products 80083 Tube Bead tool on those.
A fit check of the engine/transaxle discovered a lot of preload at the front and rear engine mounts. Upon measuring the engine location relative to the chassis, I found the engine to be 1/8” off center to the left at the front mount. Also, there was no room to install the lower “C” channel clamp at the frame rails. I cut and shortened the right side by .185” and lengthened the left side be .375”. At the rear engine mounts, I had to enlarged the bolt holes to 11/16” inboard.
Now the engine mount drops into place with no preload, the rear engine mount bolts can be installed without loosening the chassis bolts and the engine/transaxle is centered in the chassis.
Now the engine mount drops into place with no preload, the rear engine mount bolts can be installed without loosening the chassis bolts and the engine/transaxle is centered in the chassis.
Attachments

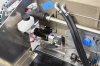
Have been working on the brake and clutch lines. You have to incorporate the brake and clutch switches and residual pressure valves that will require an inverted flare tool and a few extra fittings. I purchased SS brake line, brake line clamps and fittings and used a mini tube bender and Eastwood Pro Tube Flaring tool. I'm still working on the brake and clutch lines at the rear.
Attachments
Very nicely done Kurtis.
You have the cleanest brake line installation I have seen. Great Job!
Steven Lobel
Supporter
I could redo my lines several times and not reach that level of symmetry. Jealous.
I appreciate all your comments and words of encouragement. I’ve been having a great time reading about the other builds, researching parts, buying and using new tools and most of all, building my GT-R. I hope to be on the road by the end of the year.
Remember “the oxen are slow, but the earth is patient.”
Remember “the oxen are slow, but the earth is patient.”
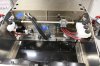
Finished mockup of the rear clutch and brake lines. The lines supplied by RCR are nice and will work just fine but I was looking for a better fit and therefore made new ones. It is very time consuming but I like the end result.
Attachments
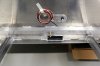
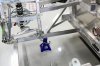
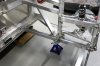
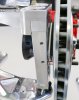
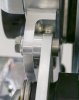
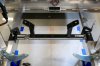
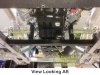
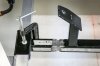
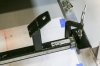
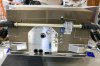
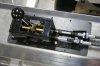
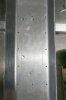
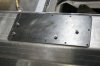
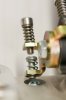
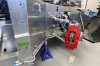
Began working on the shifter installation. I discovered there wasn’t enough clearance between the top of the fuel tank and the tunnel to install rivnuts (check out the photos). My install is like Dean’s, using a mounting plate that is attached to the tank tunnel. I used twelve ¼”-20 x 1/2" fasteners to attach the plate to the tunnel then four 5/16”-18 fasteners from the plate to the shifter. The heads of the 5/16” fasteners easily fit into the large holes in the tunnel and do not contact the fuel tank.
You’ll notice I drilled a new fastener location on the shifter since one fastener hole is covered by the shift cable. I plan to paint the plate and use a sealant between the plate and tunnel for final install.
You’ll notice I drilled a new fastener location on the shifter since one fastener hole is covered by the shift cable. I plan to paint the plate and use a sealant between the plate and tunnel for final install.
Attachments
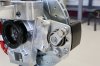
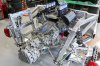
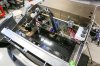
I assembled the engine/transaxle and installed it into the chassis. During assembly, I gathered a ton of information from many sources and created a file available at the following link: Dropbox - The Graziano 6.pdf.
After modification of the engine mount (see earlier post) I had it powder coated red to add some color. I drilled the holes in the frame for the engine mount and everything fits with room to spare (for now).
After modification of the engine mount (see earlier post) I had it powder coated red to add some color. I drilled the holes in the frame for the engine mount and everything fits with room to spare (for now).
Attachments
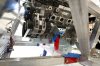
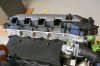
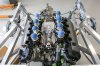
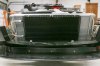
The Borla Eightstack induction gives it the retro look. I asked Borla to provide a vertical Eightstack reminiscent of the original GT40’s. They provided a beautiful induction system but since this is the first vertical Eightstack on a Coyote engine, I ran into a few clearance problems. A little careful machining (counter bore two manifold bolt holes) and grinding (valve cover bosses) took care of the issues.
Attachments

Last edited:
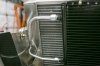
Installed the condenser with a ¾” gap in front of the radiator. At the top, I machined spacers and installed #10-24 rivnuts in the radiator cover. For the bottom, I copied others and made brackets.
At the drier I used the Vintage Air billet mount and installed the trinary switch to reduce the number of fittings. I installed a #8 hard line from the condenser down the right side through the wheel well to the rocker panel area.
At the drier I used the Vintage Air billet mount and installed the trinary switch to reduce the number of fittings. I installed a #8 hard line from the condenser down the right side through the wheel well to the rocker panel area.
Attachments


Nice work Kurtiss
Kurtiss great work I have to ask want you used to polish the suspension parts did you use a pedestal buffer or by hand it's a nice look I assume you sealed the parts after polishing I send Fran my deposit Monday for my car I will be running a 3.5 Ecoboost Twin Turbo motor with approx 600 hp
Thanks for the road map on the Graziano installation!
Similar threads
- Replies
- 5
- Views
- 941
- Replies
- 9
- Views
- 809