
You are using an out of date browser. It may not display this or other websites correctly.
You should upgrade or use an alternative browser.
You should upgrade or use an alternative browser.
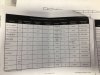
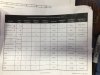
Hi Larry. Those are the typical wire assignments for an SLC so I made a few changes for my GT-R. My wiring schematics are based on changes to the wire assignments shown in post #136.
K
K
Doors - Electrical
“Electricity is really just organized lightening” – George Carlin.
Finished the passenger door mechanical and stumbled into the electrical stuff. Since I decided to use a switch and solenoid to open the latch mechanism, I also installed a relay within the door and a door-jam switch for interior lights (see Electrical Schematics, post #280, schematic page 15, 16 & 17). For the driver’s door there are 12 wires (5 for rear view mirrors, 3 for door lock, 2 for speaker, 2 for interior light). To help secure the wiring I installed 5 click bond type standoffs. I used a 12 pin Deutsch flange connector at the door to chassis interface and ran the wires directly under the upper door hinge pivot. The passenger door requires 10 wires.
Kurtiss it’s great to have someone who likes to focus on details in the way you are building your car, you take a lot of the guesswork out of this build which makes my job so much easy.
Michael Hampson
Supporter
That looks fantastic, Kurtiss. I love the door-to-car harness.
I made a modification to the wiring schematics in post #280 for the Center High Mounted Stop Light (CHMSL). I found a neat little gizmo (technical term) for a diode circuit that connects to the left and right stop light/turn signals and correctly powers the CHMSL. Found it on Amazon. Very simple to install and given the low stance of the GT-R, the CHMSL is an added safety item.

Kurtiss good Morning what did you end up purchasing for the third brake light maybe you mentioned it already and I missed it
I'm installing a 3rd Brake Lamp P/N GM559-B0000 (fits a Chevy Blazer and H2 Hummer).
Now the question is; where am I going to install it? The original location is at the upper edge of the rear clamshell window. My friends say it will take away from the mold line of the car. They want me to install it under the clamshell at the upper edge of the window. You'll be able to see the light through the window but it will be "hidden". I tend to agree but the light may highlight dirt when illuminated. Trial and error...
Now the question is; where am I going to install it? The original location is at the upper edge of the rear clamshell window. My friends say it will take away from the mold line of the car. They want me to install it under the clamshell at the upper edge of the window. You'll be able to see the light through the window but it will be "hidden". I tend to agree but the light may highlight dirt when illuminated. Trial and error...
Ok Kurtiss your the Ginny pig so let’s see how she looks I tend to agree about the inside H put his on the outside I believe
Steven Lobel
Supporter
I had mine below the Gurney flap. H said move it up top. A low car is hard enough to see. See pics in my thread. Barely noticeable. Bought off Amazon for a Suburban. Under $20
Rear Wing Attachment - Why did I opt for the rear wing since I don't plan to race the car? Because it's fun, it's a built-in table top to eat your lunch on, and it looks cool!
So the rear frame member came with wing strut mounting plates as shown. I didn’t like this design and removed the plates and welded angle steel to the frame. The wing struts are made from ¼” thick, 6061 aluminum. Each strut has three sections; one section attached to the frame member, another penetrates the rear clip and the last attaches to the wing (I may combine the latter two in the future). I added multiple layers of fiberglass to the underside of the rear clip for strength before cutting slots for the struts. My rear clamshell is hinged using H’s hinges and “yes”, the clamshell can fully open without interfering with the wing. The wing can be removed in a few minutes and the open slots can be covered if desired.
I positioned the wing so the chord is -8° (the bottom of the wing tab is at -5°). At this chord angle, the forward top section of the wing is almost flat (a good place to hold my beer). I don’t plan to race the car so the end plate design is off-the-cuff but I did account for the greatest low pressure area that is located just aft of the wing leading edge.
Kurtiss I don't know if it is great minds think alike but I was really thinking about this wing recently and damn if you didn't do it. I would like to see your car with all the panels back on and see what it looks like.
Oh and by the way that looks bad ass.
Windshield Rollbar – I did this last August before going to H’s.
There’s a lot of space between the windshield rollbar and the A-piller. So, like others, I decided to take the plunge and replace the bar with a wider one. I purchased 10’ of 1-1/2” diameter, .120” wall DOM tubing. After a few bends here and there, my friend of BJ’s Racecars did the welding. It fits so much better.
During the fabrication, I added more space behind the rollbar to allow room for the overhead switch panel. I’m using rocker type switches that are deep and need room for the wiring. The flat plate in front of the rollbar is to mount the GPS antenna's.
Kurtiss the rear wing setup is RCR correct
I created a thread in the GT40s Garage Sale section for misc parts that I didn't use or don't plan to use. Please look it over.
Kurtiss
Kurtiss
Great to see how far you have come on your build. Looks fantastic !! The detail is amazing. Would like to see sometime.
Thanks Jim!
The car is currently at Ken's Custom Auto Body in Yuba City, CA for bodywork and paint. It will be there till Mid July so now I'm twiddling my thumbs and doing honey-do's.
The car is currently at Ken's Custom Auto Body in Yuba City, CA for bodywork and paint. It will be there till Mid July so now I'm twiddling my thumbs and doing honey-do's.
Ah yes I am in the same boat but once I get the honey do list done I get to work on the wife’s 1970 Chevy Chevelle I am going to put all new Air Ride Suspension Tubular Control Arms 4 wheel disc brakes take out the 396 Big Block and put in a nice LS3 and overdrive Transmission so she can go anywhere she wants with no headache. Here is my paint scheme Alan will be doing he picked up the car today. It will be dual Black stripes with the soul crystal red in the middle
Attachments
Thats great!! can't wait to see finished car!!Thanks Jim!
The car is currently at Ken's Custom Auto Body in Yuba City, CA for bodywork and paint. It will be there till Mid July so now I'm twiddling my thumbs and doing honey-do's.
Similar threads
- Replies
- 5
- Views
- 941
- Replies
- 9
- Views
- 809