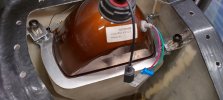
I have a set of marchal 61243603 headlights as seen in pictures. Tried making my own solution to avoid having adjustment screws visible thru the light covers.
But I am loosing faith in the solution I made up since the plastic holders just cant handle any decent spring pressure to hold the headlights steady from vibrations.
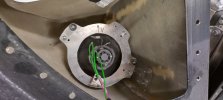
How is aftermarket headlights installed in most kits? (Picture please)
And how does the Marchal Original solution look like? Can only find frame for the 61343303 headlights
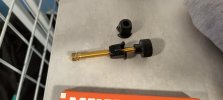
Same question applies for front spots, they are in a very early stage and have not manufactured any mounts yet. Just aluminium frame as in picture.
Are there any good universal adjusting screws that can be mounted from the rear that has a pivot point and allow spring loading? That would probably solve my problem för both headlight and spots.
But I am loosing faith in the solution I made up since the plastic holders just cant handle any decent spring pressure to hold the headlights steady from vibrations.
How is aftermarket headlights installed in most kits? (Picture please)
And how does the Marchal Original solution look like? Can only find frame for the 61343303 headlights
Same question applies for front spots, they are in a very early stage and have not manufactured any mounts yet. Just aluminium frame as in picture.
Are there any good universal adjusting screws that can be mounted from the rear that has a pivot point and allow spring loading? That would probably solve my problem för both headlight and spots.