Looking pretty spiffy there Mr. Reid.

You are using an out of date browser. It may not display this or other websites correctly.
You should upgrade or use an alternative browser.
You should upgrade or use an alternative browser.
Mark Reid RCR-40 Build
- Thread starter MReid
- Start date
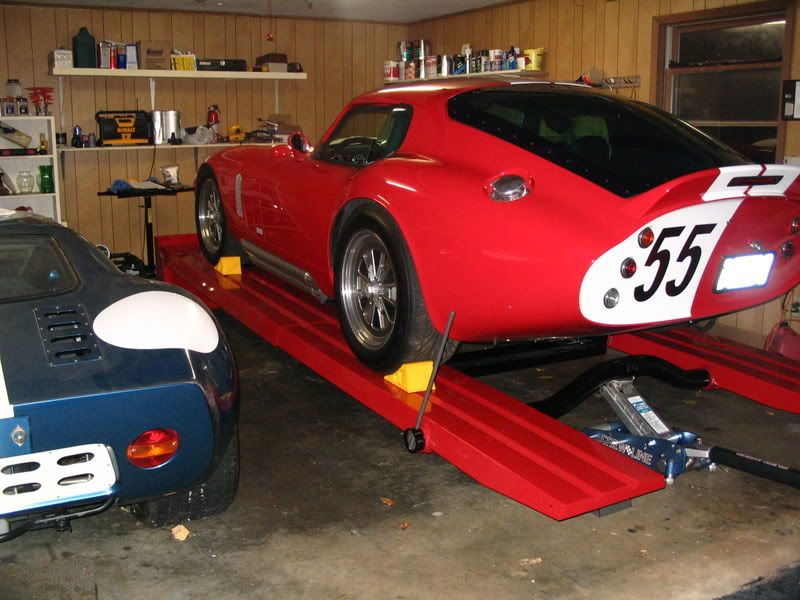
Steve, I just got a Kwik Lift, it works great for low ceilings.
Chuck,
Thanks for the pic....Will the lower nose of the CAV front clip clear the ramps as car is driven up?....Some pics of the CAV next time it's up would be great entering the ramps and then on the lift (I assume the clearance is same as the SPF?)....Thanks!...Steve
Thanks for the pic....Will the lower nose of the CAV front clip clear the ramps as car is driven up?....Some pics of the CAV next time it's up would be great entering the ramps and then on the lift (I assume the clearance is same as the SPF?)....Thanks!...Steve
will do, i will email them to you ,do not want to clog up Marks thread too much
No worries on clogging up the thread. I bought my lift used for $200. It holds 4000 lbs. I couldn't tell you what kind it is as it has been painted several times. Works great, but has one drawback. It is too high for many low cars (read that as all of mine). I have to keep planks on either side of the lift to keep the chassis high enough to clear the lift when driving on or off.
BTW, nice garage, Chuck!!! rockonsmile
BTW, nice garage, Chuck!!! rockonsmile
it must look familiar to you Mark
another good option even with a low garage ceiling is to by a 4 post lift and just do not raise it all the way. All you really want to do is be able to safely get under your car and work on it with some comfort. Standing is ideal, but a good creeper is quite comfortable
Mark
Another superb RCR40 and good luck with the rest of the build. I get my RCR (in the UK) in about two months. Fran did tell me what tyres you fitted but I had a senior moment shortly after the telecon and forgot. Are they Avon or Michelin?
I also went for the blue/black, glad that I did epper:.
Best
John
Another superb RCR40 and good luck with the rest of the build. I get my RCR (in the UK) in about two months. Fran did tell me what tyres you fitted but I had a senior moment shortly after the telecon and forgot. Are they Avon or Michelin?
I also went for the blue/black, glad that I did
epper:.Best
John
Thanks, John. They are Avon and I really like how they fill the wheel wells and look on the BRM rims. Did you go for the +2" flair in the back? I think it gives the car better balance. I finished the fuel tank sendors and returns yesterday. I'm moving on to the a/c and should have that finished over the weekend. I'll post pictures later.
Mark
Mark
Mark
Thanks for the info. on the tyres. Yes, I have gone for the 2" flairs which Fran is fitting. To my eyes this is the best look of all in terms of elegance and just looks more balanced as an overall design than a full gulf car. Readily concede, however, that the gulfs look more awesome (I think thats the right term for your side of the pond") ) in a brutish sort of way.
) in a brutish sort of way.
Look forward to seeing more of your build.
Regards
John
Thanks for the info. on the tyres. Yes, I have gone for the 2" flairs which Fran is fitting. To my eyes this is the best look of all in terms of elegance and just looks more balanced as an overall design than a full gulf car. Readily concede, however, that the gulfs look more awesome (I think thats the right term for your side of the pond
) in a brutish sort of way.Look forward to seeing more of your build.
Regards
John
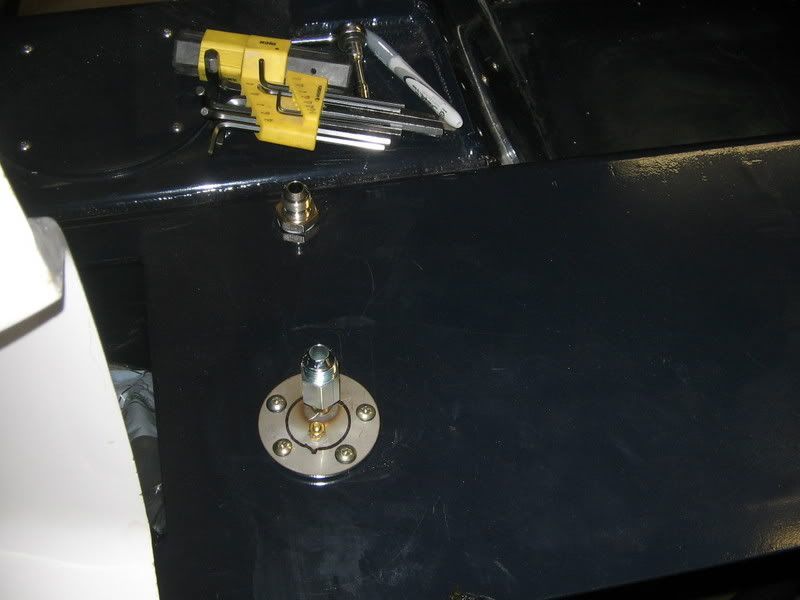
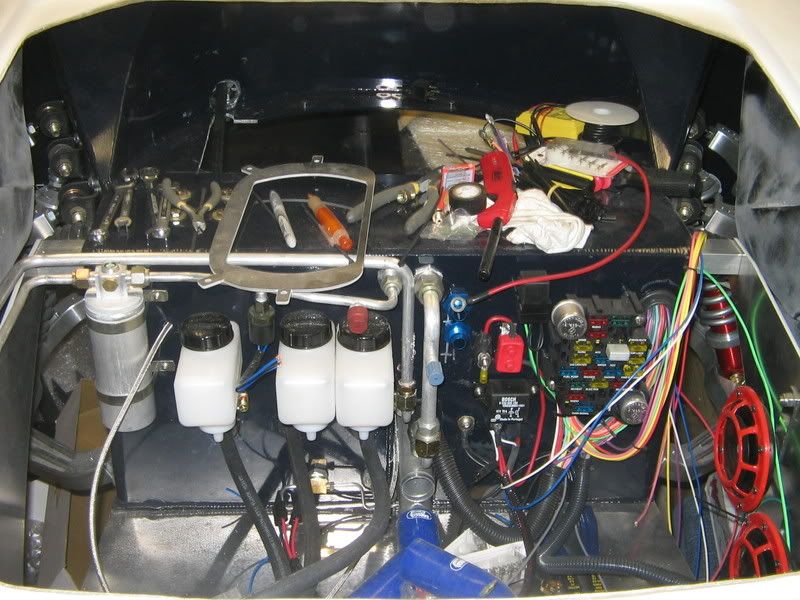
I've made quite a bit of progress over the last week. I installed the fuel tank senders, pick ups, and returns. I removed the stock ss pick up tube and replaced it with a 1/2 one. All of my lines to the fuel distribution block feeding the carbs will be 1/2" ss hard line, then 3/8" from there to the dual 4 barrel Holleys. Yes, a bit of overkill, but who wants to go lean on fuel at 7,000 rpm? Not me!
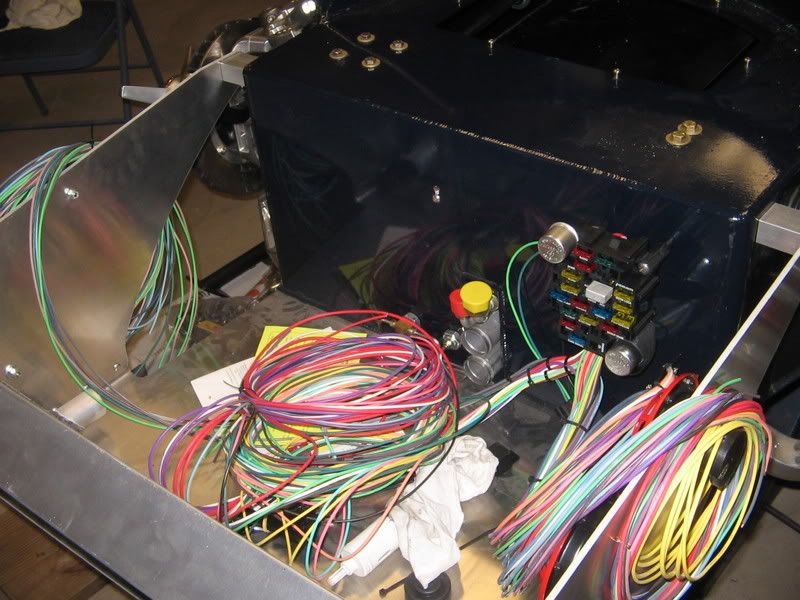
I also installed the fuse block and sorted the wiring harnesses. The one on the left feeds the front clip lights and fan relay. Center goes to the dash. The one on the right feeds the engine and rear clip. I still need to add wiring for the second fuel pump control and fuel tank sender. I also need to run a power feed to the front to feed the fan relay, but it is pretty well sorted.
Speaking of the dash, I rough cut the dash, laid out all the gauges and controls, and cut the holes for them. When the punk in the Honda turned in front of my coupe smashing the front clip, I couldn't find the horn and realized just how important a well thought out dash is when you don't have time to think about where the controls are located. The button horn in this dash is the furthest to the right at my finger tips and it powers two big Hella horns! It is amazing how events in our lives influence our decisions in the future.
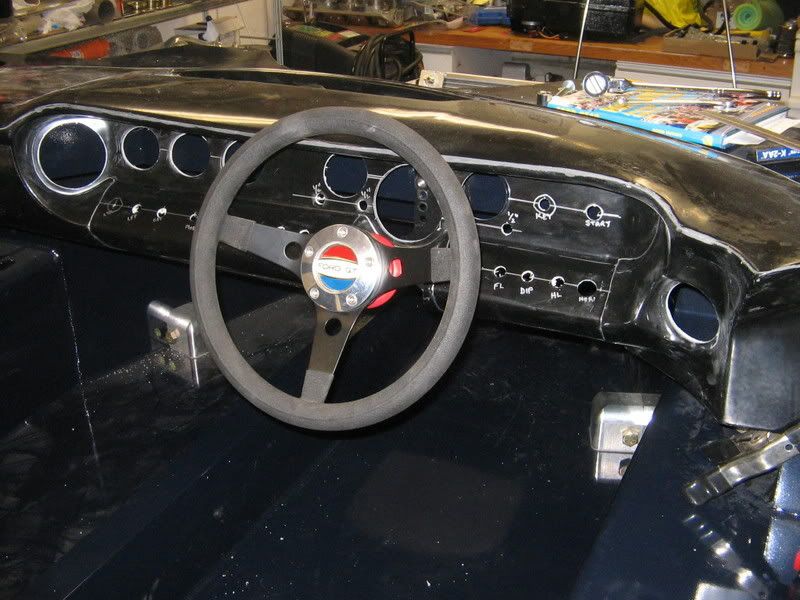
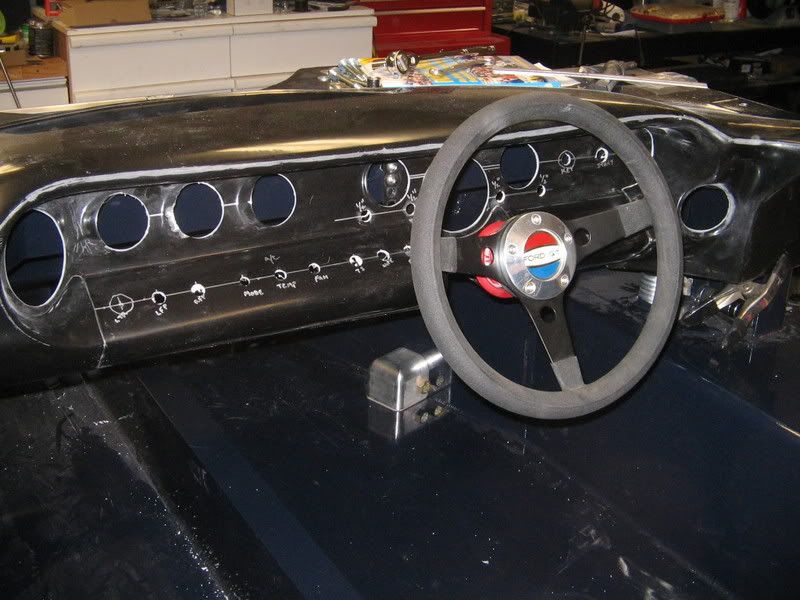
I'm not sure if you can see the silver lines outlining the gauge and switch area? I have a friend who has a process for plating anything in a variety of metals. It is real metal (aluminum, copper, chrome, etc.) and can be polished or clear coated if desired. I am going to have him coat the area in the outline and then paint the rest of the dash black. I need to first align the body panels so I can trim the dash around the A pillars and roll cage.
I also finished the installation of the rest of the suspension, steering rack, final placement of the steering shaft and wheel, and installed the a/c evaporator. I hope to finish the a/c install by the end of the week. That is if work stops getting in the way!
I also installed the fuse block and sorted the wiring harnesses. The one on the left feeds the front clip lights and fan relay. Center goes to the dash. The one on the right feeds the engine and rear clip. I still need to add wiring for the second fuel pump control and fuel tank sender. I also need to run a power feed to the front to feed the fan relay, but it is pretty well sorted.
Speaking of the dash, I rough cut the dash, laid out all the gauges and controls, and cut the holes for them. When the punk in the Honda turned in front of my coupe smashing the front clip, I couldn't find the horn and realized just how important a well thought out dash is when you don't have time to think about where the controls are located. The button horn in this dash is the furthest to the right at my finger tips and it powers two big Hella horns! It is amazing how events in our lives influence our decisions in the future.
I'm not sure if you can see the silver lines outlining the gauge and switch area? I have a friend who has a process for plating anything in a variety of metals. It is real metal (aluminum, copper, chrome, etc.) and can be polished or clear coated if desired. I am going to have him coat the area in the outline and then paint the rest of the dash black. I need to first align the body panels so I can trim the dash around the A pillars and roll cage.
I also finished the installation of the rest of the suspension, steering rack, final placement of the steering shaft and wheel, and installed the a/c evaporator. I hope to finish the a/c install by the end of the week. That is if work stops getting in the way!
Last edited:
Ron McCall
Supporter
Great job Mark!!!
Where did you get that steering wheel center??? I WANT ONE !!!
Where did you get that steering wheel center??? I WANT ONE !!!
Thanks, guys, it is a labor of love!
It just so happens that the Grant steering wheel boss is the same as the RCR wheel boss. I happened to have an old Grant horn boss, but you can get one here:
http://store.summitracing.com/partdetail.asp?autofilter=1&part=GRT%2D5875&N=700+400103+4294842689+115&autoview=sku
I then got the insert from Fran Kress, but you can also get one from Paul. He currently has a thread open in the interior section. Mine was a perfect interference fit into the Grant boss.
Here is a link to the thread that also contains Fran Kress' phone number:
http://www.gt40s.com/forum/gt40-tech-exterior-interior-trim/19815-gt40-steering-wheel-emblem.html
http://www.gt40s.com/forum/gt40-tech-exterior-interior-trim/19815-gt40-steering-wheel-emblem.html
The solution for my big feet
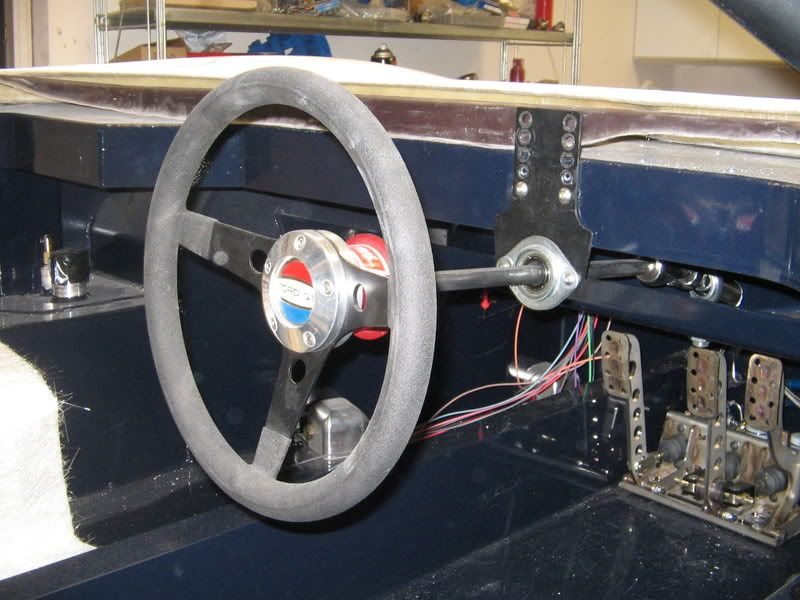
I have been working away, but haven't had much time to post pictures. Here is a shot of the front. The a/c is installed, about 50% of the wiring is done, and the brakes/pedal box are now installed.
One of my challenges (Randy take note), is that I have long legs and big feet (unfortunately, the rest of that old adage is not true). This provides a challenge in that the steering wheel position, dash height, seat position, and pedal location are critical. Fortunately, the RCR design provides ample room for a tall driver (I'm 6'4" and 230 lbs.) as it has an extended foot box and is 2" wider on the driver's side. The foot box allowed me to push the pedal set all the way down into the foot well. I then found the perfect position for the seat and dash. Two things then became apparent. First, in order to push the pedal set into the well, I end up with the accelerator pedal and brake pedal on either side of the steering shaft. Well my big feet then hit the steering shaft when I move from brake to accelerator and back. Unacceptable. Second, the angle of the steering wheel is tilted too far forward for my taste.
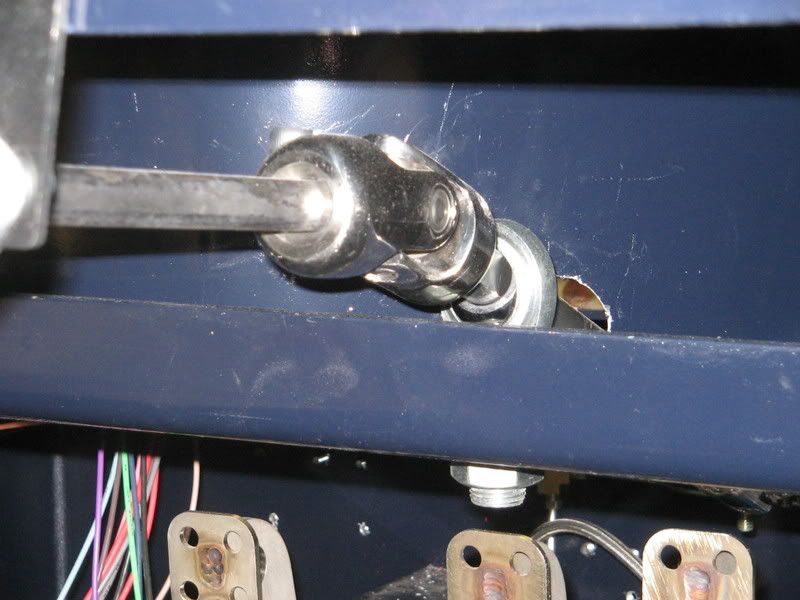
After some careful measuring and trial fitting, I found a single solution that address both issues. Originally in the RCR, the steering shaft goes under the chassis dash support, under the spare tire mount and connects to the rack inside the foot box. There is an adjustable bearing mount right behind the dash. The shaft passes through this bearing into a universal joint and the intermediate shaft then passes through a shaft support rod end pointing down just behind the spare tire tray. From there the intermediate shaft rides along the inside top of the foot box to the rack. This is where my big feet hit the shaft.
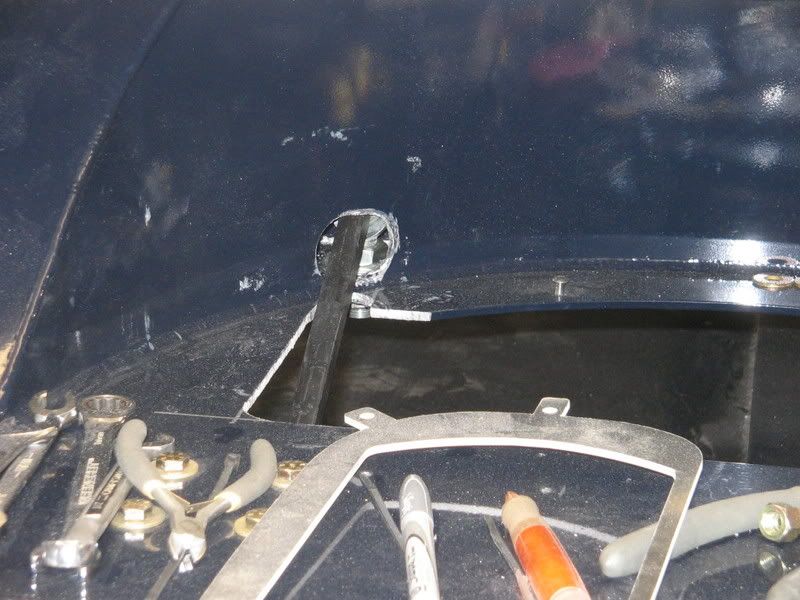
I found that if I reverse the rod end, pointing it up instead of down and drill an 1 1/2" hole through the back of the spare tire tray, I can move the intermediate shaft up out of the way. This also improved the steering wheel tilt and gives me a perfect fit with nothing in the way of my now very happy feet!
Here you can see the rod end reversed and now pointing up:
Here is the hole drilled in the back of the spare tire tray and the intermediate shaft now in the revised position:
And finally, here is the new steering wheel angle. The pedal set is pulled forward in this shot and not in its final position.
I am also going to put a 2" offset to the right on the accelerator pedal to give me additional clearance around the rack universal and better brake/go pedal control. I am currently welding up a cover for the shaft.
I'm having a blast building this car!
I have been working away, but haven't had much time to post pictures. Here is a shot of the front. The a/c is installed, about 50% of the wiring is done, and the brakes/pedal box are now installed.
One of my challenges (Randy take note), is that I have long legs and big feet (unfortunately, the rest of that old adage is not true). This provides a challenge in that the steering wheel position, dash height, seat position, and pedal location are critical. Fortunately, the RCR design provides ample room for a tall driver (I'm 6'4" and 230 lbs.) as it has an extended foot box and is 2" wider on the driver's side. The foot box allowed me to push the pedal set all the way down into the foot well. I then found the perfect position for the seat and dash. Two things then became apparent. First, in order to push the pedal set into the well, I end up with the accelerator pedal and brake pedal on either side of the steering shaft. Well my big feet then hit the steering shaft when I move from brake to accelerator and back. Unacceptable. Second, the angle of the steering wheel is tilted too far forward for my taste.
After some careful measuring and trial fitting, I found a single solution that address both issues. Originally in the RCR, the steering shaft goes under the chassis dash support, under the spare tire mount and connects to the rack inside the foot box. There is an adjustable bearing mount right behind the dash. The shaft passes through this bearing into a universal joint and the intermediate shaft then passes through a shaft support rod end pointing down just behind the spare tire tray. From there the intermediate shaft rides along the inside top of the foot box to the rack. This is where my big feet hit the shaft.
I found that if I reverse the rod end, pointing it up instead of down and drill an 1 1/2" hole through the back of the spare tire tray, I can move the intermediate shaft up out of the way. This also improved the steering wheel tilt and gives me a perfect fit with nothing in the way of my now very happy feet!
Here you can see the rod end reversed and now pointing up:
Here is the hole drilled in the back of the spare tire tray and the intermediate shaft now in the revised position:
And finally, here is the new steering wheel angle. The pedal set is pulled forward in this shot and not in its final position.
I am also going to put a 2" offset to the right on the accelerator pedal to give me additional clearance around the rack universal and better brake/go pedal control. I am currently welding up a cover for the shaft.
I'm having a blast building this car!
Ian Anderson
Lifetime Supporter
Mark
it looks excellent
I am 6'3" and would call you a lightweight! but with the DAX it gives an inch extra height so a bit easier for me to fit.
I do note however you do not seem to have a "dead" pedal / foot rest for the clutch foot. I likewise do not have one and it is tiring holding the foot off the clutch. (I have the rad pipes running side by side so the tunnel is lower and end up resting my foot on top of this when cruising)
So if you can fit a dead pedal it would probably be a good idea - possibly move all the pedals to the right to give space
Cheers
Ian
Nice work Mark (per usual)...
I was considering what I was going to do differently with mine after a conversation with another RCR owner..
I had considered an extremely elegant "Rope Steering" device but think that I might need something on the order of 1" hemp to take the side loading of the massive 225 tires...")
So - instead - I may just save the hemp for better purposes and swipe your idea!!!
I was considering what I was going to do differently with mine after a conversation with another RCR owner..
I had considered an extremely elegant "Rope Steering" device but think that I might need something on the order of 1" hemp to take the side loading of the massive 225 tires...
So - instead - I may just save the hemp for better purposes
and swipe your idea!!!Similar threads
- Replies
- 25
- Views
- 7K
- Replies
- 3
- Views
- 980