McCopy mk 5

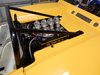
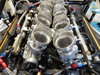
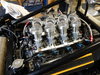
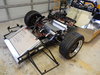
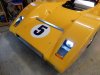
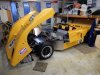
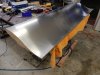
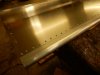
Well that`s the final panel / clip done now, only one run that should sand / polish out and if not then still got plenty of paint to blow a fourth coat over, better depth of colour anyway. Got good gloss and finish so all the effort is worth it, now for those decals...and then we had better start putting it on the road.
Cheers
 

Attachments

  • DSCN5788.JPG
    DSCN5788.JPG
    379.3 KB · Views: 492
  • DSCN5789.JPG
    DSCN5789.JPG
    372.3 KB · Views: 576
Just fitting in small jobs as time permits, been trying to come up with a solution to keep `stones` out of the TB`s and came up with this idea. Got some aly tube the dia of the TB trumpet flares and cut / turned ring up to accept the wire mesh. Turned a little seat in those rings so the the trumpet seated square and then proceeded to push pre cut squares of mesh into a piece of that pipe with a tennis ball. I then ran around the edge with a 1 mm cut off blade which gave me perfect mesh domes which will then be glued into the ring, onto the trumpet. Should look the part as there is not much room between them as they lay across the manifold at an angle.
Paint is all finished now and just waiting for my decals......then!
 

Attachments

  • DSCN5914.JPG
    DSCN5914.JPG
    194 KB · Views: 462
  • DSCN5915.JPG
    DSCN5915.JPG
    195 KB · Views: 480
Terry, good old Araldite. The rings are almost a press fit and could have survived being pressed on, the glue will also hold the mesh in place.
 

Terry Oxandale

Skinny Man
They look the part, no doubt! Wondering though, if I need to buy another couple of pairs of glasses if I were to try this. ;)
 
Last edited:
Well they actually fit! The trumpets still have the original shape / flare and the idea was to have as large a surface area as practical given the space restrictions. Fitted the LED lights to the rear clip and sat it back on the car. Starting to look finished now as I am moping up all the little small jobs that get left till last.
DSCN5918.JPG
DSCN5918.JPG
 

Attachments

  • DSCN5920.JPG
    DSCN5920.JPG
    183.2 KB · Views: 459
  • DSCN5917.JPG
    DSCN5917.JPG
    200.7 KB · Views: 403
  • DSCN5916.JPG
    DSCN5916.JPG
    200.5 KB · Views: 527
Spent the day doing all the little things that get left till last, installed and wired all the lights in the rear clip...and they worked! Tomorrows job is fit out the front clip with the head and park / side lights. Basically once I get my seat belts fitted, I can drive the thing. Weight looks like being sub 900kg just. As this is a road going venture, I have not worried about weight at all so am happy with that. I will give it a few laps of our block before I take it and get it wheel aligned then off to the final inspection and `rubber stamp`. I need to save some pennies to get the upholstery done....hope the tester has got a soft bottom!
 

Attachments

  • DSCN5928.JPG
    DSCN5928.JPG
    196.4 KB · Views: 437
  • DSCN5929.JPG
    DSCN5929.JPG
    194.5 KB · Views: 453
  • DSCN5930.JPG
    DSCN5930.JPG
    196.7 KB · Views: 446
  • DSCN5931.JPG
    DSCN5931.JPG
    190.2 KB · Views: 412
  • DSCN5932.JPG
    DSCN5932.JPG
    196.8 KB · Views: 474
  • DSCN5933.JPG
    DSCN5933.JPG
    191.1 KB · Views: 452
  • DSCN5935.JPG
    DSCN5935.JPG
    195.5 KB · Views: 447
  • DSCN5936.JPG
    DSCN5936.JPG
    194.3 KB · Views: 471
  • DSCN5938.JPG
    DSCN5938.JPG
    191.5 KB · Views: 483
  • DSCN5939.JPG
    DSCN5939.JPG
    192.4 KB · Views: 503
Grand opening...lights are on....somebody must be home.

Finally got the wiring sorted out, nothing works when there is no connection DOH.
Going to fit some gas struts as it`s a breeze working under the raised front clip.
Cheers
 

Attachments

  • DSCN5967.JPG
    DSCN5967.JPG
    383.2 KB · Views: 402
  • DSCN5970.JPG
    DSCN5970.JPG
    374.3 KB · Views: 449
  • DSCN5975.JPG
    DSCN5975.JPG
    184.2 KB · Views: 408
Bit of a milestone....had the VIN number supplied and fitted so its in the LVVTA system now, all I have to do is make it work....first drive once my seat belts arrive in a couple of weeks and then its the final check. WOF and rego all going well.
 

Attachments

  • DSCN5969.JPG
    DSCN5969.JPG
    411.2 KB · Views: 431
  • DSCN5984.JPG
    DSCN5984.JPG
    329.2 KB · Views: 430
  • DSCN5986.JPG
    DSCN5986.JPG
    265.6 KB · Views: 447

Brian Kissel

Staff member
Admin
Lifetime Supporter
Maybe you already did Russell. That car looks like it should fly just sitting there. Congrats on a job very well done.

Regards Brian
 
Well the big day finally arrived...a day later and just before it rained. Went to drive it out yesterday, all hyped up and it would not go into gear! I had previously ran it up on blocks with no drama so was a little confused. Long story short, after much thought, I removed the clutch rod in the trans and lengthened it 12 mm....hey presto we have selection, but time had run out. Today was meant to be wet so held no hopes. The day dawned grey and dry so when I felt that most of the neighbors were awake decided to go for it. The plugs are / were fouled so it was running rough as...still it drove nicely on the road for a brief run. All the work and effort now rewarded. I have down loaded the short video to You Tube under McLaren M8B Can Am replica first run. Not sure how to link it here. Next weekend it goes into the SPEEDSHOW here in Auckland, I have now displayed 3 times with the same model of car but 3 different versions. Hope it does not rain!
The wing is all built and ready to mount on once we are road registered, not going to push my luck with the inspection.
Cheers
DSCN5997.JPG
 

Neil

Supporter
Russell, if you replace those dome head blind rivets near the leading edge of your wing with countersunk rivets there will be less disruption of the airflow over the wing. Less drag, more down force.
 
Back
Top