
You are using an out of date browser. It may not display this or other websites correctly.
You should upgrade or use an alternative browser.
You should upgrade or use an alternative browser.
McLaren M8 B look alike
- Thread starter russell k
- Start date
--Run it dry--???--Only a VW ''expert" could come up with a daft idea like that, prefill the cooling system with --'warm' not boiling --water if you like & allow it to 'soak' for a few minutes before you fire it up. This can be very helpful if your still running press fit piston pins as it allows oil to reach these areas a bit quicker on initial startup.
I've used these magnetic heaters before to pre-warm the oil and the block;
.gif)
Although they obviously won't "stick" to an alloy block - the oil pan would most likely be steel.
I too would advise against running dry.
Curious about the mineral oil - I've never used it for break-in. If you can find some Shell Rotella (Truck) oil - it has copious quantities of ZDDP Zinc. If not I use just a standard 10w-30 motor oil with a couple of bottles of STP oil treatment in it. STP also has ZDDP. I run the first batch of oil long enough to break in the lifters, then dump it along with the filter - This gets rid of a lot of the assembly lube too. Another batch of oil with ZDDP to break in the rings - no more than 50-75 miles is required. Then dump and install Mobil-1 Synthetic for the long haul. Once the rings and lifters are seated, the engine is just slowly wearing out rather than wearing in..
Last edited:
JacMac, now you now why I asked about running it dry for the initial start up, I was not comfortable with that advice.
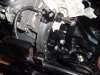
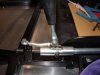
Sorted out the clutch now with the hydrolic`c fitted, 3/4 master to 3/4 slave and its an easy pedal. Fitting all the ancillaries now and its encouraging that all the assemblies fit correctly. All the water works are now connected so oil plumbing is next. The exhausts will get wrapped before install then maybe its time to hit the button. Basicly I want to get all the assembly done before I run it as I have it on a construction trolley giving a comfortable work height.
Cheers:thumbsup::thumbsup:
Attachments

Russell, if you can get the car a bit fwd on the trolley so that the cg is about midway on the trolley there shouldnt be any problems doing the initial start while still on the trolley, handy to be able to have an underside inspection for leaks etc as well. Just dont try any pretend race car driving while up there") dont want to read in tomorrows paper about a Can Am car parked in your neigbours front lawn surrounded by palm trees!!!
dont want to read in tomorrows paper about a Can Am car parked in your neigbours front lawn surrounded by palm trees!!!
dont want to read in tomorrows paper about a Can Am car parked in your neigbours front lawn surrounded by palm trees!!!Steve
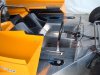
Its PPG IND. 48740 HYD EXCAVATOR YELLOW.
I will give you a ring when I have the offical fire up in about a month, bugger work getting in the way any way I got a good 12 hours this weekend.
Jacmac, thanks but I will feel more comfortable with it on the deck. I will need to get some big ribber pipes to fit over the exhausts, then I can thro a bit of water down them and keep it and the neighbours quiet.
Cheers
Last edited:
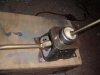
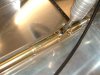
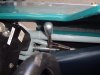
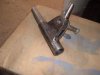
John, there are many ways of creating that gear shift, some of which I have attached. The one sitting on the box is one that I made as an exersize and have not used, you are welcome to that one as it would fit in a narrow space, and could be the basis of what you need. The methode I ended up using was a mixture of bits that ended up getting modified so that the throw was in the correct direction and its simple.
Cheers
Cheers
Attachments
Well it was time to hit the button and turn it over for the first time on the weekend how ever nothing happend appart from some fuses popping. Had the starter motor in and our several times and finaly got that to work and then spent about 4 hours tracing where the earth leak was. It turned out that the oil and alternator lights were earthing out and I was also getting a false reading thru the oil pressure switch to earth. After all this fuss was over I then tried for some oil pressure....even though I had filled all the hoses,filter and cooler, then run the pump up with a drill. I have given the pump a good whirl so am now trying JacMac`s litre bottle direct injection methode so will see what the morning brings. Basicly once I have pressure up and my headers are painted,then its noise noise noise.
You did a fine job Russell. Keep us posted on the break in. I am curious as to your how your spring rates will work in the discussion we had in the spring. Let us know how close you are when you start setting it up. Did you use Fred's chart?
Dave
Dave
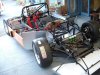
hi Russel , looks a million dollars mate ,hope all goes well with first fire.
i notice youve put R6 tyres on her, a word of warning , they dont like to much pressure, or they wont come up to temp, trust me been there, have them on my car and initialy set press same as i ran in DZOG's and couldnt keep it on the track, the more i let them down the quicker i went, but when hot they stick like the preverbial to a blanket.
cheers John
David / Jac Mac
Well first thing i noticed when it was on the ground was the permanent errection at the rear, those springs are just plain hard up. The fronts have just about the right amount of squat and the rear none. I know we worked the rate out in the begining at 350lb and I have just done the same again at 340lb so why so hard. Here is what I have done using the QA1 formula.
435mm inner to shock divided by 605mm inner to tyre cntr = .719 sqrd = .516 motion ratio.
Wheel weight 220lb each divided by .516 = 426 divided by my shock angle (27deg) factor .80 = 340 lb spring rate. I can stand on the car and bugger all efect, two of us and we can bounce it a bit so that is an effective 200 lb a wheel extra weight and it`s still hard. Talk about a staunch car. My origional calculation called for about 1,5 inches of droop at the rear to keep in touch with the track.
Any ideas, all measure weights in pounds as thats what the charts in so its easier.
Remember spring rate is per inch of spring compression, so if your spring is to be compressed say 1.5" at ride height and have an effective load of 340lb (NOT rate) then you should choose a spring rate that equals your calculated load when multiplied by 1.5. eg 226lb x 1.5 = 339lb.
I use a simplified calc for this and using the data you gave ended up with 381lb per spring which if divided by the 1.5 factor above would require springs with a 255lb rating.
Now you have to measure your shocks platform to platform at both ;fully extended and at what you consider to be your ideal/optimum rear ride height to get your spring compression distance in order to work this out. If you get a situation where the spring is going to drop away from the top platform @ full droop then some anti rattle/take up platforms might be reqd.
Jac Mac
By my own various best estimates, I `guessed` that they should be around that 250 lb mark also, and yes I did mean load at 350lb. I am waiting to borrow some scales to get an accurate weight before I try for some new ones. Ideally I will find some one with some 60mm id springs by 250mm long or even 200mm that I could try before I buy. I could even fit the 65mm bore ones just for a test.
I may have time 1st week in Sept. to call in so can you re send me your address thanks.
Cheers
That sounds like a good starting point Russell. You should get it on the scales and do a dry measurement and with a full load of fuel and try to average it out. Your shocks should be valved in the area for your spring rates. It's been a while since I have done any of this. I would check for tire scrub too when you start tweaking for uneaven wear on the inside or outside tread. That's a good indicator also.
Dave
Dave