Mclaren M8b replica (visual)

Hello
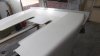
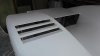
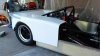
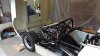
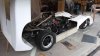
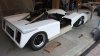
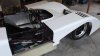
Last pics are showing the very very neat work you are doing !!!
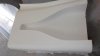
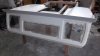
Effectivly one can understand,watching the quality of the plug on the last pic, the hudge work you did !!!! superb work indeed !!!
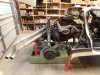
Very few people are able to achieve such nice work ; having done by the past many times, such tuff things I understand what you mean by "shit loads of sand paper"!!!!
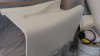
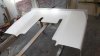
Your molds looks nice and you will get you surely nice parts from those.
Have good holidays !! Hope these will help you to recover from these hard monthes of horrible sanding and laminating with warm atmosphere .
Keep your good work when coming back and show us more then !!:thumbsup:

"Bonnes vacances" on the Murray River !
 
Last edited:
Wonderful work Russell, I have been away through the really hot months of Jan/Feb but I have heard its been pretty bad and to have done that during those hot humid months will take it out of any man. Enjoy your holiday and thanks for the insight and helpful info as I will start glassing soon and hopefully the hot times have past and I will probably have the cold to worry about.

Cheers Leon
 
3 months work and today I pulled the first door from the mould, all the hard work at getting a good finish has paid off as just minor fine sanding for the paint is all that's needed. Very happy.
Cheers
 

Attachments

  • DSCF3110.jpg
    DSCF3110.jpg
    86.2 KB · Views: 314
  • DSCF3114.jpg
    DSCF3114.jpg
    72.1 KB · Views: 275
  • DSCF3112.jpg
    DSCF3112.jpg
    93.2 KB · Views: 283
Hi Guys
Little to report from the shed, had 2 very pleasant weeks in Aussie doing the Murray river cruise and The Great Ocean Road drive, just happened to be there for the Phillip Island Classic Car meeting. Saw many cars that we never get to see in New Zealand along with a large field of F5000 cars...great sounds and sights.
I spotted a couple of cars that could interest you as I wandered around the pits.
I moulded the nose section the day before I left so its had plenty of time to cure in the mould so will pop it out tomorrow, it looks good so far.
Cheers
Russell
 

Attachments

  • DSCF3219.jpg
    DSCF3219.jpg
    153.5 KB · Views: 298
  • DSCF3258.jpg
    DSCF3258.jpg
    154.2 KB · Views: 304
  • DSCF3267.jpg
    DSCF3267.jpg
    182.6 KB · Views: 348
  • DSCF3274.jpg
    DSCF3274.jpg
    224.1 KB · Views: 337
Happy Easter
Look what the Easter bunny popped out for me, just pulled the tail mould out from its home this morning and all good, did not even need to use the compressor. The final product has shrunk 10mm from the buck so I will need to section the rear wing lip that I moulded on the buck itself. After a bit of cleaning up, I will retrieve the chassis from storage and mate them together.
All the moulds have survived with out any damage so more could be pulled. This time I will pay some one to spray them...be a hell of a lot easier, after more than 3 months of dust and smell, its great to see the light at the end of the tunnel.
Cheers
 

Attachments

  • DSCF3462.jpg
    DSCF3462.jpg
    159.7 KB · Views: 250
  • DSCF3463.jpg
    DSCF3463.jpg
    136.5 KB · Views: 227
  • DSCF3464.jpg
    DSCF3464.jpg
    102.2 KB · Views: 274

Terry Oxandale

Skinny Man
Great job Russell. Any chance that you could weigh each of these panels/doors? They look pretty light, and wonder if this could be a good place to lose some weight on my project.
 
Terry
I was aiming for a finished thickness of around 3mm and to achieve that, I had laid up 3 layer of 450gram chopped strand matt and only rolled the first layer with the grooved roller to express any air. The balance of the layers were just applied using a 120mm wide long haired paint roller because it was quick and easy to get an even coverage of resin. I cut out all the segments of cloth just like a seamstress to avoid any areas of double up so the only thicker areas are along the top outer radius of the body edge. I also numbered each layer 1.2.3 so that you could visually see where you were at in the process. I feel that if I had paid some one to spray the glass with a chopper gun it would have avoided that and we may have saved a little weight? Maybe a race car could go lighter but I did not think I could go much lighter than 3mm
The weights are as follows.
Nose 19kg
Tail 14kg
Doors 2.5 kg each
I was particularly pleased at how the front guard air vents worked out as they were a last minute addition to the mould.
Biggest lesson I learnt was that the Gelcoat needs to be applied quite thick and allowed to cure substantially otherwise you get a wrinkly reaction when you lay up your fiberglass.
Cheers Russell
 

Attachments

  • DSCF3465.jpg
    DSCF3465.jpg
    91.8 KB · Views: 253
Hi there
Could not resist it, brought the car down from storage and sat the rear clip on the car, fits real good only a fraction tight around the roll bar so about 10mm of easing will do it. I will dummy its position and then construct the rear tilt mounts as I am determined to be able to check the oil single handed this time.
Tomorrow I will sit the front clip in place and see where that fits. The wheel arches and side panels have purposefully been made larger so that other chassis can be accommodated.
Cheers
Russell
 

Attachments

  • DSCF3470.jpg
    DSCF3470.jpg
    172.2 KB · Views: 283
  • DSCF3467.jpg
    DSCF3467.jpg
    179.6 KB · Views: 286

Terry Oxandale

Skinny Man
Russell,

Your spoiler turned out real nice. I was planning on using foam inside of mine when I start on the spoiler this summer. Based on what you've done, and the forces this spoiler will see, do you see any reason I should need to use the foam?

Terry
 
Sorry
but the moulds have been made purely for future security, they are not for mass production.

Terry
I did use high density marine boat construction foam and then covered it with 2 layers of Dynel Cloth. I cut the shape on my saw bench and then stuck the shape onto the waxed mould using bondifil. It sticks quite good providing you don't get to physical whilst glassing it, once glassed its then just a case of popping it off and hey presto...a wing. 4 layers would give an immensely strong structure.
Have spent all day today lining up the rear body section and constructing the pivots to tilt the rear. When I made the buck, I kept the bottom line of all my parts the same and that has helped line everything up. Shrinkage and some distortion around the door vents has caused some juggling but will all fit together eventually.
Regards
Russell
 
Hi there
A full day and a half of looking measuring and juggling to make it fit before any cutting what so ever. Quite hard when you have 4 elements that have an amount of flex so eventually got some progress with the back clip tilting as I wanted. The last car took two people to remove the rear clip just to check the oil. About the only area where I have had to do some chopping is the front radiator exit bottom form, it was quite hard taking measurements whilst making the plug to ensure that the scoop under the radiator exit was low enough so I will need to fabricate some alloy panel there and also in under the nose to push all the air flow thru the radiator.
Once I have the nose clip fully mounted, then I will mate the doors into the correct space(both nose and tail are set up to the correct height and length). Once all this work has been done it will then be onto sand and prime, am going to try and borrow a proper spray booth this time.
Club shed raid tomorrow so no work.
Cheers
Russell
 

Attachments

  • DSCF3475.jpg
    DSCF3475.jpg
    204.8 KB · Views: 249
  • DSCF3476.jpg
    DSCF3476.jpg
    189 KB · Views: 401
  • DSCF3473.jpg
    DSCF3473.jpg
    183.9 KB · Views: 282
  • DSCF3474.jpg
    DSCF3474.jpg
    155 KB · Views: 279
Forrest
Sorry but as you will see, whilst I have got very a good surface to work from, there is still considerable detail to be added that I could not put into the mould. Side scoops, door fitments and front radiator air inlet details.
There is an English company selling these body`s commercially which would be a better buy.
Regards
Russell
 
Got a link to them? Thanks.

I'm cutting and stretching my Kelmark this month for a new drivetrain of my own devising - the Corvair transaxle is just too fragile to play hard!
 

Attachments

  • P4030032.JPG
    P4030032.JPG
    107.6 KB · Views: 291
  • Kelmark CAD.JPG
    Kelmark CAD.JPG
    87.7 KB · Views: 274
Back
Top