
A little more progress.
Installed the rear number plate lights
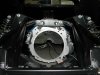
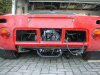
Installed cover plates to hide the access holes I made for the rear downforce plate
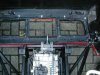
Installed the rear wiring loom
Fixed large grommets for rear number plate lamps (For easier access to the nuts at the rear)
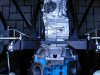
Fixed the centre loom to the drivers side pontoon
Labelled the Dash loom the best I could and laid it in position
Front loom also laid in position
Pipe fixed in drivers pontoon to carry accelerator cable, clutch and brake pipe.
Martin
Installed the rear number plate lights
Installed cover plates to hide the access holes I made for the rear downforce plate
Installed the rear wiring loom
Fixed large grommets for rear number plate lamps (For easier access to the nuts at the rear)
Fixed the centre loom to the drivers side pontoon
Labelled the Dash loom the best I could and laid it in position
Front loom also laid in position
Pipe fixed in drivers pontoon to carry accelerator cable, clutch and brake pipe.
Martin
![Rear Loom [640x480].JPG](/data/attachments/20/20392-5eaf8774d3587f75cd09fb197c2bedd5.jpg?hash=Xq-HdNNYf3)
![Drivers side pontoon [640x480].JPG](/data/attachments/20/20391-201f90435dbe2909834bc2a00b3bcd4c.jpg?hash=IB-QQ12-KQ)
![DSCN2808 [640x480].JPG](/data/attachments/20/20393-3f8601bdd613d5e5fdbb10e9edb2b405.jpg?hash=P4YBvdYT1e)
![DSCN2811 [640x480].JPG](/data/attachments/20/20394-5bd1183bb31e6c047e38b6a4dcf08167.jpg?hash=W9EYO7MebA)
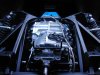
![Engine bay wiring Loom[640x480].JPG](/data/attachments/20/20690-afe1fadb3a54bd6b19e83f5abe5a9868.jpg?hash=r-H62zpUvW)
![Access Hole[640x480].JPG](/data/attachments/20/20691-b766ac2a11083390a1fcc42b11c8c168.jpg?hash=t2asKhEIM5)
![Blank Plate[640x480].JPG](/data/attachments/20/20692-464618f70d1062f9d86074be98a17e9c.jpg?hash=RkYY9w0QYv)
![DSCN2974 [640x480].JPG](/data/attachments/21/21494-fa4c0a8c41d9d4113fe8f592cb741a7c.jpg?hash=-kwKjEHZ1B)
![DSCN3103 [640x480].JPG](/data/attachments/22/22016-51f8bb12bc720aedbc2a3820b863a71a.jpg?hash=Ufi7ErxyCu)
![DSCN3113 [640x480].JPG](/data/attachments/22/22076-c3c16ab59a6cc4ad8c4571f39c00dc98.jpg?hash=w8FqtZpsxK)
![DSCN3118 [640x480].JPG](/data/attachments/22/22078-d53219e975be4e987c6e3320d7cec6ca.jpg?hash=1TIZ6XW-Tp)
![DSCN3117 [640x480].JPG](/data/attachments/22/22077-5548fac9ee1ab6bae69478c420dfc1e3.jpg?hash=VUj6ye4atr)
![DSCN3115 [640x480].JPG](/data/attachments/22/22079-0a959a7eab7e37ec5bf226366f0f5f22.jpg?hash=CpWafqt-N-)
![DSCN3104 [640x480].JPG](/data/attachments/22/22080-335053266c4ead1070aa5b5266f80b5d.jpg?hash=M1BTJmxOrR)
![DSCN3105 [640x480].JPG](/data/attachments/22/22081-c071386cbba1e461aedf3bbe371bd97c.jpg?hash=wHE4bLuh5G)
![DSCN3106 [640x480].JPG](/data/attachments/22/22082-a45b62395e01a6bf608b9981c6475b76.jpg?hash=pFtiOV4Bpr)
![DSCN3107 [640x480].JPG](/data/attachments/22/22083-73f29cfde3585f325b3ca4be26a2dbcd.jpg?hash=c_Kc_eNYXz)
![DSCN3111 [640x480].JPG](/data/attachments/22/22084-a2db47631a319af5c1372a9d751794ff.jpg?hash=ottHYxoxmv)
![DSCN3110 [640x480].JPG](/data/attachments/22/22085-4bd7b15cb877fd72a644041e348886b5.jpg?hash=S9exXLh3_X)
![DSCN3109 [640x480].JPG](/data/attachments/22/22086-c9db67d149186bed84d3151933d22312.jpg?hash=ydtn0UkYa-)
![DSCN3182 [640x480].JPG](/data/attachments/23/23230-d64939ba53f42ccbfe6a686728dda776.jpg?hash=1kk5ulP0LM)
![DSCN3183 [640x480].JPG](/data/attachments/23/23231-b4b177b00a70256aeda2c99145c55095.jpg?hash=tLF3sApwJW)
![DSCN3180 [640x480].JPG](/data/attachments/23/23232-08c2751a58a2105903568cde176bd89d.jpg?hash=CMJ1GliiEF)
![DSCN3178 [640x480].JPG](/data/attachments/23/23233-8312f5aa0266ecc630fcab6fbe4321a9.jpg?hash=gxL1qgJm7M)
![DSCN3313 [640x480].JPG](/data/attachments/24/24628-917ad9b01845aa31e4a02ab0fc594b7e.jpg?hash=kXrZsBhFqj)
![DSCN3315 [640x480].JPG](/data/attachments/24/24630-483fe875167c38cce9279df67346d81c.jpg?hash=SD_odRZ8OM)
![DSCN3314 [640x480].JPG](/data/attachments/24/24629-5029b75b9f2a69e6e024bacdb5aa982a.jpg?hash=UCm3W58qae)
![DSCN2669 [640x480].JPG](/data/attachments/24/24627-dd89e6583c2379686f2f5caae1f8441b.jpg?hash=3YnmWDwjeW)
![DSCN3317 [640x480].JPG](/data/attachments/24/24679-d98068ae47302e1c32f88725abde9fbb.jpg?hash=2YBorkcwLh)
![DSCN3318 [640x480].JPG](/data/attachments/24/24680-99932cc345ba4a7dfa97f659f14fe045.jpg?hash=mZMsw0W6Sn)
![DSCN3319 [640x480].JPG](/data/attachments/24/24681-ac263f7170850a2e2bd51b07c9556a0d.jpg?hash=rCY_cXCFCi)
![DSCN3320 [640x480].JPG](/data/attachments/24/24682-479c6c2ce6afe9a868a04e77d0a70f33.jpg?hash=R5xsLOav6a)
![DSCN3321 [640x480].JPG](/data/attachments/24/24810-cd7bac5beeffc6de4c43950f42cbc28e.jpg?hash=zXusW-7_xt)
![DSCN3327 [640x480].JPG](/data/attachments/24/24822-bf9a56f93d2b188eaefd6be8b7ddb884.jpg?hash=v5pW-T0rGI)