
You are using an out of date browser. It may not display this or other websites correctly.
You should upgrade or use an alternative browser.
You should upgrade or use an alternative browser.
MDA Mk1 with Gulf Arches - Martin P
- Thread starter Martin Potts
- Start date
Andy,
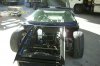
The front ducts were formed in three sections. The middle section is a piece of plastic air ducting from the local DIY store, cut in half lengthways, then cut to size. For each end I made up a cardboard template then formed over it with very fine aluminium mesh. The very fine stuff you can mould and bend easily. Then I just laid up glassfibre over the mesh. I then loosely attached all three pieces until everything lined up and pointed in the right direction, screwed them together, then finally glassed over the entire duct and removed the screws. I did a lot of alignment in situ before finally glassing it all together. If you take a look at my previous pages, you'll see that quite a while ago I formed the holes at the front of the car into oval ducts. The idea being that I could make the long ducts sit ontop of these and direct all the air into this duct and onto the brakes.
Bill,
Thanks. I can't wait for paint either but I have a lot of work to do before that.
Cheers,
Martin
Attachments
![Forming the ducts[640x480].JPG](/data/attachments/18/18521-bd99a788ec67fff1fb67d1a2f586889d.jpg?hash=vZmniOxn__)
Hi Martin,
thanks for the feedback, your method certainly gives a give result. I was wondering if there was a way where you make the final shape out of a 'foam' laminate the external surface with fibreglass and then dissolve or break out the original mould
Regards
Andy
thanks for the feedback, your method certainly gives a give result. I was wondering if there was a way where you make the final shape out of a 'foam' laminate the external surface with fibreglass and then dissolve or break out the original mould
Regards
Andy
Chris Kouba
Supporter
Andy,
With apologies to Martin on thread drift, there are a few pics on this post from my build thread regarding flare extensions I made.
Subsequently I have made ductwork for brake ducts as Dean Lampe did as well as a manifold to enable functional NACA ducts on the front clip. These I made from foam and "laminated" with tape. Surface finish suffered but was non-critical. I also have them to use again should I need to (but hopefully won't have to).
Process is just as straightforward for this method as well. I'd bet our results are very similar as well.
Cheers!
Peter Delaney
GT40s Supporter
Hi Martin, nice work on closing the gaps - you will definitely appreciate the lack of road debris in the front !
The DRB has f/glass panels which cover the sides of the front frame & then extend out & up to achieve the same thing as you have done. For the 1st few hundred kms, I ran the car without a rubber seal on the top of these lips, & even with only a 1/4" gap there, it pulled in all manner of cr*p from the road. Once the soft rubber seals went in, all was solved.
The attached pic from way back shows these panels.
I recently decided to open up the NACA ducts on the front guards, & used some advice from Hayden M for making up the under-guard duct extensions - just use some lead sheeting for the mold. My duct extensions are only some 8" long (final destination TBA), but were dead easy to set up with the lead - just finger-tip pressure required to get the final shapes, & a few taps with a block/hammer to get nice flat surfaces. Once the glass had set, the lead sheets came away easily.
Kind Regards,
Peter D.
Attachments
Thanks peter,
I'd never seen those front extensions before. I feel more comfortable now the gaps are closed.
Here are two photos of the original rear ducting I've also installed. I've extended the inner arch and added a weather strip. This closes down on the sill extensions I made earlier and forms a good seal so no dirt and muck can get onto the fuel pumps etc.
Attachments
![Rear Ducts[640x480].JPG](/data/attachments/18/18710-6d34958c5925e248d0203b2dac0fba9a.jpg?hash=bTSVjFkl4k)
![Rear Ducts1[640x480].JPG](/data/attachments/18/18711-787926fad9d1f28b54b7b0af9b6dd470.jpg?hash=eHkm-tnR8o)
Some pics of the rear downforce plate I had fabricated. Chris Martino kindly sent me a template which I had fabricated in 4mm Aluminium plate. I cut all the slotted holes and the vent holes myself once I could offer it up to the car.
Cheers,
Martin
Cheers,
Martin
Attachments
![Rear Downforce plate [640x480].JPG](/data/attachments/19/19285-4ad325791fa65af88dcd4f0b57db9cf6.jpg?hash=StMleR-mWv)
![DSCN2638 [640x480].JPG](/data/attachments/19/19286-934be2a694deeeacb01953a72b3f81f7.jpg?hash=k0vippTe7q)
![DSCN2639 [640x480].JPG](/data/attachments/19/19287-9b5579e4a42789cf34c34f174883d3ce.jpg?hash=m1V55KQnic)
Very nice Martin, you'll have a real gem after all your hard work!
Cheers
Chris
Cheers
Chris
Peter Delaney
GT40s Supporter
Martin, that rear deflector looks so "business-like" - a great addition !
The ducting under the rear deck looks like it was fun to fabricate - not !! But the end result looks good & should work a treat.
A quick note on a comment you made quite a while ago regarding opening up the front NACA ducts - I have just completed this exercise & found it to be "non-trivial". With your experience so far, you would have no trouble making up the under-clip ducting - but the challenge that I found was in getting the new ducting extensions to merge nicely with the original (& highly visible) NACA ducts. Cutting the opening at the back of the NACA was done with a drill & a Dremmel, then a lot of hand sanding. Blending the "floor" & "sides" of the NACA duct with the extension duct was just plain hard work - repeated layers of tiny bits of f/glass & resin, heaps of hand sanding in the most difficult places to get at.
However, I reckon that it was worth the effort in terms of "looks" - but my advice would be to do it now, rather than later.
Kind Regards,
Peter D.
Hi Peter,
I would do it now, but I've been told it opens a can of worms with our retrictive SVA test. My idea is to build the car and get it through the test but without paint. Then when I've passed SVA, get the mod done and send it to paint but I'll have a good think about it before I get too far in.
Cheers,
Martin
Ian Anderson
Lifetime Supporter
Martin
Mine were open for the side NACA ducts at SVA - no problem.
There may be a sharp edge on the "inside" of the duct but unless he can get his "ball" tool in there there is no problem.
Get an expanded polystyrene cistern ball and roll it over the area. The only area he can question is where it actually makes contact.
Ian
Peter Delaney
GT40s Supporter
Hi Martin - now I understand - the dreaded SVA "radius test". And I thought that our RTA here in NSW/Oz were the consumate bastards in terms of thinking up totally stupid rules !!
However, as Ian mentioned, there should not be a problem inside the NACA duct entrance - way too small a space to deal with.
If only I knew what we all know now - build the car "sans paint", get rego, then go play - hindsight is always 20:20 !!
BTW, you might like to ask the SVA tester to double-check the radius of your injection trumpets - just make sure that you give the throttle a kick when he drops one of his balls in the top !!!
Kind Regards,
Peter D.
![DSCN2705 [640x480].JPG](/data/attachments/19/19806-3df36ca54dce09f3287692024a529adc.jpg?hash=PfNspU3OCf)
![DSCN2706 [640x480].JPG](/data/attachments/19/19807-fdd2002574e0f08def9656879f4c2a79.jpg?hash=_dIAJXTg8I)
")
![After [640x480].JPG](/data/attachments/20/20352-d3d911b7b64bddaf8e70e0a27d7d0b7e.jpg?hash=09kRt7ZL3a)
Similar threads
- Replies
- 14
- Views
- 5K
- Replies
- 4
- Views
- 4K