
You are using an out of date browser. It may not display this or other websites correctly.
You should upgrade or use an alternative browser.
You should upgrade or use an alternative browser.
MDA Mk1 with Gulf Arches - Martin P
- Thread starter Martin Potts
- Start date
Brett James-McCall
Moderator
Rob,
When I finally get to IVA, I plan to use some switch guards like the Mini has (Car Builder also sells them), and then fix the situation afterwards. Though I will make my own, and have soemthing similar for the gauges as well.

When I finally get to IVA, I plan to use some switch guards like the Mini has (Car Builder also sells them), and then fix the situation afterwards. Though I will make my own, and have soemthing similar for the gauges as well.

Sorry for thread drift Martin.
Brett
Brett
Hi Rob,
At the moment I'm installing the switches as I want them, but for IVA there are certain ones that need to be grouped within the confines of the steering wheel shadow, if you know what I mean. My switches are mounted on a removalble plate. The idea is that I will have an IVA plate made up just for the test, probably with rocker switches on, then substitute it back for the toggle switch plate when through the test. I'll have to also remove items like the fire extinguisher pulls, bias brake adjuster and other non compliant stuff.
Brett, no problem its all good stuff. Congrats on the new addition by the way.
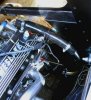
I had fun with the air con system today, running pipes and connectors. I bought some bulkhead connectors so I wasn't running pipes from the inside to the outside in one run. Thought that would make it easier to change them in the future and make for a neater installation. I'll have them crimped when I get the compressor and do it all at the end.
Martin
At the moment I'm installing the switches as I want them, but for IVA there are certain ones that need to be grouped within the confines of the steering wheel shadow, if you know what I mean. My switches are mounted on a removalble plate. The idea is that I will have an IVA plate made up just for the test, probably with rocker switches on, then substitute it back for the toggle switch plate when through the test. I'll have to also remove items like the fire extinguisher pulls, bias brake adjuster and other non compliant stuff.
Brett, no problem its all good stuff. Congrats on the new addition by the way.
I had fun with the air con system today, running pipes and connectors. I bought some bulkhead connectors so I wasn't running pipes from the inside to the outside in one run. Thought that would make it easier to change them in the future and make for a neater installation. I'll have them crimped when I get the compressor and do it all at the end.
Martin
Attachments
![DSCN3832 [640x480].JPG](/data/attachments/29/29172-ffad79ff8f920fd37d25f73a21f64e9e.jpg?hash=_615_4-SD9)
![DSCN3833 [640x480].JPG](/data/attachments/29/29173-26d0c9be306b3a32099c118e0d2228d7.jpg?hash=JtDJvjBrOj)
![DSCN3834 [640x480].JPG](/data/attachments/29/29174-ac8b0b708ef98a36127c6079c3a82ec5.jpg?hash=rIsLcI75ij)
![DSCN3831 [640x480].JPG](/data/attachments/29/29171-3c913e422128415c9cce29ccccbb628c.jpg?hash=PJE-QiEoQV)
I decided to make a bit of a better job on the split ducts I have on the rear clip. I've blended the ductwork into the body so I can paint farther back into the duct.
Martin
Martin
Attachments
![DSCN3873 [640x480].JPG](/data/attachments/29/29310-50f5924bc22b7e5599d96365b3d06375.jpg?hash=UPWSS8Irfl)
![DSCN3874 [640x480].JPG](/data/attachments/29/29311-47c21797514ab68b78783317f5165c31.jpg?hash=R8IXl1FKto)
![DSCN3875 [640x480].JPG](/data/attachments/29/29312-a10753354c9b03fce2638b433d45af6f.jpg?hash=oQdTNUybA_)
My engine builder called me yesterday with some interesting news. The last time the engine ran on dyno it was producing 446 BHP which I was very happy with. It had some small issues and so the rockers were changed and the inlet manifold had a bit of machining done on it. He re tuned it and it was ran again on the dyno last week for an hour to check everything one last time. Good job he was being so thorough, as he found a small water leak in one of the head gaskets. Nothing bad but he needs to now strip one head off and replace it. Not a big deal but more time and I've been waiting a long time for this motor.
Now the one interesting result was that when he ran it on the dyno, he managed to eek out a fair bit more power. It's now running at 504 BHP which to me was far more than I was bargaining on. Haven't seen the dyno sheet and it was only a brief conversation so I don't have many more details and I forgot to ask about the torque figures.
Unfortunately I'm now away on business again so I'll have to wait for delivery until I come back.
Martin
Martin:
Looking great, Nice fitting of AC lines, I am watching to see how your side ducts come out as I was contemplating the same treatment. I noticed the speedo you had fitted, looks like an electronic unit with LCD display for elapsed miles. I was wondering what unit that was and if you had any problems on the fitting of the sensor.
Cheers
Phil
Hi Phil,
Don't worry, I'll keep posting progress so you can see how it all turns out. The speedo is indeed an electronic one. I'm yet to fit the sensor. First I need to get the engine in, then fit the hydraulic clutch release mechanism to box, then fit gearbox, make up support brackets and driveshaft adaptors, then I'll be mounting the sensor. I'm just waiting for the engine to get all this started.
Cheers,
Martin
Martin,
Sounds like good progress for sure. I was contemplating using my sensor on a front wheel. I know it sounds a bit unconventional but it has been done before, and by my calculations I will
get approx 7000 pulses per mile, I just need to see if the sensor will pick up the bolt heads on the rotor hat (8). I think it will simplify wiring as my center tunnel is getting quite busy.
If it doesn't work there's always the hubs on the gearbox. If it works I will post photos.
Cheers
Phil
After a long long wait I am now the happy recipient of my engine. Mark Sibley delivered it over the weekend and we both fitted it together. It's a beautiful piece of kit. I can now, at last, make some real progress with the car. I've not stopped smiling since. I am so relieved that Mark came through for me in the end.
Martin
Martin
Attachments
![DSCN4167 [640x480].jpg](/data/attachments/31/31604-af5a40ef82b57eb7254d381e654081c2.jpg?hash=r1pA74K1fr)
![DSCN4168 [640x480].jpg](/data/attachments/31/31605-303e4614348cdf90ff241ef47b21cadb.jpg?hash=MD5GFDSM35)
Today I fitted the clutch, made some measurements for my hydraulic clutch bearing then trial fitted the transaxle and exhaust. No major clearance issues, just some tweeking required. It's great to see all the major pieces mated together. I attached the rear bodywork last thing but it was too dark to take pictures.
Martin
Martin
Attachments
![DSCN4177 [640x480].JPG](/data/attachments/31/31663-50f9d8615775f2571276ca3c3be628c5.jpg?hash=UPnYYVd18l)
![DSCN4184 [640x480].JPG](/data/attachments/31/31664-091f7b24c1d04e65a7184ed850629bc1.jpg?hash=CR97JMHQTm)
![DSCN4186 [640x480].JPG](/data/attachments/31/31665-e22298283fd739556cb690a4fc097baa.jpg?hash=4iKYKD_XOV)
Great progress Martin, inspiration for other MDA owners for sure! Hope a test drive is in the near future... ")
Chris
Chris
![DSCN4204 [640x480].JPG](/data/attachments/31/31795-2cb59b2db1934cc6bdd79ea1e046bada.jpg?hash=LLWbLbGTTM)
Finished installing all the remaining cooling pipes today. I got the majority of the hoses in black silicone to go with my basic theme of black and silver.
The only blue hose is the reducer which I couldn't get easily in black.
I also offered up both front and rear anti roll bars. I don't have all the items needed to finally fit them yet so they are just placed in position.
I also looked at the routing for the main ECU harness.
Martin
The only blue hose is the reducer which I couldn't get easily in black.
I also offered up both front and rear anti roll bars. I don't have all the items needed to finally fit them yet so they are just placed in position.
I also looked at the routing for the main ECU harness.
Martin
Attachments

Thanks Garry, I'm certainly looking forward to that day.
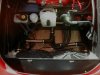
Latest progress. Decided on the location of the swirl pot. It's directly in the draft from the side vent. I've also loosely installed the high pressure pumps and on the passenger side under the pontoon, i've also positioned the low pressure pump, filter and regulator. Also run most of the lines with the exception of the bulkhead fittings, which I still need to get.
+ a couple of pics taken today in the sunshine. The one showing the rear shows my finished rear Le mans vents which I had meshed and powder coated black.
Martin
Attachments
![Low pressure pump[640x480].JPG](/data/attachments/32/32168-93c283f5db2fe63d1c10a5526bd73e2a.jpg?hash=k8KD9dsv5j)
![Swirl Pot [640x480].JPG](/data/attachments/32/32169-1dde8d0b0672088a400395284fb1d8ea.jpg?hash=Hd6NCwZyCI)
![Fuel lines [640x480].JPG](/data/attachments/32/32170-3b7d666699a91c63598bd5126bb74003.jpg?hash=O31mZpmpHG)
![DSCN4245 [640x480].JPG](/data/attachments/32/32171-99b29b734d746e66870dc7af732c209e.jpg?hash=mbKbc010bm)
![DSCN4248 [640x480].JPG](/data/attachments/32/32172-c038dbc69a982bf1181300c7dc60b24f.jpg?hash=wDjbxpqYK_)
Hi Martin
you are doing a fantastic job, your detailing is excellent, I do like your special touches like the split side intakes,your motor and trans look fab, bet your chuffed with the HP,look forward to meeting you again with the 40 I hope soon,
cheers
John.:thumbsup:
you are doing a fantastic job, your detailing is excellent, I do like your special touches like the split side intakes,your motor and trans look fab, bet your chuffed with the HP,look forward to meeting you again with the 40 I hope soon,
cheers
John.:thumbsup:
Hi Martin ,
It was good to meet you last week and have a look at your 40 if you want a aluminium reducer to replace the blue, F.O.C please let me have the details,
Exhaust looking GOOD will post pictures soon.
regards Bryn
It was good to meet you last week and have a look at your 40 if you want a aluminium reducer to replace the blue, F.O.C please let me have the details,
Exhaust looking GOOD will post pictures soon.
regards Bryn
Thanks John, thanks Bryn. I may well take you up on the offer of the ali reducer.
Today I fitted my high pressure pumps. I went for some rather expensive brackets to set them off nicely as the ones I got with them were poor. These came with sound reducing jackets too.
Martin
Today I fitted my high pressure pumps. I went for some rather expensive brackets to set them off nicely as the ones I got with them were poor. These came with sound reducing jackets too.
Martin
Attachments
![DSCN4295 [640x480].JPG](/data/attachments/32/32440-2836830fde363439a85c6cd676b59323.jpg?hash=KDaDD942ND)
![DSCN4296 [640x480].JPG](/data/attachments/32/32441-0bbbfe422ae164675500cab00028442a.jpg?hash=C7v-QirhZG)
Made a start on the rod gear change set up. Located the front bracket assembly and cut the hole for the gearstick through the sill. Then located the next bracket and fixed it in position connecting the rods and UJ's to get the position for the next cut out in the chassis panel just behind and below the engine mount. The next part will be the tricky bit, but I don't yet have all the parts to complete.
I've also found a convenient location for the Motec ECU. It is completely hidden from view.
Also installed hand held fire extinguishers for driver and passenger.
I've made sill ribs from extruded aluminium and these will be powder coated black so as to match the sill panel. I'll attach the fuel blanking plates and sill ribs once I am sure of the full throw of the gearstick as I want enough space in that area to make a proper gate for the gearstick.
Positioned the catch tank, started finishing the door bins and added a reflector to the door.
Attachments
![DSCN4307 [640x480].JPG](/data/attachments/32/32870-1d7c5f057311a02dd8079060b51eb052.jpg?hash=HXxfBXMRoC)
![DSCN4309 [640x480].JPG](/data/attachments/32/32871-e2c11b327b2b6df7e6b3cc0a7702ba2f.jpg?hash=4sEbMnsrbf)
![DSCN4308 [640x480].JPG](/data/attachments/32/32872-1704662016dcf679624e344eac84fae2.jpg?hash=FwRmIBbc9n)
![DSCN4314 [640x480].JPG](/data/attachments/32/32873-6fe208e5f9bceda01ace8057fe70843e.jpg?hash=b-II5fm87a)
![DSCN4315 [640x480].JPG](/data/attachments/32/32874-632009e1cc978f9d9bf5efa3526b1213.jpg?hash=YyAJ4cyXj5)
![DSCN4313 [640x480].JPG](/data/attachments/32/32875-1798d60adc4bfbfee61e31ce24245e8a.jpg?hash=F5jWCtxL-_)
Similar threads
- Replies
- 14
- Views
- 5K
- Replies
- 4
- Views
- 4K