
- Forums
- GT40 Replica Manufacturers' Corner
- RCR Forum - RCR40/SLC/917/Superlite Aero
- The SLC Clubhouse
You are using an out of date browser. It may not display this or other websites correctly.
You should upgrade or use an alternative browser.
You should upgrade or use an alternative browser.
Been a while since I posted, but also been a while since I got anything done. Since my last post, I have done a bunch of stuff that can't be seen like built a relay box under the hood for the lift pump, got all of the brake lines and clutch lines mounted, polished the rear frame rails and fitting the spider and dash. The past few days built brackets to mount the rear diffuser. Then moved on to getting the car on its weight and setting the frame height and then setting caster, camber and toe. Pretty straight forward and everything is now within spec but will probably be adjusting it again to optimize after it is at full weight with motor and transmission in. Next moved on to reinstalling the front and rear body work so I can get things to a point where I actually secure the spider to the frame. Still optimizing the fit of the wheels in the openings. Based on my wheel/tire combination, I am going to have to move the rear suspension forward 1/8" but otherwise all seems to fit fine.
I also got my gauges delivered this week. I had Speedhut custom make oil pressure, volts and water temp gauges to match the Koso cluster. I was able to select font, colors of bezel and pointer and they match pretty good. Also got the night illumination to match the Koso. Attached some pictures. I am pretty happy with the way it is looking.
Next will be moving on to sit the gauges and switches in the cluster, but was waiting on the wiring harness to get all of that done. Also have on order the billet shifter, carbon seats and my transaxle so once those are in can move ahead with bigger things.
Attachments
Mike - what is your rear ride height in the photo above? Can you tell me what tire size you’re running and what is the vertical clearance between the tire and wheel arch, at it’s highest point? Thanks!
Edit - most interested in your rear tire and clearance info but if you wouldn’t mind also sharing your front I think this data would be helpful.
Edit - most interested in your rear tire and clearance info but if you wouldn’t mind also sharing your front I think this data would be helpful.
Rear height at 4 1/2" at end of 2x2 tube at joint by engine plate mount
Front height at 4" at front of foot box just below lower control arm mount
Tire clearance in rear to top of arch 1 3/4"
Tire clearance in front to top of arch 1/1/4"
Rear tires: 325-30-ZR19 Michelin
Front tires:275-30-ZR19 Michelin
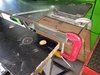
The red boxes are from when I did an air ride suspension on my truck a few years back. I leveled them on the floor and then can set the ride heights and alignments pretty easy. The boxes are just 3/4" exterior plywood with a 2x4 frame.
Front height at 4" at front of foot box just below lower control arm mount
Tire clearance in rear to top of arch 1 3/4"
Tire clearance in front to top of arch 1/1/4"
Rear tires: 325-30-ZR19 Michelin
Front tires:275-30-ZR19 Michelin
The red boxes are from when I did an air ride suspension on my truck a few years back. I leveled them on the floor and then can set the ride heights and alignments pretty easy. The boxes are just 3/4" exterior plywood with a 2x4 frame.
Thanks for the info Mike! Note you may have bottoming concerns if running 4” front ride height. Pull your spring or disconnect front shock and articulate suspension to be sure.
Are you running the fiberglass or carbon wing? Be sure to plan for loss of rear ride height due to aero loading.
I’m planning to run 4.5”F/5.5”R and I have the carbon wing. Assuming loss of ~0.5” rear ride height due to aero loading so running +1” in rear will ensure car always has positive rake angle even with bump. Should be less than 0.5” but doing some hand wavy assumptions.
When I set my suspension up at 5.5” I can almost stick my fist in between the tires and wheel well, running 325/25/20 PSS rears. I’ve done some recontouring of the rear wheel arches to avoid the 4x4 look in the rear.
Thanks for the heads up. Always good to have someone a few steps out in front of me to help give me some insight to what I will find. Right now, I am just using the factory settings to get things square and mount the body. I still haven't decided what to do about the wing. That is probably the last thing I have to order from Fran but figure it can wait for now.
Long way to go...
Long way to go...
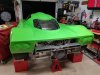
Another couple of days in the garage and feels like I got a bunch done. Started with walking around the car for a couple days staring at all of the gaps, wheel clearances, symmetry, and being scared to death to drill the first hole. But then once I did one, they didn't end. Also was working on minimizing the gap between the windshield and the mounting flange. Going to probably have to build up the flange in the lower corners to avoid stress on the windshield - I moved the spider as far as I could and ended up with about a 3/16" gap in the lower corners for about 3 inches.
Then moved on to mounting the tail hinges to the diffuser. Spent a bunch of time aligning the nose and the splitter and got that to fit pretty well. Also put one the side skirts and finally hinged the doors.
Felt good to make that much progress in one weekend. Still have some work to do fitting the body to the tub, trimming some of the excess fiberglass and it all needs to come off to finish the wiring when I get the harness. When it comes off, I am also going to coat the entire inside of the body - I don't think I have a finger that doesn't have a shard of fiberglass in it.....
And then I need to decide if I want to add a rear wing or not. Probably going to wait until I get the rear window and louvers done before I decide. It looks pretty subtle without the wing, but the wing is pretty cool.
Attachments
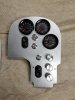
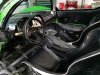
I think this is progress with the instrument cluster, even though it needs to be remade. I had a rough template for the instrument cluster that has been modified twice as I have made changes to the dash position and the console. But now having all of the switch gear and instruments I figured I'd get everything in and see how it fits. For the AC controls, I used the switches that came with the kit but found some billet knobs from Vintage Air for $9 each that look a lot better than the plastic knobs. Left for the interior is a holder for my cell phone, so stereo equipment and a few more trim pieces. Once I do the final assembly, the aluminum panels for the instruments will be remade to the proper size and finished in the brushed texture that is on the temporary pieces.
Attachments
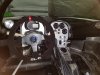
Been a long time since I was home to be in the garage, and this past week spent a lot of time remembering where I was. A bit frustrating, but finally got some stuff done. Been working in Texas for the past few months so a week in Florida was good for progress. Had a bunch of parts shipped over the past couple months including the rest of the carbon fiber interior pieces, carbon fiber rear window louvers, carbon fiber seat and most important the graziano transaxle. Also found a few things I had to re-do - when I installed the door panels I realized I had installed the dash too low to line up and when I aligned the dash to the door panels I now have to remake all of the aluminum panels in the interior.
Also installed the struts to hold the doors up using the parts that came in the kit so all the hardware is hidden from view but then realized that on the passengers side I need to re-route the heater hoses slightly but can do that when the body comes off to do wiring and final finishing.
Those will come next, but moved on to make some progress in other areas.
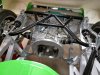
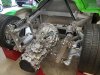
1. Got the transaxle in, although I didn't have the rear mounts so those are being shipped and I have the rear supported by a jackstand, but I installed it alone in less then 30 minutes with an engine hoist and a chain.
2. cut the rear window opening, and then trimmed the rear window to fit with the louvers.
3. Made a close out panel to go on the passenger side under the dash. Going to make a foot plate and another panel to go in the back of the footwell.
4. Finished the mounting of the rear diffuser now that I have the transaxle in place
5. Also installed some seat sliders on the drivers seat and test fit my daughter (5'2") moving the seat and the pedals - fit almost perfect, and some additional padding in the seat will fix that. So for those who think seating is limited, I am 6'1" and we both can fit in the car.
Planning to get back at it in a few weeks, and as soon as the wiring and shifter come I can get some things finished off. Attached a few pictures to show some progress.
Also installed the struts to hold the doors up using the parts that came in the kit so all the hardware is hidden from view but then realized that on the passengers side I need to re-route the heater hoses slightly but can do that when the body comes off to do wiring and final finishing.
Those will come next, but moved on to make some progress in other areas.
1. Got the transaxle in, although I didn't have the rear mounts so those are being shipped and I have the rear supported by a jackstand, but I installed it alone in less then 30 minutes with an engine hoist and a chain.
2. cut the rear window opening, and then trimmed the rear window to fit with the louvers.
3. Made a close out panel to go on the passenger side under the dash. Going to make a foot plate and another panel to go in the back of the footwell.
4. Finished the mounting of the rear diffuser now that I have the transaxle in place
5. Also installed some seat sliders on the drivers seat and test fit my daughter (5'2") moving the seat and the pedals - fit almost perfect, and some additional padding in the seat will fix that. So for those who think seating is limited, I am 6'1" and we both can fit in the car.
Planning to get back at it in a few weeks, and as soon as the wiring and shifter come I can get some things finished off. Attached a few pictures to show some progress.
Attachments
Progress?
The rear mounts for the transaxle and axles are now installed
Installed the canards on the front of the body.
Also picked up the SL-C emblem and continue to move it around looking for the best spot to mount
Working on getting the shifter installed (more details in the forum under the new shifter thread).
Progress has been slowed as I currently split my time beteen Florida and Texas, and am in the process of moving part of my shop to the Fort Worth area along with the SL-C so hopefully can start making a little more rapid progress. Should be set up by the end of January. In the mean time, I only get a few days a month to work on this project.
Attachments
Mark,
I picked up my new shifter from RCR on Friday. Kristin (parts) mentioned to me that there is a lower base plate that the shifter bolts to which is where the cables will attach. They are not available yet but she expected them in the coming week. Then they will be sent out to the people who bought the shifters. Will that change the design of the brackets you are building?
I picked up my new shifter from RCR on Friday. Kristin (parts) mentioned to me that there is a lower base plate that the shifter bolts to which is where the cables will attach. They are not available yet but she expected them in the coming week. Then they will be sent out to the people who bought the shifters. Will that change the design of the brackets you are building?
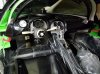
I hadn't heard that, but am just about complete with the mounting. They did ship the cable support bracket with the shifter, so I swapped the cables to the new bracket and was just going to mount that to the center rail. None of it was very complicated and it was nice to get out in the garage the past couple days and work on the car. The missing piece I really need is the gate so I can do the final trimming of the console, but I won't be doing that for a while.
The other thing I was looking for is a diagram of the positions of the two shift levers on the transmission for each gear and reverse - want to make sure I have everything in right and adjusted properly, but this is the first time I have dealt with this type of transmission
The other thing I was looking for is a diagram of the positions of the two shift levers on the transmission for each gear and reverse - want to make sure I have everything in right and adjusted properly, but this is the first time I have dealt with this type of transmission
Mike - swing the levers on the transmission back and forth. One will feel like it’s engaging the gears and the other will just go back and forth. The first is your fore/aft shifter cable and the other is your left/right. You can then extrapolate position. On this shifter 1st is left/forward and 6th is right/back. Reverse is all the way left then back.
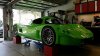
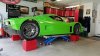
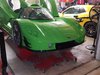
Not sure this is progress, but I guess it is. Been working in Texas since March and the car has been in Florida, so I haven't made much progress. Over the next few weeks, I will be moving the car, a bunch of parts and some of my shop to Fort Worth so I can have something to do on weekends and try to get this thing finished. I did get the canards mounted as well as the wing on the back over the past couple of months and earlier this week loaded it into my new trailer to pull it west. It has been a long time since the car has been on the ground, and you forget just how low and small it is until you step back and look at it. Never gets old.
The trip east was awful, raining both days which caused much congestion on the roads. Hopefully leaving the second week of January should have the holiday traffic over.


The trip east was awful, raining both days which caused much congestion on the roads. Hopefully leaving the second week of January should have the holiday traffic over.
Thanks Cam. Taking a couple weeks here in Florida with the family and then headed back. Hopefully I have better weather on the ride back.Looking good Mike! Good luck with the move!
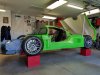
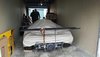
Move is now complete, and after 4 days on the road and 2400 miles (round trip), we unloaded the SL-C in Fort Worth yesterday. Still have lots of sorting to do of all of the boxes that were packed around the car, but was a relatively uneventful move. I was worried about the windshield which is still only taped in place, but I added some packing quilts around it and it made it fine. Couple of incidents of things coming loose along the way but the worst was the rear wing coming loose and flipping back - thankfully no damage and caught it on a gas stop. The one thing I never thought of but experienced was when we went to unload, the rear tires had about 3 inches of toe in. I had only hand tightened the jam nuts on the tie rods and the vibration of the trip caused them to back off. Easy fix and the car unloaded fine. The race ramps worked well to unload, although I had a bolt sticking down from mounting the seat slider (a temporary install) that caught on the floor of the trailer coming off. No other contact of the car coming off, and the winch worked fine and put minimal stress on the splitter. I think in the future when the car is done, the lift cylinders in the front suspension will be all I will need to unload without any trouble.
But the car Be a few weeks to get everything settled, but then can get back into the build.
But the car Be a few weeks to get everything settled, but then can get back into the build.
Attachments

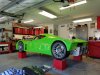
Unloaded all of the boxes, sorted the parts and now I think I have the shop set to start working. Currently in a small garage but looking for a bigger place. This will do for now. Have the minimum tools (drill press, band saw, belt sander, compressor) and will pick up a welder soon.
Next step will be to remember where the heck I was in the build, and start to make some progress.
Next step will be to remember where the heck I was in the build, and start to make some progress.
Attachments
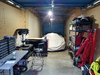
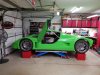
What a weekend. Actually got some work done on the car for the first time in a long time. But also realized how much more I am going to need for my new shop here in Texas. Seems that every time I turn around, I need something else. Guess I take for granted all of the tools I have at my shop in Florida. But making progress on getting what I need. I did move some stuff from Florida, but forgot things (actually ran out of room in the trailer for) like air saw, threaded insert tool, grinding wheel, combination square, ..... Seems to never end. But, I managed to clean up the shop and get it to a point of being able to work.
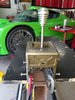
Mounted the headlight covers and side view mirrors, and took all of that black goop off the back of my graziano - that stuff is on there good but a little heat and it comes off a little easier. Took about 3 hours, but it was therapeutic.


Last thing I did was mounted the fuse panel under the dash. I am using a Ron Francis wiring system and I picked up a quick release bracket for the fuse panel to drop it down for ease of service. Attached some pictures below.


Will get back at it next weekend and hopefully start to make some progress. My new welder should be getting here this week so I can start to get some of the fab work done also.
Mounted the headlight covers and side view mirrors, and took all of that black goop off the back of my graziano - that stuff is on there good but a little heat and it comes off a little easier. Took about 3 hours, but it was therapeutic.
Last thing I did was mounted the fuse panel under the dash. I am using a Ron Francis wiring system and I picked up a quick release bracket for the fuse panel to drop it down for ease of service. Attached some pictures below.
Will get back at it next weekend and hopefully start to make some progress. My new welder should be getting here this week so I can start to get some of the fab work done also.