Mitch Krause's RCR GT40 Build

Mitch Krause

Supporter
Wiring, Wiring, Wiring

The last month or more has been consumed with wiring (along with a couple of weeks away for a vacation down under), but there has been progress, so time for a couple updates.

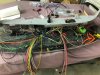
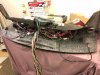
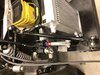
One of the last pictures (from last weekend) before I took the dash back apart in order to do the painting. At that point, I had the fuse box, all of the dash switches and everything in the dash wired from that point outwards as well as the wires resorted and re-routed into the bundles for the front or rear or wherever they go.

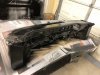
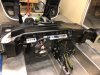
The second picture is the dash from last night as the paint was dry and ready for all of the wiring to be re-installed into the dash.

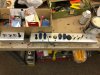
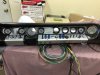
The Third picture are the switch panels that I fabricated to go into the dash along with the various switches.
 

Attachments

  • Dash_Being_Wired.jpg
    Dash_Being_Wired.jpg
    347.9 KB · Views: 691
  • painted_dash.jpg
    painted_dash.jpg
    249.6 KB · Views: 718
  • Switch_Panels.jpg
    Switch_Panels.jpg
    365.7 KB · Views: 585
Hi Mitch,
Some good progress and work being made here. Regarding your dash wiring I do hope that the blue Scotchlok connectors are only a temporary solution. They’ve a bad reputation for reliability as moisture can get into the joint leading to corrosion. All joints should be properly crimped or soldered<?xml:namespace prefix = o ns = "urn:schemas-microsoft-com<img src=" /><o:p></o:p>
I’d also recommend putting the dash harness on a single or a couple of multi-pin connectors. This will make dash removal so much easier<o:p></o:p>
Regards,<o:p></o:p>
Andy
 

Mitch Krause

Supporter
Andy,

Good thought on the connectors for the dash harness, I am going to think about that, one issue I know I would have is some of the heavy solenoid wires would not work for any of the connectors I have, I guess I could get some bigger connectors for those.

Two of the scotchlock connectors were slated for replacement and I actually already did that. Three of them are staying and I am ok with that. One gives me a 12v signal to a manually operated backup light switch, I am not sure I need that and if I activate it off the transmission, it will be replaced. The other two are used to provide 12v signal to two led light in the dash panel that will flash in time with the signal lights. If I had issues with those it would not be a big deal. All other connections are crimped and or soldered and hear shrinked so I feel pretty good about everything.

Mitch.
 

Mitch Krause

Supporter
front power board

I got the front power board pretty much completed, it has the relays for the head and driving lights, the fans and the water pump. Have to finish a few connections and mount it and I can complete the wiring of the front end. I am happy to report that everything seems to work as I connected it up from the dash and a power supply temporarily and tested it all out. Now I just hope that is the case when the final connections are made.
 

Attachments

  • 7E91BB43-951D-4272-929A-96E297DE9A30.jpeg
    7E91BB43-951D-4272-929A-96E297DE9A30.jpeg
    132.3 KB · Views: 550

Mitch Krause

Supporter
‘‘twas the night before Christmas

No, strike that ‘‘twas the day of the dash”
Connectors, shrink wrap & wires paid for with cash

Wires, wires, wires, If I forgot one
Then the forty won’t run.

Gauges, switches and wires snuggled up tight
I really hope all my connections are right
So when the battery is connected, I see light
Because tracing wires is really a fright.

Every connection each in the right place
Thank you Santa, I’m ready to race.
 

Attachments

  • C70C7967-B434-4F65-9AC2-BFB53ED8F337.jpeg
    C70C7967-B434-4F65-9AC2-BFB53ED8F337.jpeg
    100.1 KB · Views: 615
  • A50CFFE5-12D4-4081-8CC5-FA2F9CBF348A.jpeg
    A50CFFE5-12D4-4081-8CC5-FA2F9CBF348A.jpeg
    122 KB · Views: 610

Mitch Krause

Supporter
the wife said “it looks real now”

I guess that is a good thing.
 

Attachments

  • 0F5ABE90-C594-41A9-BB06-43780D0F29AF.jpeg
    0F5ABE90-C594-41A9-BB06-43780D0F29AF.jpeg
    115.3 KB · Views: 687

Mitch Krause

Supporter
Engine In

OK,

A little while since an update, some fitting of seats and carpeting over the weekend just to make sure everything fits. Removed it all after fitting. I did try out and think I am going to stick with a Velcro system for the carpeting that is mounted vertically (like on the side of the gas tank). I had bought heavy duty sticky backed velcro that was supposed to stick to rough surfaces (the back of the carpet was my hope). That did not stick to the carpet well enough. The hook part sticks to the chassis very well, but the loops were not staying attached to the carpet. I used a few 3 inch long pieces on the top verticals where I figured it would be good to keep it attached. I did finally use a very thin layer of Gorilla Glue on back of the velcro, and that seems to keep it attached to the carpet well enough that you can remove the carpeting without having the loops (attached to the carpet) stay with the car. The carpeting on the floor should be good enough laying down to stay put since there are a couple of things holding it down. The only place I might have to use something is around the pedal arrangement. I have a moveable pedal box, and need to keep it clear under that so that the pedals can move back and forth (this is all so that the wife can drive it, probably once, ha). So I will have to cut the drivers floor carpet to fit around that pedal mounting plate.

Dropped the engine in last night, so have to share that picture.
 

Attachments

  • Bare_Engine_Back.jpg
    Bare_Engine_Back.jpg
    132.2 KB · Views: 752

Mitch Krause

Supporter
Not as much work time in the spring / summer with sports and outdoor work. Another update and I have to vent. Was running wires to the rear after getting holes in the bulkhead and such. I of course had done all the testing and such for the dash and front power board when I wired them up and was sure I had everything right. Ran the wires and had them laid out about where they go. And I discovered a ground short. Spent about 4 hours trying to trace that down, of course taking the dash off, wiring out, disconnecting things and trying to sort it out. Then I happened to notice that the "Coil Positive" wire was laying in the rear with an open end and touching the chassis. Oh shoot (or a word close to that was what I said). Yep, that was the culprit, so last night spent 3 hours putting things back together (more testing as I did that), and am only half ways done. This will be 10 hours of wasted time tracking down nothing.
 

Randy V

Moderator-Admin
Staff member
Admin
Lifetime Supporter
Sorry to hear of the miscue....
It is interesting how building these cars enriches our vocabularies....
Wiring is some of the most tedious work. Some people really enjoy it though!
 
Hi Mitch ... I had something similer to your problem .... Loom all fitted got on with my build some months down the line . I started testing the Electrics .. nothing worked .. dash loom in and out 5 times . sent it all back the makers .. they sent me back a loom 3 weeks later with the EARTH wire fitted this time .And hay presto it all worked ..

It happens m8 .. Good luck with the rest of your build ...
 

Mitch Krause

Supporter
I haven't had time to do anything since June and the start of softball season (and lawn cutting and gardening), but the season has changed and I am back to it. Engine and Transmission installed so that I can check clearances and measure for the upcoming install of remote oil filter and cooler, fuel system, transmission pump and cooler and things like that.
 

Attachments

  • Tran_Eng_Mounted.jpg
    Tran_Eng_Mounted.jpg
    464.2 KB · Views: 540

Mitch Krause

Supporter
I now have an installed fuel delivery system. Tank pickups and plates from tanks inc. facet duralift pumps fac-40290. Second filter Fram HPG-1 and a Aeromotive AEI-13222 pressure regulator. All tied together with braided 3/8 line and various an-6 connectors and fittings.
936156E5-249A-48F5-B639-BCC11FFFCC28.jpeg
E4888F85-4893-4F2A-8E9A-E608A299CCE0.jpeg
 

Randy V

Moderator-Admin
Staff member
Admin
Lifetime Supporter
Looks great Mitch!
You’re going to be running very soon! Don’t forget to put oil in the gearbox before you do though...
 

Bill Kearley

Supporter
Hi Mitch, Just getting back to work on mine as well. An Optima with a vent line ahead of passengers feet, ok to put them indoors. Home made wiring, I enjoy'd that part, spent a lot of time wiring trucks and heavy equipment. My finesse could have been a little better. O, and one more thing. Do you fund your project by selling poetry?
 

Mitch Krause

Supporter
More progress. Remote oil filter mounted and plumbed to the oil cooler which is now mounted. I have the remote filter adapter on the engine and with the right fittings. So all I have to do here when I drop the engine back in is get the right length an10 lines to run from the filter and cooler to the engine. The oil pressure and temperature sensing units and wires are done, they connect at the remote filter. Oil goes from engine to remote filter and then to cooler so temperature is before cooler, not sure that is ideal. Would be easy to reverse the lines and run through the cooler first and then the filter. That would give me readings after the cooler, with the downside being that the hot oil would enter at the top of the cooler, I read that best to have hot oil enter the bottom so that air goes out the top as the return. So think I am going this way. Anyone have thoughts?
 

Attachments

  • ACF315E2-B67F-4B6B-A2D2-4AC57D1B0C0A.jpeg
    ACF315E2-B67F-4B6B-A2D2-4AC57D1B0C0A.jpeg
    469.1 KB · Views: 466

Mitch Krause

Supporter
Good progress on front end radiator area. All plumbing and wiring is done up there now. Heating, cooling and AC are all done and connected. Temp sensors and such also. It was a very tight fit to get the two heating lines and the two ac lines through the tunnel. Had to put on heating line through and then stagger and tape together the other heating pipe and the two ac lines and put the through together from the rear to get all arranged. It would not fit to have the two pipes in and try and get the AC lines through as the slight 90 connector at the end would bind. So taped the two AC 90 over the end of one pipe and thread them through together and the untape and turn the AC lines until they were in the correct orientation.
78116D69-9057-4763-B274-E7EBBF30446A.jpeg
A5C47F03-2ED3-49A9-83EF-C9C1E2BD219A.jpeg
78116D69-9057-4763-B274-E7EBBF30446A.jpeg
A5C47F03-2ED3-49A9-83EF-C9C1E2BD219A.jpeg
16307A24-9725-477B-9242-E95F6AAA088F.jpeg
1AE003BE-21DD-4577-B959-095B168308B5.jpeg
74E2224E-B0B7-4705-9743-6BD4C28FE713.jpeg
E30BA21A-C474-48C7-8BAB-7CC4EB0FA7AD.jpeg
78116D69-9057-4763-B274-E7EBBF30446A.jpeg
A5C47F03-2ED3-49A9-83EF-C9C1E2BD219A.jpeg
16307A24-9725-477B-9242-E95F6AAA088F.jpeg
1AE003BE-21DD-4577-B959-095B168308B5.jpeg
74E2224E-B0B7-4705-9743-6BD4C28FE713.jpeg
E30BA21A-C474-48C7-8BAB-7CC4EB0FA7AD.jpeg
 

Randy V

Moderator-Admin
Staff member
Admin
Lifetime Supporter
Great update Mitch! Looks like it is coming together nicely... :)
I don’t recall if I did this or was just planning to do it -
The pipes that the temp senders are in will need to be well grounded to the chassis for the senders to work properly. I had planned on welding a small nut to the pipe to screw a ground wire to it. If not, you could always trap a ground wire with a small hose clamp over one of the sender bases and accomplish the same thing.
 
Back
Top