Need cooling help please

David Garton

Supporter
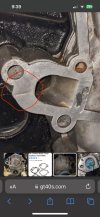
If you look at what failed it appears to have filled the back of the plate from the void in the timing cover surface. You are so close to removing and replacing the timing cover with just the removal of the balancer. It's a lot of work to be in the same boat down the road. Plus you would be installing new timing cover to block gasket with the new cover. Just my thoughts. Something to think about you are more than capable to take the next step. Doing great either way..
 
Mike, you may want to heed David’s advice, that timing cover is in marginal condition and realistically should be replaced at this point. If you decide to go forward without replacing it, I think a better approach would be to thoroughly clean out the void, fill it with a bit of JB Weld, and gently file/sand flat to the sealing surface without removing any of the surrounding surface. Tough to do with hand tools. Also, I see another void circled in the photo that will need the same treatment.

What you think is a casting recess in the sealing surface of the inlet housing, looks like the machined recess to seat a thermostat.
 

Attachments

  • IMG_1065.jpeg
    IMG_1065.jpeg
    130.6 KB · Views: 57
I hear you gents...sage advice. Michael, the casting void in the thermostat housing is near the edge (the last photo I posted). Oh, and the filler they use on the timing cover is hardened like JB Weld. This is a Roush crate motor.

So I need to remove the crankshaft balancer to get the timing cover off?

I guess I need to hunt for these parts now. I have less than two weeks before I head out for a month. I guess this project will drag on...

Is there anything special to look for in a timing cover or is it pretty standard stuff?
 
Last edited:
I checked this morning, and it looks like if I can get the belt pulley off, then I might be able to fit a wrench on the damper bolt. It is tight for sure. I will know when I try next week and will post my results.
 

Howard Jones

Supporter
I have an old piece of glass about 2 feet square that I have used many times as a leveling surface. I lay it on my workbench and tape a new piece of sandpaper on it, apply some oil, and then carefully resurface the part by using a circular motion and gently sanding the surface that needs to be done. Glass has an extremely flat/level surface. I also use it as a flat surface to check the straightness of rods or tubes. Pretty useful tool.

For aluminum parts like that thermostat housing you have posted above, I would usually use 400-600 grit and some ATF fluid. The ATF fluid is because I have a lot of it in excess but any oil will work as well as even water

For the timing cover, you could use a flat piece of metal, wrap it with sandpaper, and use it as a sanding block. JB weld is perfect for filling a scratch on an aluminum mating surface like that. That stuff is really amazing and does what it says it does. Clean it first with some alcohol or acetone and apply just enough to fill the voids. Then finish with the sanding block method. Given that fix I would reuse the timing cover.


To be honest I hate working on the engine front dress or really anything more than the carb/top of the engine stuff in the car. I would take the engine/transaxle out of the car to change the water pump in my GT40. I've done that at least twice. I know it sounds like a lot of work but it's easy work and not bent over in the interior work. That's what I hate to do the most along with up-under-the-dash stuff.
 
Last edited:

Randy V

Moderator-Admin
Staff member
Admin
Lifetime Supporter
Listen to Howard.... I've used JB Weld (original recipe) dozens of times on literally the exact same conditions. You can count on it to hold back anything but gasoline as the gasoline will soften it.
 
Next to my lathe, I have a little 36" lower kitchen type cabinet (all drawers) with a granite top, and I usually have adhesive backed sandpaper stuck to it for this exact purpose.
 

Attachments

  • IMG_20221126_201507.jpg
    IMG_20221126_201507.jpg
    340.6 KB · Views: 32
So I had a bit of time today and decided to try to remove the serpentine belt pulley only to find out that the hardware is probably something I don't have tools for or experience with before. After some 21;attempts I was able to get these pics. It is the ARP
black bolt. Can you tell me what socket set I need to get please. Town is some 45 minute drive away, so I hope to know what I am looking for before I make a trip. Thanks again!

PXL_20240206_212421496.jpg
PXL_20240206_212039908.jpg
 
Ahhh...looks like a 12pt. I did try a basic 12 socket, it seemed to fit, but slipped when wrenching on it. These bolts don't seem to have that good of defined points...
 

Neil

Supporter
So I had a bit of time today and decided to try to remove the serpentine belt pulley only to find out that the hardware is probably something I don't have tools for or experience with before. After some 21;attempts I was able to get these pics. It is the ARP
black bolt. Can you tell me what socket set I need to get please. Town is some 45 minute drive away, so I hope to know what I am looking for before I make a trip. Thanks again!

View attachment 136213View attachment 136214
Is it metric or UNF?
 

Neil

Supporter
I assumed UNF. The 3/8 cheap socket I have for fairly snug.
Maybe the cheap socket is the problem. See if you can borrow a well made socket. Some cheap sockets are broached so poorly that they do not fit properly. Also, try a six-point socket.
 
Back
Top