Old Tornado- Bringing Back to Life

Here it is all freshly welded. This will allow the inner framerail to now be the limit for the wheel, rather than the paneling for the outer corner. Still waiting on the darned arbor for the hole saw, or the new suspension would be bolted on one side.
 

Attachments

  • IMG_20130701_170438_424.jpg
    IMG_20130701_170438_424.jpg
    60.1 KB · Views: 408
Dylan, good evening!
Modeling body finish.
 

Attachments

  • 69.jpg
    69.jpg
    196 KB · Views: 354
  • 70.jpg
    70.jpg
    181.2 KB · Views: 300
  • 71.jpg
    71.jpg
    214.8 KB · Views: 295
  • 72.jpg
    72.jpg
    165.1 KB · Views: 302
molleur! Thank you very much!
 

Attachments

  • 73.jpg
    73.jpg
    189.7 KB · Views: 288
  • 74.jpg
    74.jpg
    167.9 KB · Views: 262
  • untitled.1.jpg
    untitled.1.jpg
    258 KB · Views: 266
  • untitled.2.jpg
    untitled.2.jpg
    291.8 KB · Views: 248
  • untitled.3.jpg
    untitled.3.jpg
    272.4 KB · Views: 258
The work continues ...
 

Attachments

  • untitled.4.jpg
    untitled.4.jpg
    264.4 KB · Views: 257
  • untitled.5.jpg
    untitled.5.jpg
    249.6 KB · Views: 256
  • untitled.6.jpg
    untitled.6.jpg
    300.7 KB · Views: 245
A Work in Progress
 

Attachments

  • 78.jpg
    78.jpg
    369.3 KB · Views: 258
  • 79.jpg
    79.jpg
    266.9 KB · Views: 269
  • untitled.31.jpg
    untitled.31.jpg
    317.6 KB · Views: 238
  • untitled.34.jpg
    untitled.34.jpg
    301.6 KB · Views: 250
  • untitled.36.jpg
    untitled.36.jpg
    196.9 KB · Views: 261
I promised myself I wouldn't update this until I was 100% finished with the suspension front and rear, but I can't help it...

Here are some pictures of the aluminum rear uprights I designed and milled. We got a new milling machine at work and of course I needed a 'training' part to learn how to program the thing. ;) These bolt to stock C5 Corvette hubs, rotors, calipers, mounting brackets, and ebrake assembly. I'm not quite done with the a-arm mounting arms that come off it. (PS...ignore the rusty rotor. For mockup purposes only, I swear!)

I've taken a break from some of the contract work I've been doing at night, and set myself a 50hr workweek limit. Hopefully it will help in spending time with friends, family, and GT40. I've been flat-out for over a year and it finally got to be too much.

More pictures soon :)
 

Attachments

  • 20140410_103644.jpg
    20140410_103644.jpg
    179.3 KB · Views: 461
  • 20140410_103653.jpg
    20140410_103653.jpg
    130.3 KB · Views: 419
  • 20140410_200519.jpg
    20140410_200519.jpg
    151.7 KB · Views: 383
  • 20140410_201150.jpg
    20140410_201150.jpg
    146.1 KB · Views: 418
  • 20140410_201650.jpg
    20140410_201650.jpg
    127.3 KB · Views: 413
A long update to bring this build log up to the present!

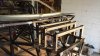
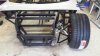
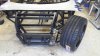
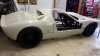
I cut apart the frontend and welded in new upright columns and cross supports. The tubing that supports the coilover mount is now actually braced across the frame. The front columns might get a smaller cross brace. I need to finalize brake component/battery/etc...location up front before I decide how to tie that together. The radiator will be held on by an aluminum structure that bolts onto the frame. The front frame is just sprayed down with rustoleum for now. I'm sure I'll be back in it welding all sorts of cap tubes for other mounting points.

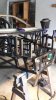
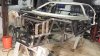
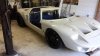
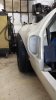
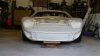
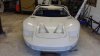
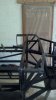
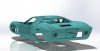
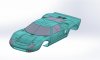
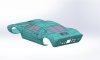
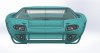
I am in the middle of figuring out exactly where to mount the coilovers on the lower A-arms. This required me to drag out the body and start measuring, so I got to see it sitting on the car again for the first time since 2012. :) 
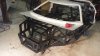
The upper a-arm design and upper ball joint will be changing, and now that I have access to a mill I will most likely be remaking all the arms out of aluminum, but I want to finish the arms I started with, for the geometry prove-out and because I'm so close to done with them. The car's track width is widened about 2" in the front and the rear compared to original Tornado numbers. Camber gain is at around 0.75°/in, with caster at 7.2° at ride height.

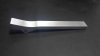
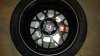
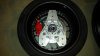
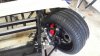
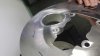
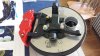
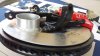
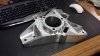
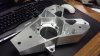
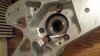
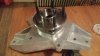
I made some aluminum brake duct backing plates for the Wilwood spindles. I had to make a redneck forming tool out of some metal disks and rings, but it came out really well. The form stiffens the heck out of the 0.090" aluminum, so I can push the gap extremely close to the rotor and not worry about the backing plate flexing and touching the rotor. I've had some experience making ducts for 2005-2012 Mustangs after I got angry at the price Ford Racing wanted for a set and the amount that mine squealed under cornering when touching the rotor, so those lessons came in handy here.

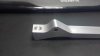
I milled a few more odds and ends like door handles for myself, too. I bought some from Tornado last year, but it was a good part to 'learn the mill' with.

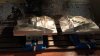
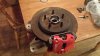
I've been ignoring the rear suspension but will be starting on the rear upright bolt on arm mounts now that both uprights are done and ready to bolt together. I'm split between powdercoating or anodizing them. I spent so much time on them that I'm sad they won't be more visible when the car is together.

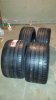
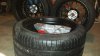
I ordered wheels from HRE and got Michelin Pilot Super Sports. No, these aren't very classic looking wheels...but my choice of brakes didn't allow me that option. ;). The fronts are 285/35/18 and rears are 345/30/19. The rear clip will need mild flares glassed in, but it will be much more subtle than actual Gulf flares.

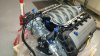
I got my Coyote crate engine delivered as well. A nice 25th birthday present. I have the intake all flipped around, but I still have to modify the harness. Thanks to Renato for giving me a detailed rundown on what to expect. It was easier than anticipated and only took about two hours even with me being excessively careful about plastic grit. Unfortunately, the engine will have to stay at my work for a while...I am not ready yet with the engine/trans mounts, and the garage is unheated so I don't want to leave the engine sitting in it any longer than absolutely necessary for fitup.
 

Attachments

  • 20140227_114656.jpg
    20140227_114656.jpg
    118.8 KB · Views: 319
  • 20140227_115740.jpg
    20140227_115740.jpg
    133 KB · Views: 314
  • 20140321_140043.jpg
    20140321_140043.jpg
    226.6 KB · Views: 341
  • 20140308_150246.jpg
    20140308_150246.jpg
    80.8 KB · Views: 339
  • 20140308_171930.jpg
    20140308_171930.jpg
    237.4 KB · Views: 325
  • 20140415_190841.jpg
    20140415_190841.jpg
    221 KB · Views: 339
  • 20140420_191312.jpg
    20140420_191312.jpg
    199.2 KB · Views: 331
  • 20140403_163834.jpg
    20140403_163834.jpg
    212.7 KB · Views: 341
  • 20140430_141055.jpg
    20140430_141055.jpg
    64 KB · Views: 273
  • 20140430_143425.jpg
    20140430_143425.jpg
    151.4 KB · Views: 280
  • 20140430_143445.jpg
    20140430_143445.jpg
    140.3 KB · Views: 325
  • 20140430_143546.jpg
    20140430_143546.jpg
    170.3 KB · Views: 288
  • 20140506_185248.jpg
    20140506_185248.jpg
    171.7 KB · Views: 331
  • 20140506_185339.jpg
    20140506_185339.jpg
    187.5 KB · Views: 380
  • 20140506_185705.jpg
    20140506_185705.jpg
    188.1 KB · Views: 323
  • 20140515_141333.jpg
    20140515_141333.jpg
    123.6 KB · Views: 287
  • 20140515_141346.jpg
    20140515_141346.jpg
    117.6 KB · Views: 270
  • 20140517_122402.jpg
    20140517_122402.jpg
    169.9 KB · Views: 309
  • 20140517_122417.jpg
    20140517_122417.jpg
    148.4 KB · Views: 313
  • 20140520_185933.jpg
    20140520_185933.jpg
    165.7 KB · Views: 297
  • 20140520_185956.jpg
    20140520_185956.jpg
    62.6 KB · Views: 307
  • 20140520_190017.jpg
    20140520_190017.jpg
    126.6 KB · Views: 263
  • 20140520_190107.jpg
    20140520_190107.jpg
    160.6 KB · Views: 346
  • 20140520_190129.jpg
    20140520_190129.jpg
    168.8 KB · Views: 254
Dylan,

Long time lurker and it looks like Im going to be taking over a RF GT40 build here pretty soon.

Firstly, really incredible work on your project... nice job.

Re your frame, are you doing any FEA on it to see what mods help with torsional stiffness? What program did you model it in?

David
 
Bob, you're a little ahead of me already.... ;)

Simon, I don't think I could beat out the prices of someone like Tornado that just has the door handles cast. Plus I still have to make the actual housing bit.

David, firstly thanks for your compliments and hope to see your build soon! I don't have any FEA abilities myself, but I stripped and simplified my 'original' and 'modified' frame models enough that I could have a friend do some FEA comparisons for me. Relative to the original, the front section is around 25-30% stiffer torsionally. Not to mention the benefits of less flex at the coilover mount points. Everything you see is modeled in Solid Edge.
 
As it's an aluminum engine that is currently pristine, and the garage has big humility swings, I'd rather not move it in until I have to. I have to shut off power to the garage when I'm not in there, so no dehumidifier :(
 
I see you went with a Coyote. Guessing it's not the Aluminator variant by the look but the size is identical to mine and will be the same as Renato's.

Have you tried to fit everything? I think given that you have a Tornado not designed for the Coyote you might run into the same issue Renato did in that the thing is a bit too long depending on your transaxle and adapter. I'm going to go with a 15mm thick steel one to give me the room I need and still may have to notch something here and there. Renato did more surgery to get his to fit but his adapter was 1.75" thick aluminum I believe.
 
Hi Darrin,

Yes, it is an aluminator crate!

I have done extensive modifications to the frame to fit the Coyote. The changes to the Tornado frame for the Coyote engine are highlighted in one of my earlier posts, but basically require cutting out and welding in new upper engine bay rails back to the horseshoe, and also cutting out the interior bulkhead tubing inside the bulkhead hoop and redoing the angle.

My adapter is Eric's (Kitcarchassis) thick aluminum one, and I'm using an Audi 01E transaxle. The bulkhead will be tilted even farther forward than the Tornado Coyote chassis to give me some more room to play with, and I'm raising the tail of the drivetrain to get the axles in a better position.
 
Back
Top