RCR #010 Build Progress

Dutton

Lifetime Supporter
The boys are right, Bill - quite a piece o work you've assembled there!

As for the harnesses, STRONGLY recommend you attach them to the roll bar as you noted. There's not a better place in the car to attach them to on the off chance (perish the thought, please) that you'll be truly in need of them.

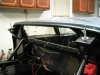
To shift gears ever so slightly, the clear panel between the cockpit and the engine bay... is that the plexi panel Fran supplied with the car, or a true glass panel which you mentioned in a post many months ago?

The work of you and your team is inspirational, my friend.

T.
 
Bill
Your GT40 has to be the toughest MoFo around.
A great advert for RCR and a credit to you and your sons.
Keep up the sensational and inspiring work.:pepper: :pepper:

That rear shot of your car with those huge tyres is now my wall paper
on my home and work computers.
 
Bill,
no Eye bolts.....loop around the cross bar of the roll bar.

I suggested another solution for the guys that have a bolt on harness preference...Pantera1889 used it on his car ...hopefully he will be kind enough to share a picture or two.....
 

Ron McCall

Supporter
gt40fran said:
Bill,
no Eye bolts.....loop around the cross bar of the roll bar.

I suggested another solution for the guys that have a bolt on harness preference...Pantera1889 used it on his car ...hopefully he will be kind enough to share a picture or two.....


Here you go. Let me know if you need a more detailed picture.
 

Attachments

  • 128_2848 (Small).JPG
    128_2848 (Small).JPG
    46.1 KB · Views: 1,322
Congratulations on getting the engine installed Bill. Very impressive work. I hope my brother Paul gets a chance to drop by and look it over. He is think of doing an RCR Mk IV.
 
A MARK IV!!!! REALLY?? That would be sooooooooooo cool! I hope he does. I'll be over there helping, that's for sure.

Bill D

PS - Thanks Fran and Ron
 
This weekend I added front brake cooling ducts. I made a bracket that attaches to the front spindle. It's made from a piece of angle aluminum, a piece of sheet aluminum, and 3" brake duct flanges from Richardson Racing Products.

brake%20duct%20001.jpg


brake%20ducts%20001.jpg


The mounting brackets are attached to the front spindle with three 8-32 SSTL screws and lockwashers. One end of the hose attaches to the bracket on the spindle...

brake%20ducts%20012.jpg


And the other end attaches to a similar flange mounted on the body. The body mount is open in teh front where air passes into the box containing the headlamp and driving lamp. Air flows into the "box", through the duct and to the brakes...

brake%20ducts%20011.jpg


Bill D
 
Last edited:

Chris Kouba

Supporter
NICE WORK Bill. I had been staring at that portion of the front clip as I worked on the headlamps this morning and thinking about doing exactly what you've done.

Again, nice work. Looks great!
 
Installed the wiper motor and gearbox today. I located the wiper motor in the front area like many of the originals I've seen (still need to install the bundy tube though)

wiper%20motor.jpg


I also installed my SPA 3.75 liter electrically activated fire suppression system today. Still need an idea of where to mount the nozzles in the engine bay.

spa%20fire%20001.jpg


spa%20fire%20002.jpg


BACK TO THE GARAGE FOR MORE!!!!!!

Bill D
 
I wanted to hook up the small NACA ducts to direct fresh air to the cockpit so I don't have to use the AC all the time. Fran came up with a great idea and today I made a mockup of the idea.

fresh%20air%20001.jpg


fresh%20air%20002.jpg


Here is the design...

2-1/2" duct hose will be attached to the small NACA duct opening on both side of the car. The hose is attached to 2-1/2" plastic blast gates used in woodworking. They are located on the inside of the access panel. A pair of 1965 Chevy Nova vent cables are used to open and close the vents.

The hose from there is attached to a pair of "Y" adaptors that also connect to the AC unit. The other end of the hose goes from the "Y" adaptor to the dash eyeball vents. Thus, I can either use AC or just fresh air.

I ordered the parts today and they should be here next week.

Cheers
Bill D
 

Rob

Lifetime Supporter
I like it Bill! Very cool (pun intended ;-)

What is the part (No.) used for the underside of the nose to attach the hose and what was your source...please? I don't see that part in you layout pic above. Is it a standard NACA piece from Pegasus or the like...?

Thanks,
 
Rob-
I am using original duct transitions made by FRPGuy (datonabill) that will be glassed in. But you can use just about anything that transitions to 2-1/2" for the hose to attach to
 

Randy V

Moderator-Admin
Staff member
Admin
Lifetime Supporter
Bill - As usual - EXCELLENT workmanship!

I'm curious if something like these ducts from AFCO will fit over the bottom of the NACA duct to make that transition to the hose?

70871.jpg


PRODUCT: 70870C
[SIZE=-1]Air Duct - Window Type (5in. x 8in.) - Clear (2 1/2in. outlet)[/SIZE]

Also - another question for you - in the picture spa%20fire%20002.jpg - you can clearly see the left upper control arm. Is there a block-off panel or splash-guard that's not been installed yet?
 
Back
Top