Ryan where did you get the latches? RodMore bits arrived. Someone must have been feeding the rocking horses.
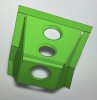
I had a set of the later vents with the knob in the centre, but got lucky and found some original early MK IV ball vents. The rubber rings from the later ones have a foam liner which feels a bit tight on the early vent. I need to check if they are different sizes.
would be good to see what the early rubber rings are like.
View attachment 113390View attachment 113391View attachment 113392View attachment 113393

You are using an out of date browser. It may not display this or other websites correctly.
You should upgrade or use an alternative browser.
You should upgrade or use an alternative browser.
Ryans Group Ten GT40 build - Body 5.
- Thread starter Ryan Love
- Start date
Ryan where did you get the latches? Rod
latches were from eBay.
the eyeball vents both early and late came from a local buy swap and sell group for Zephyr cars.
Do you have the sellers name on the latches or his store?latches were from eBay.
the eyeball vents both early and late came from a local buy swap and sell group for Zephyr cars.
Hi Rod, I think I messaged you via Instagram the link.
I did a metal shaping course with an automotive coach builder the other weekend. Was lots of fun and very enjoyable. I need some practice on the wheel. Here I am laughing at myself. To anyone else watching it would have been like sitting at the side of a boat ramp on a warm summers day.


I did a metal shaping course with an automotive coach builder the other weekend. Was lots of fun and very enjoyable. I need some practice on the wheel. Here I am laughing at myself. To anyone else watching it would have been like sitting at the side of a boat ramp on a warm summers day.
got told it had been too long since I updated my build diary.
some photos here of recent work/current progress.
some photos here of recent work/current progress.
The rear engine mounts have been doing my head in. Have the top of the RHS sorted to my satisfaction at this point. Onto the LHS one now which is not a mirror image of the RHS.
Will need to get the engine block 3d scanned to a higher quality than the scan I have now. This is a scrap cracked block, but will be sufficient for this purpose.
Will need to get the engine block 3d scanned to a higher quality than the scan I have now. This is a scrap cracked block, but will be sufficient for this purpose.
Attachments

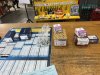
Have not been able to find proper details of the Windsor engine block online, so a trip to the bolt shop to get bolts for all the blind holes in the block.
Hopefully this results in a useable high quality scan that can be used.
Now to get some lunch in the remaining minutes of my lunch brake.
Hopefully this results in a useable high quality scan that can be used.
Now to get some lunch in the remaining minutes of my lunch brake.
Attachments


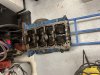
Long weekend here for Remembrance Day. So in between other duties I managed to get the block cleaned down, threads chased out and most of the bolts sorted out. I am short a few 7/16 UNC, so will get them added to the thing resembling an echidna before sending it off to get 3d scanned.
I have not looked up the casting number yet to work out what the block may have come from originally.
cad work is continuing on the LHS upper engine mount.
Here's a trick I pulled making a belhousing flange for a JDM 4 cyl.
Take a pic with the phone, making sure your a fair distance away and dead on facing. Crop the pic and import to a cad program and trace with a Pline. Then get a good measure (I used the dowels), and scale to fit. This got me to within .050" or close enough to index with a dial indicator to weld bushings for the dowels.

Take a pic with the phone, making sure your a fair distance away and dead on facing. Crop the pic and import to a cad program and trace with a Pline. Then get a good measure (I used the dowels), and scale to fit. This got me to within .050" or close enough to index with a dial indicator to weld bushings for the dowels.
I have been working hard on the CAD model a lot this last week.
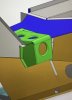
This is where i was a few days back. I have been working on the joint/junction where the mouse cursor is. You can see some clashes with the Yellow and Grey sheets. The blue floor is also not right.

The light blue floor sheet looks like it needs to get modified from what the drawing shows. I have added an extra bend to follow the lower profile of the outer tank/sill cover. I have also continued joggle around this fold to allow space for side sill cover to be added in. Hard to find good photos of this junction on the car as its normally removed when you see the cars upside down for chassis repairs.

I have matched the dimensions of the taper on the rear end of the channel in the side sill cover (yellow sheet) and lower engine bay floor (light blue sheet, so that the sill cover can go onto the engine bay ribs before the floor sheet goes on in final assembly. Not sure on this part at this stage. more research required. Any photos of this area would be greatly appreciated and help with the OCD obsession") .
.

Below is where i was at by Sunday night/Monday morning.
Next sheet will be the panel that closes the rear corner in side sill and engine bay. It interfaces with 11 or 12 other parts. Half of these I don't have the drawings for, the other half I have the drawings for, but from past experience's they will only be about 50% correct. I will try and get another post done to detail the development of the next sheets dimensions

Cheers.
Ryan
This is where i was a few days back. I have been working on the joint/junction where the mouse cursor is. You can see some clashes with the Yellow and Grey sheets. The blue floor is also not right.
The light blue floor sheet looks like it needs to get modified from what the drawing shows. I have added an extra bend to follow the lower profile of the outer tank/sill cover. I have also continued joggle around this fold to allow space for side sill cover to be added in. Hard to find good photos of this junction on the car as its normally removed when you see the cars upside down for chassis repairs.
I have matched the dimensions of the taper on the rear end of the channel in the side sill cover (yellow sheet) and lower engine bay floor (light blue sheet, so that the sill cover can go onto the engine bay ribs before the floor sheet goes on in final assembly. Not sure on this part at this stage. more research required. Any photos of this area would be greatly appreciated and help with the OCD obsession
.
Below is where i was at by Sunday night/Monday morning.
Next sheet will be the panel that closes the rear corner in side sill and engine bay. It interfaces with 11 or 12 other parts. Half of these I don't have the drawings for, the other half I have the drawings for, but from past experience's they will only be about 50% correct. I will try and get another post done to detail the development of the next sheets dimensions
Cheers.
Ryan
Davidmgbv8
Supporter
Impressive cad skills
Hi Ryan, very detailed CAD work! Just curious about 01E transmission, how does it fit in the horseshoe compared to ZF? I think it may be a little bit challenging to fit it in the available space for the quite large bellhouse.
I have not optimized its position at this time.
The positioning of the drive line components I have in the CAD model is currently all based/positioned off the removable support member.
This is positioned based on the 10" grid reference from the ford drawings. Using the ZF 5DS-25 drawings, I have then positioned the crankshaft centerline height of the driveline based of this.
At a later stage I procured a 3D scan of the Windsor block and the Audi gear box. This 3d scan was aligned with its crank shaft center line at the same height and axis as you would for the ZF5DS-25 gear box. This puts the Audi gear box very low within the chassis. If I was going to use the Audi box i would probably end up raising the rear of the engine, and angling the front of the engine down in the chassis. This would lift the bell housing higher up in the chassis.
I still expect that the clearance would be really tight.
I may still look doing the MK II modification to the lower part of the horse shoe gets chopped out and lowered.
I have an updated scan of the 302 block to add into the model soon. I will use this to develop the positon of the engine mounts.
I also have a 3D model of a Audi R8 Graziano gearbox that I will add in as well as I am keen to see what the clearance is. These models have all come from the Bremar Automotion 3D Scan Store (bremar3dscanstore.com)
let me know if that makes sense or need any more clarification.
I will add that I am 99% sure that I have the crank shaft horizontal with the horizontal plane that Ford use in the drawings. Its height will just be based on the height from the C/L of the ZF drawing up to the bushes that it hangs on within the support member.Using the ZF 5DS-25 drawings, I have then positioned the crankshaft centerline height of the driveline based of this.
I still need to work on the fire wall end of the drawings.
At this stage I have done the upper engine mounts (green ones) in the images.
As well as the water pump pulley bump on the drawings. I need to confirm the placement of this though. More loose ends to chase down.
Hi Rayan, I did very similar thoughts. Actually I don't have all the precise 3D scan, but the placement looks challenging and may require both a slight modification of the lower part of the horseshoe and to angle the engine. Personally I'm going to use an electric water pump to have more clearance in the front of the engine in combination with the 01E, I will revert to the mechanical pump if I decide to go for complete originality of the powertrain with the ZF gearbox.
HNY all.
I have become bogged down and feel I am stuck. I am at the point where I am trying to merge and mate up a number of sub assemblies.
These being the rear support hoop (horse shoe or "Horse collar" as @turb00le calls it), The engine bay assembly and the side sills/fuel tanks that run down the side of the car. There are so many angles and flange length variances its been doing my head in. I am not sure I have an answer to it, just frustrated at the time its taking and my lack of progress.
Anyway, here are a few more screen captures. Doesn't look like I have achieved much but there has been lots of fiddling.
Ryan
Davidmgbv8
Supporter
That is pretty awsome
Well i have finally loaded the scanned block into my cad model. This is the one that Bremar Automation did and is on their scan store. They have 3 different versions of the Windsor available now. This one is a non roller block 302 as it does not have the bosses and drilling for the hold down spider in the valley. I have aligned the block on the center line of the car. The height has been defined by the ears on the transaxle/crank shaft center line, thus leaving only the longitudinal position as an unknown as well as any cant/tipping forward and aft. This final measurement and position has been clarified by drawing up the engine mounts as found in the GT40 Uncovered book.
I have then added in the bushes. Thanks @JIMMYMAC for your help here.
next step in the jigsaw puzzle will be to make a start on the lower parts of the engine mount structure on the chassis.
Other things that may have changed are the rear closing panels for the engine bay and side sill/fuel tank area.
I have also done some more work on positioning the fuel surge tank on the right hand tank. I'm still going to go with the battery in the left rear on my car so ill leave that as its drawn as well.
Ryan