Scandinavian SL-C build

Johan

Supporter
Hi Stephan, I’ve had a brake from the SL-C build for a while, but I’m back at it again.
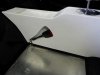
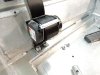
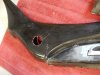
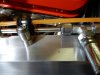
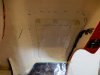
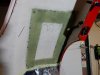
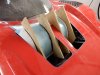
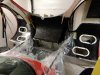
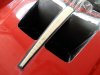
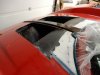
Just started to fabricate a center console in foam. Trying to figure out how to make a hot wire cutter, if it works with a battery charger.
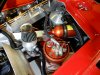
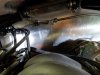
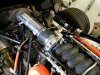
Going to Stockholm in two weeks to tune the engine. Actually need two tunes, one for inspection, I’m allowed to have just 20Kw per 100 Kg, so I figure I have to detune it to around 325Hp.
 

Johan

Supporter
Time for an update. The front and hinge was a little shaky so I triangulated the construction, it`s now quite stiff. Also changed to M12 Heimjoints at the hinge itself.
DSCN0938.JPG
DSCN0939.JPG
DSCN0940.JPG
DSCN0940.JPG
 

Johan

Supporter
Some body mods. I covered the front air outlet behind the wheels. Started with 5mm foam then three sheets of 450gr csm and then some bondo.
Also, you can clearly see it`s two guys that`s made the spider. Left side is very good, on the right the fiberglassing is not, a lot of air pockets all over.
DSCN0936.JPG
DSCN0937.JPG
DSCN0944.JPG
DSCN0944.JPG
 
Hah, we must have had the same pair of guys working on our spiders! My right side was a lot worse than the left. I cut everything out from below, preserving my gel coat and repaired the underside. I ended up having to fill in a good gap between my spider and ceiling panel but I think you were able to get a better fit with yours than I did on mine.
 

Johan

Supporter
A new center console, I started with 3 sheets of styroform and a wooden template in between glued together.Then tried to fabricate a hot wire cutter. I tried all sorts of wire, all burnt. then a friend told me I have to use a kanthalwire (Nicrome) found in all sorts of electrical equipment. so I scrapped a hot air gun and pulled the wire out of it, worked perfect.
After cutting the styrofoam a couple of layers of epoxy and bondo.
I then made a two piece mold on the plug and then the console itself. I was out of black gelcote so white it is. It will be upholstered anyway.
DSCN0878.JPG
DSCN0880.JPG
DSCN0881.JPG
DSCN0909.JPG
DSCN0941.JPG
DSCN0942.JPG
 
Very very cool, thanks for showing your technique! Be sure to keep in mind where your lap belts will anchor and that you will need to be able to accommodate them - both their location and any turning if they're to be mounted to an eye bolt.

You can see the large cut-out I made for the passenger side belt in the last few photos of my blog posts here: https://socalslc.com/2018/04/02/30-interior-refinement/

Something to keep in mind - your shifter gate looks like it is flush with your console top. When you upholster this the extra material will add some thickness, causing your console to sit higher than the gates. You may have done that on purpose; but if you want the two surfaces to be flush you may need to build in some adjustment capability to raise/lower as necessary. The factory R8 shifter has a plastic ring which sits around the silver piece as a transition, probably to help mask a possible step issue at the transition.
 

Johan

Supporter
Very very cool, thanks for showing your technique! Be sure to keep in mind where your lap belts will anchor and that you will need to be able to accommodate them - both their location and any turning if they're to be mounted to an eye bolt.

You can see the large cut-out I made for the passenger side belt in the last few photos of my blog posts here: https://socalslc.com/2018/04/02/30-interior-refinement/

Something to keep in mind - your shifter gate looks like it is flush with your console top. When you upholster this the extra material will add some thickness, causing your console to sit higher than the gates. You may have done that on purpose; but if you want the two surfaces to be flush you may need to build in some adjustment capability to raise/lower as necessary. The factory R8 shifter has a plastic ring which sits around the silver piece as a transition, probably to help mask a possible step issue at the transition.

If I would do it all over again I will use two wooden templates, one on each side to rest the hot wire on while cutting. It will be a whole lot easier to hold the hot wire stable.
 
If I would do it all over again I will use two wooden templates, one on each side to rest the hot wire on while cutting. It will be a whole lot easier to hold the hot wire stable.

Good idea! Maybe a few dowels to connect the two templates to keep them aligned. I tried to do something similar with some insulation foam I purchased from the home improvement store - a bad idea! During cutting/melting the fumes were really bad (even with a good respirator). Then when I tried to bond a few pieces together my glue ended up melting the foam. I must have used the wrong foam type, I stopped playing with the foam cutting technique and moved onto something less advanced ;)

I believe you can purchase those wire cutters on eBay/amazon if you don't want to sacrifice a tool.
 

Johan

Supporter
Good idea! Maybe a few dowels to connect the two templates to keep them aligned. I tried to do something similar with some insulation foam I purchased from the home improvement store - a bad idea! During cutting/melting the fumes were really bad (even with a good respirator). Then when I tried to bond a few pieces together my glue ended up melting the foam. I must have used the wrong foam type, I stopped playing with the foam cutting technique and moved onto something less advanced ;)

I believe you can purchase those wire cutters on eBay/amazon if you don't want to sacrifice a tool.

I think you had the right type of foam, wrong type glue. Yes, I found the wire on eBay and I could get it here also, but when I’m exited it has to happen right now, no time to wait.
 

Johan

Supporter
Time for seat belts. Over here building a car by yourself you have to use 3-point belts and if that doesn´t work you can use 2-point. I´m NOT allowed to use 4,5 or 6-point belts. Crazy I know, but that how it is.
So, 3-point it is. It was very tight for the connector/reciever so I modified the center console so the reciever end now folds in to the console. Also fabricated brackets for the belt roll, they are mounted to the floor panel with M10 12.9 quality bolts. On the back side of the bracket I welded a round bar (threaded 7/16-20) that sits inside of the cross beam. I´ll wait with the top mount on the roll bar until I have the spider back in place.
 

Attachments

  • DSCN0945.JPG
    DSCN0945.JPG
    121.7 KB · Views: 541
  • DSCN0946.JPG
    DSCN0946.JPG
    129.8 KB · Views: 522
  • DSCN0949.JPG
    DSCN0949.JPG
    714.3 KB · Views: 387
  • DSCN0950.JPG
    DSCN0950.JPG
    574.6 KB · Views: 446
  • DSCN0951.JPG
    DSCN0951.JPG
    724 KB · Views: 478

Johan

Supporter
Today`s screwup. Having spent the last 3 days for final fitment of the doors and opening mechanism I was quite happy with the result. Perfect gap all around the door and the opening/closing worked great.
So when closing the door the final time I hear something falling inside the door, sounded like a washer or nut. Sure thing, can`t open the door anymore. So what to do? Impossible to get to the opening mechanism or the front hinge due to the inner panel, and I can`t get to the inner panel fasteners eighter when the door is closed.
Only solution-Holesaw.
I know what you`re thinking, why not use nylocks. But since everything is coming on and off so many times i elected to use regular nuts until final assembly.
Maybe it`s smart to have an alternate way to door opening.(Cable)
 

Attachments

  • DSCN0973.JPG
    DSCN0973.JPG
    863.9 KB · Views: 471

Joel K

Supporter
Johan,

Always disappointing when something like that happens. At least you did not have the Carbon Fiber door panels.

Wondering which interior door handles you are using, I think I saw a similar handle on this build and thought it looked great.

2A94B367-0DB8-45F4-B56E-DBA2D88DD182.jpeg
 

Johan

Supporter
Finally got my fire supression system. It`s a water based system capable of decreasing the temperature by 1300F/700C in 10seconds. I chose manual activation. It consist of a detection loop, a plastic tube that melts at approx 330F/170C and then gives an alarm in the cockpit, then it`s up to you to activate it. The extinguisher part has 7 nozzles, I placed 6 in the engine bay and 1 in the fuel tank compartment, non in cockpit.(Handheld)
 

Attachments

  • DSCN1015.JPG
    DSCN1015.JPG
    877.1 KB · Views: 385
  • DSCN1004.JPG
    DSCN1004.JPG
    736.8 KB · Views: 356
  • DSCN1017.JPG
    DSCN1017.JPG
    780.4 KB · Views: 310
  • DSCN1019.JPG
    DSCN1019.JPG
    853.6 KB · Views: 342
  • DSCN1016.JPG
    DSCN1016.JPG
    758.2 KB · Views: 355

Johan

Supporter
Next was fender vents. I started with the vent itself as a template and used a hacksaw to cut the vent holes. I didn`t cut all the way around, left 8 small (3-4mm) parts uncut just so the "lid"stayed in place. Then filled the holes and cutlines with clay/wax and taped the underside of the lid and some release agent. Then on to fiber glassing, and when cured I cut the remaining 3-4mm that held the lid in place. After that just lift the lid and some minor sanding to complete. The fit is very good. Next project will be fabricating cooling fan exhaust on the hood.
 

Attachments

  • DSCN0999.JPG
    DSCN0999.JPG
    723.7 KB · Views: 364
  • DSCN1000.JPG
    DSCN1000.JPG
    645.8 KB · Views: 383
  • DSCN1002.JPG
    DSCN1002.JPG
    667.6 KB · Views: 350
  • DSCN1003.JPG
    DSCN1003.JPG
    691 KB · Views: 334
  • DSCN1011.JPG
    DSCN1011.JPG
    770.1 KB · Views: 344
  • DSCN1013.JPG
    DSCN1013.JPG
    766.8 KB · Views: 408

Joel K

Supporter
Next was fender vents. I started with the vent itself as a template and used a hacksaw to cut the vent holes. I didn`t cut all the way around, left 8 small (3-4mm) parts uncut just so the "lid"stayed in place. Then filled the holes and cutlines with clay/wax and taped the underside of the lid and some release agent. Then on to fiber glassing, and when cured I cut the remaining 3-4mm that held the lid in place. After that just lift the lid and some minor sanding to complete. The fit is very good. Next project will be fabricating cooling fan exhaust on the hood.

Awsome job on the fender vents. I like your approach.
 

Johan

Supporter
Finally got the curage to cut holes in the hood. I have been thinking of this for a year now. As a precaution I made a mold of the upper part of the front clam, just in case.
Begun with the rear part of the air outlet and then the outer sides, fiberglassing it.
Then did the front end of the holes and the center divider.
Added a 10mm high "strip" in the center a`la McLaren, think it lookes pretty good.
 

Attachments

  • DSCN1062.JPG
    DSCN1062.JPG
    721.3 KB · Views: 499
  • DSCN1065.JPG
    DSCN1065.JPG
    771.5 KB · Views: 498
  • DSCN1069.JPG
    DSCN1069.JPG
    797.9 KB · Views: 450
  • DSCN1073.JPG
    DSCN1073.JPG
    767.9 KB · Views: 447
  • DSCN1083.JPG
    DSCN1083.JPG
    707.5 KB · Views: 456
  • DSCN1088.JPG
    DSCN1088.JPG
    752.7 KB · Views: 458
  • DSCN1095.JPG
    DSCN1095.JPG
    706.6 KB · Views: 446
Back
Top