
- Forums
- GT40 Replica Manufacturers' Corner
- RCR Forum - RCR40/SLC/917/Superlite Aero
- The SLC Clubhouse
You are using an out of date browser. It may not display this or other websites correctly.
You should upgrade or use an alternative browser.
You should upgrade or use an alternative browser.
Johan
Supporter
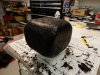
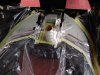
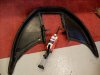
Last week I made a CAI, cold air intake. Started with a big Fuzzy Dice, I made it out of two washer fluid containers, then cut it up. Also made a mount for the Dice in aluminium.
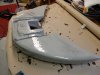
Proceded with a plug for the intake itself. I made it out of low desity PU foam, very easy to sculpture/sand. Then a couple of layers of epoxy and finally some release agent.
When finished with fiberglassing I glued it to the body
Proceded with a plug for the intake itself. I made it out of low desity PU foam, very easy to sculpture/sand. Then a couple of layers of epoxy and finally some release agent.
When finished with fiberglassing I glued it to the body
Attachments
-
 DSCN1072.JPG826.1 KB · Views: 577
 -
 DSCN1110.JPG807.7 KB · Views: 565
 -
 DSCN1116.JPG827.7 KB · Views: 533
 -
 DSCN1114.JPG770.1 KB · Views: 539
 -
 DSCN1115.JPG766.6 KB · Views: 566
 -
 DSCN1120.JPG797.1 KB · Views: 571
 -
 DSCN1119.JPG818.5 KB · Views: 518
 -
 DSCN1122.JPG786.1 KB · Views: 514
 -
 DSCN1123.JPG831.2 KB · Views: 533
 -
 DSCN1134.JPG872.4 KB · Views: 597
Ken Roberts
Supporter
Thanks for the heads up with the KVJ axle flange bolt pattern (V10 Graziano). I can confirm that mine is also 95mm. I took one of the axles off my Ricardo awhile ago and placed it temporarily on my V10 Graziano to mount the reluctor sensors and wondered why the bolts wouldn't thread in. Good thing I don't have the CVjoints and axles yet.
Joel K
Supporter
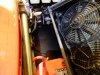
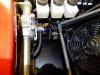
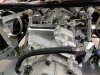
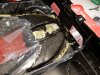
Joel, I took a couple of pics of the EWP, it very tight most due to my extension of the air duct.
Thanks Johan
Looks like he is a very good friend to have. Very nice work indeed.
Regards Brian
Regards Brian
Johan
Supporter
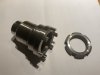
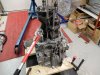
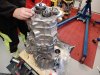
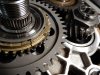
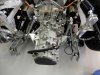
The transmission is back together. Well almost. Everything went smooth until we should install the Transmission cover (housing), when I lifted it from my working bench a washer fell to the floor. My buddy and I looked at each other and said, where the heck did that come from. I will say that reassemble the transmission is normally a 45min to 1 hour job, but now we spent 2 hours to figure out where that washer were supposed to sit.
We had a pretty good clue but wasn`t sure, so, this may sound crazy but we pulled my second Graz (KVJ) apart to be 100% certain.
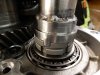
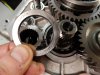
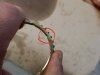
Then a second "possible" problem, when inspecting every part before installing I discovered what might be a crack in the reverse syncronizing ring. It`s not cracked apart but it sure lookes like the beginning of a brake. I´ll investigate further today.
3:rd picture is the washer, 6:th is the possible crack circled.
We had a pretty good clue but wasn`t sure, so, this may sound crazy but we pulled my second Graz (KVJ) apart to be 100% certain.
Then a second "possible" problem, when inspecting every part before installing I discovered what might be a crack in the reverse syncronizing ring. It`s not cracked apart but it sure lookes like the beginning of a brake. I´ll investigate further today.
3:rd picture is the washer, 6:th is the possible crack circled.
Attachments

Johan
Supporter
Well, it was a beginning of a small crack. I placed the sync ring on the gear where it`s supposed to sit (on the cone) and tapped it quite lightly and it broke right off. So,not a good weekend.
The only good thing about this is that I discovered it now, not later, 100 miles from home.
Wonder how much on of those cost considering one crushnut is $70 .
The only good thing about this is that I discovered it now, not later, 100 miles from home.
Wonder how much on of those cost considering one crushnut is $70 .
Attachments
Last edited:
Like you say, better now than 100 miles down the road. Great catch.
Regards Brian
Regards Brian
Roger Reid
Supporter
Extra washer? Reminded me of the scene in Ford vs Fararri with the extra lug nut. Starts at minute 2:50
Johan
Supporter
Roger, I’ve seen the movie and I can say I had a feeling of Deja vu.Extra washer? Reminded me of the scene in Ford vs Fararri with the extra lug nut. Starts at minute 2:50
Johan
Supporter
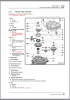
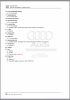
Update. Paid a visit to the local Audi dealer. You can’t buy the sync ring separatly, it’s a ”kit” containing 19,20,24,25 and 26.
And the price-$460. Guess it’s acceptable, in my dreams last night it was a lot more. I’m glad I woke up from that dream. I’ll have it here in 3 days.
And the price-$460. Guess it’s acceptable, in my dreams last night it was a lot more. I’m glad I woke up from that dream. I’ll have it here in 3 days.
Attachments
OUCH!!!!
Johan
Supporter
And a hint/suggestion, for you guys planning on doing the drop gear yourself. Instead of buying those damn expensive crushnuts you can try swapping position on them. If you’re lucky you will a fresh part on the nut to peen. It worked on my KVJ. It was almost a 1/4 turn differance.
J
I also considered that Johan. The reason I couldn't do that with my Graz is that when the nuts on my transaxle were orriginally peened the process slightly distorted the threads of the threaded shafts. So when the peened nuts were removed the distorted threads on the shafts cut the threads of the removed nuts. in fact I had to run a Die over the shaft threads to make them prefect again. In my case the removed nuts all head threads that were too distorted to attempt to retorque them. If someone is going to reuse that nuts take a good look at the threads first to make sure they are ok,
And a hint/suggestion, for you guys planning on doing the drop gear yourself. Instead of buying those damn expensive crushnuts you can try swapping position on them. If you’re lucky you will a fresh part on the nut to peen. It worked on my KVJ. It was almost a 1/4 turn differance.
I also considered that Johan. The reason I couldn't do that with my Graz is that when the nuts on my transaxle were orriginally peened the process slightly distorted the threads of the threaded shafts. So when the peened nuts were removed the distorted threads on the shafts cut the threads of the removed nuts. in fact I had to run a Die over the shaft threads to make them prefect again. In my case the removed nuts all head threads that were too distorted to attempt to retorque them. If someone is going to reuse that nuts take a good look at the threads first to make sure they are ok,
Johan
Supporter
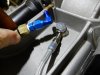
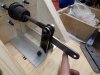
Got the sync hub and ring yesterday so now the Graz is back together agin. While at the Audi dealer Monday I discovered in the schematics that there is supposed to be a banjo fitting on the clutch line fitting. So instead of 3 pieces of adapters and fittings I ordered a banjo and bolt.
The thread is M12x1,5. I only got hold of a straight banjo so I heated it and bent it 20*. On the stock Audi it`s a banjo with a cramped hose, don`t know how long so I elected to make my own. Lookes better and is more snug to the transmission.
The thread is M12x1,5. I only got hold of a straight banjo so I heated it and bent it 20*. On the stock Audi it`s a banjo with a cramped hose, don`t know how long so I elected to make my own. Lookes better and is more snug to the transmission.
Attachments
Johan
Supporter
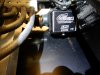
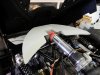
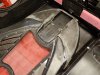
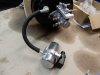
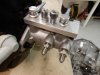
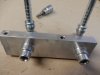
I haven't decided to switch to power brakes yet, but if I do I've prepared the linkage and all fittings. About 2.5 years ago I bought a LS3 from a 2012 Camaro SS and got half the car. Among other things a complete brake system so I already had the MC and booster.
I had to get rid of the reservoir and do a remote mount due to my cooling duct so I made a new aluminium mount that fits where the old reservoir was and used banjo fittings to get it as low as possible. Also made new brake tube fittings, however I don't know if I'll use them or the -3AN/M12x1.5 fittings.
The stock Camaro brake pedal has a ratio of 3.8:1 and the Tilton has about 5:1 so I used the slave lever to get to approximatly 3.8:1. Also lasercut a couple of extra levers if I don't get it right the first time. I made all bushings with POM (acetal) plastic round bar and will use sholder bolts on all 4 places. I'll make the last lever from the pedal to the slave lever after I have mounted it.
When it comes to vaccuum I choose the Hella UP30 which is designed to provide the nessessary vaccuum independant of engine (diesel,gasoline turbo or electric). I have tested the system and it works perfect.
Attachments
Joel K
Supporter
I haven't decided to switch to power brakes yet, but if I do I've prepared the linkage and all fittings. About 2.5 years ago I bought a LS3 from a 2012 Camaro SS and got half the car. Among other things a complete brake system so I already had the MC and booster.
I had to get rid of the reservoir and do a remote mount due to my cooling duct so I made a new aluminium mount that fits where the old reservoir was and used banjo fittings to get it as low as possible. Also made new brake tube fittings, however I don't know if I'll use them or the -3AN/M12x1.5 fittings.
The stock Camaro brake pedal has a ratio of 3.8:1 and the Tilton has about 5:1 so I used the slave lever to get to approximatly 3.8:1. Also lasercut a couple of extra levers if I don't get it right the first time. I made all bushings with POM (acetal) plastic round bar and will use sholder bolts on all 4 places. I'll make the last lever from the pedal to the slave lever after I have mounted it.
When it comes to vaccuum I choose the Hella UP30 which is designed to provide the nessessary vaccuum independant of engine (diesel,gasoline turbo or electric). I have tested the system and it works perfect.
Johan, nice work on the remote reservoir and slave pedal. How do you plan to control the electric vacuum pump?
Can you also share the dimensions of the slave pedal which works out to the 3.8 ratio?
Last edited:
Johan
Supporter
For the pump, I got a pressure switch from the junkyard from a Volvo V70 T5.Johan, nice work on the remote reservoir and slave pedal. How do you plan to control the electric vacuum pump?
Can you also share the dimensions of the slave pedal which works out to the 3.8 ratio?
But some of the pumps have the switch built in. Don’t think the UP50 have one, I can check the part no on Monday.
My measurements of the second hole is 76mm up from the lowest hole and then 32mm between the second and third. Total length of the slave is 108mm. That is around 3.52:1. I made a last minute change of the ratio due to the lower weight of the SL-C compared to the Camaro.
I don’t have the experiance to figure out what ratio will be correct for a light car like ours, so this will be trial and error.
But if you want 3.8:1 you should place the second/middle hole 76% over the bottom hole. That is if your Tilton ratio is 5.0:1.
Similar threads
- Replies
- 10
- Views
- 2K
- Replies
- 3
- Views
- 1K