Sean's RCR GT40 build

Sean S.

Supporter
Which size bushings worked out best for the door hinges?

Hi Vinny,

I found 1/2" ID and 3/4" OD at the local Ace Hardware. Just needed to drill out the hinge to 3/4" and then cut them off flush once pressed into the hinge as 1/2" long was the shortest I could find..

Regards,

Sean
 
Hi Devin

I’m not sure if the brand that RCR uses. But they are replica BRMs 17x10 on the rear with Toyo Proxes R888 315/35R17 rubber and 17x8 on the front with Toyo Proxes R888 225/45 r17 rubber. I will likely go a lower profile on the front to solve a rubbing issue, but I haven’t gotten to where I can research that yet.

Sean

Hey Sean,

I am battling for a good set of tires also for R17 on a RCR. A lower profile front tire would help, but in 225 size I can only find a 45. Upping the width to 235 gets one or two options in 40 but I am not so sure about the extra width. Let me know what you land on!

Nick
 

Sean S.

Supporter
Hey Sean,

I am battling for a good set of tires also for R17 on a RCR. A lower profile front tire would help, but in 225 size I can only find a 45. Upping the width to 235 gets one or two options in 40 but I am not so sure about the extra width. Let me know what you land on!

Nick
Hi Nick

I haven’t had time to research them yet. But I will definitely post what I figure out. Please let me know if you find something as well.
Sean
 

Sean S.

Supporter
It’s been close to a month since I have been able to work on the car, today was the first day back home and I made a lot of progress.

I still need to weld out the brackets, but I’m glad the rear transmission support is completed. I followed pretty closely how Randy did his. I needed to use the lower suspension mounts vs the top due to how I ran my oil filter and catch cans. I had a hard time finding a clevis that would screw on the the 5/8” bolts that have a 1/2” hole for the hiem joints. The left over bushing material from the doors worked perfectly to convert them to 1/2”.

I also completed the plumbing for the crankcase vents to the catch cans. I’m hoping to have all the coolant plumbing completed this weekend as well, just waiting for a few fittings to show up tomorrow.

I finally received my safety harnesses. They took almost 6 months from ordering to arrive from the UK. I love the way they look.

I also received the bearings seals and gaskets to get the rear transmission housing machined shorter. I’m hoping I can get it taken apart and to my machine shop guy this weekend as well.
 

Attachments

  • BC5889DE-5F3E-4129-BA9D-1AA08B639B2E.jpeg
    BC5889DE-5F3E-4129-BA9D-1AA08B639B2E.jpeg
    533.5 KB · Views: 466
  • 0EA8C965-C502-468B-962C-E1FD2626B924.jpeg
    0EA8C965-C502-468B-962C-E1FD2626B924.jpeg
    292.9 KB · Views: 461
  • 0E88EED6-ECC2-4C98-9A3B-E72A296AAA7A.jpeg
    0E88EED6-ECC2-4C98-9A3B-E72A296AAA7A.jpeg
    402.2 KB · Views: 392
  • 255AE8F3-7452-4421-9D48-1350675B5820.jpeg
    255AE8F3-7452-4421-9D48-1350675B5820.jpeg
    456.1 KB · Views: 369
  • 2D14EEAC-1324-46AA-9147-7AED7747C229.jpeg
    2D14EEAC-1324-46AA-9147-7AED7747C229.jpeg
    418.2 KB · Views: 351
  • E4D56876-A98B-42F3-912E-3004AACCF5FA.jpeg
    E4D56876-A98B-42F3-912E-3004AACCF5FA.jpeg
    375.7 KB · Views: 376
  • 48386169-4818-4EE5-A790-D1695B26CA2D.jpeg
    48386169-4818-4EE5-A790-D1695B26CA2D.jpeg
    591.4 KB · Views: 375
  • A2D61362-333A-4F88-8940-3A2BA5E0CA95.jpeg
    A2D61362-333A-4F88-8940-3A2BA5E0CA95.jpeg
    505.2 KB · Views: 378
  • image.jpg
    image.jpg
    281.1 KB · Views: 390

Randy V

Moderator-Admin
Staff member
Admin
Lifetime Supporter
Nice job on the transaxle support! I like yours better than mine and can’t think of any reason why it wouldn’t work even better being in compression rather than extension…
 

Sean S.

Supporter
I took some pictures to show better details of the trans axle support bracket.
 

Attachments

  • 52D43C36-1042-4CB5-A659-57BF55AFF6C6.jpeg
    52D43C36-1042-4CB5-A659-57BF55AFF6C6.jpeg
    343.2 KB · Views: 310
  • 994D1822-5D4E-431C-AE52-1578A06A6019.jpeg
    994D1822-5D4E-431C-AE52-1578A06A6019.jpeg
    515.3 KB · Views: 293
  • E827F8E9-D276-4800-9F4D-7A8438C4A165.jpeg
    E827F8E9-D276-4800-9F4D-7A8438C4A165.jpeg
    639.6 KB · Views: 302
  • B4C4CC1E-94D8-4F77-BEFC-775B0391EB74.jpeg
    B4C4CC1E-94D8-4F77-BEFC-775B0391EB74.jpeg
    342.1 KB · Views: 283
  • D3744358-5233-4D83-A426-1930558B554D.jpeg
    D3744358-5233-4D83-A426-1930558B554D.jpeg
    426.3 KB · Views: 271
  • 358225D6-23C0-4EFD-970F-5EE743BA03DD.jpeg
    358225D6-23C0-4EFD-970F-5EE743BA03DD.jpeg
    586.2 KB · Views: 275
  • A45690CF-6EFE-4D92-AC75-F4A9F5694A36.jpeg
    A45690CF-6EFE-4D92-AC75-F4A9F5694A36.jpeg
    504.3 KB · Views: 326

Randy V

Moderator-Admin
Staff member
Admin
Lifetime Supporter
Great job in design & fabrication! I think my starter stuck out too far for me to have made the right side a straight shot.
 

Sean S.

Supporter
Made the first car parts with the CNC plasma cutter. They came out great. This is going to be on the firewall below the window to fill the gap between the firewall and the rear clamshell. I still need to weld it out, but I think I got a good concept.
 

Attachments

  • E0B68060-0E6A-44CC-9C92-BD0018C221DD.jpeg
    E0B68060-0E6A-44CC-9C92-BD0018C221DD.jpeg
    522.7 KB · Views: 278
  • 5FD08B82-ADF5-4714-8A23-AC36B6DFB1E0.jpeg
    5FD08B82-ADF5-4714-8A23-AC36B6DFB1E0.jpeg
    446.5 KB · Views: 261
  • DEEFFDB0-4F8D-4FFB-B648-A8C7C90F6A1D.jpeg
    DEEFFDB0-4F8D-4FFB-B648-A8C7C90F6A1D.jpeg
    624.8 KB · Views: 252
  • 838076A2-15FD-418D-A843-48A1D1633785.jpeg
    838076A2-15FD-418D-A843-48A1D1633785.jpeg
    524 KB · Views: 258
  • A1DBBE8D-16AA-4B97-BBB0-40F066594776.jpeg
    A1DBBE8D-16AA-4B97-BBB0-40F066594776.jpeg
    529.6 KB · Views: 256
  • 4551ACE4-1900-4344-AF81-B9363EC10F51.jpeg
    4551ACE4-1900-4344-AF81-B9363EC10F51.jpeg
    536.3 KB · Views: 318

Sean S.

Supporter
I got the shortened nose cone for the transaxle back today. Everything looks and worked out great. It is now 4 1/4” shorter. I still need to shorten the shifter shaft to match it, but I’m happy with how it has worked out. Not much left to go for a test drive. :cool:
 

Attachments

  • C9306553-7D34-45C2-8C68-57967D2D0F61.jpeg
    C9306553-7D34-45C2-8C68-57967D2D0F61.jpeg
    480.1 KB · Views: 260
  • 27CF5655-18C4-4FC4-89C0-2E3E49DBB7F2.jpeg
    27CF5655-18C4-4FC4-89C0-2E3E49DBB7F2.jpeg
    498.2 KB · Views: 269
  • 72782F52-7118-48CF-B8CB-5DB53741343B.jpeg
    72782F52-7118-48CF-B8CB-5DB53741343B.jpeg
    510.4 KB · Views: 265
  • C964F7CC-9E89-40FA-9098-F12093C1C21A.jpeg
    C964F7CC-9E89-40FA-9098-F12093C1C21A.jpeg
    515 KB · Views: 256
  • 482B70FD-1A4C-4D89-915E-FD043E0DBF7B.jpeg
    482B70FD-1A4C-4D89-915E-FD043E0DBF7B.jpeg
    518.5 KB · Views: 255
  • ADF04EC0-4B3C-41CB-8084-3E9A1637F420.jpeg
    ADF04EC0-4B3C-41CB-8084-3E9A1637F420.jpeg
    515.6 KB · Views: 254
  • D79A6D7F-8EB6-4099-B4D7-F7EFBB6683A8.jpeg
    D79A6D7F-8EB6-4099-B4D7-F7EFBB6683A8.jpeg
    474.9 KB · Views: 278
Last edited:

Randy V

Moderator-Admin
Staff member
Admin
Lifetime Supporter
Looks good Sean! Just a heads up on shaft shortening and redrilling. The shaft is case-hardened and I had a really tough time drilling and tapping it. I burned through a couple of really good HSS drill bits even though I ground the flat in the shaft first. Tapping it was also a pretty tense operation. I used tapping oil and had to slowly take 1/16 revolution and back up to remove chips, then another 1/16, etc..
I recall I had to use 1 number size larger drill bit than was recommended as the shaft could not be tapped with full depth threads.
Practice first on the few inches you cut off the shaft.
 
There are 3 different tap styles. Taper, plug and bottoming. The typical hardware store tap is a plug tap. Look at a real machine tool supplier and get a taper if you have a through hole. It has less aggressive bites, so it can cut harder material. Better yet, get a set of 3 so when you need to tap a blind hole later, you start with the taper, then the plug, then the bottoming.

Mcmaster Carr has a cobalt steel tap for harder than usual steel. Not cheap, but a good tool to have in the box.
 

Sean S.

Supporter
Looks good Sean! Just a heads up on shaft shortening and redrilling. The shaft is case-hardened and I had a really tough time drilling and tapping it. I burned through a couple of really good HSS drill bits even though I ground the flat in the shaft first. Tapping it was also a pretty tense operation. I used tapping oil and had to slowly take 1/16 revolution and back up to remove chips, then another 1/16, etc..
I recall I had to use 1 number size larger drill bit than was recommended as the shaft could not be tapped with full depth threads.
Practice first on the few inches you cut off the shaft.
Thanks Randy. Great advice as always.

I made the cut with a 28TPI blade. I was surprised to see sparks flying off the blade. :eek:

I Am going to try your advise by tapping the off cut first to see what I am getting into.
 

Sean S.

Supporter
There are 3 different tap styles. Taper, plug and bottoming. The typical hardware store tap is a plug tap. Look at a real machine tool supplier and get a taper if you have a through hole. It has less aggressive bites, so it can cut harder material. Better yet, get a set of 3 so when you need to tap a blind hole later, you start with the taper, then the plug, then the bottoming.

Mcmaster Carr has a cobalt steel tap for harder than usual steel. Not cheap, but a good tool to have in the box.
Thanks Brian.
I’m actually not sure what type of taps I have. It’s a snap on set, but I’m sure they would say if they were taper taps. I know they aren’t the blind hole taps. If I have some issues with them I will take your advice on getting the taper taps.

thanks

Sean
 

Sean S.

Supporter
I have successfully shortened the shaft. I didn’t have too much of an issue drilling or tapping the hole, although my tap did lose a couple teeth in the process. I did drill the hole slightly larger with a J bit to help tap the hole.

I’m playing with a couple designs for the shift cables to see what I like the best.
 

Attachments

  • E086D108-EB53-4F47-96F1-C1562CF44A5A.jpeg
    E086D108-EB53-4F47-96F1-C1562CF44A5A.jpeg
    329.2 KB · Views: 239
  • CF4AEE19-8B3E-413B-83F3-4D6096518BD0.jpeg
    CF4AEE19-8B3E-413B-83F3-4D6096518BD0.jpeg
    694.9 KB · Views: 227
  • 7043AA4B-05A4-4189-9663-A8C985ED4252.jpeg
    7043AA4B-05A4-4189-9663-A8C985ED4252.jpeg
    381.3 KB · Views: 215
  • F0B8BC30-4EDB-46E0-A804-AD7FBF87B3D3.jpeg
    F0B8BC30-4EDB-46E0-A804-AD7FBF87B3D3.jpeg
    372.6 KB · Views: 209
  • 67621488-5C04-469C-B78B-F7EF462DECE6.jpeg
    67621488-5C04-469C-B78B-F7EF462DECE6.jpeg
    492.7 KB · Views: 204
  • 957C7C07-25A5-4BAE-B41D-C06D99372424.jpeg
    957C7C07-25A5-4BAE-B41D-C06D99372424.jpeg
    447 KB · Views: 234

Sean S.

Supporter
I have a good design for the part of the shifter that moves it in and out. The bar across the top of the transaxle it mounts to will also serve as a support for the exhaust pipes. I’m very happy with how things are working thus far. The shifter shaft is entirely under the clamshell now, and the exhaust pipes will completely block the view of it. The shifter feels much more solid with this set up vs the original design bracket that came with the shifter.
I did need to clearance the nose cone a bit so that the linkage on the cable wouldn’t bind up.
 

Attachments

  • A81C10C9-4400-4BE1-B997-377DA768FF30.jpeg
    A81C10C9-4400-4BE1-B997-377DA768FF30.jpeg
    507.4 KB · Views: 220
  • 850C04E0-C6C4-404A-B387-19D1AAA8B636.jpeg
    850C04E0-C6C4-404A-B387-19D1AAA8B636.jpeg
    438.3 KB · Views: 216
  • F37C2366-9095-4B86-87B8-1B974276CEB6.jpeg
    F37C2366-9095-4B86-87B8-1B974276CEB6.jpeg
    596.4 KB · Views: 214
  • ED74DE65-335B-4BCB-B724-9B22CB67FDF9.jpeg
    ED74DE65-335B-4BCB-B724-9B22CB67FDF9.jpeg
    284.7 KB · Views: 214
  • B6DBEB12-DA5D-4756-8495-DD2A15B432FE.jpeg
    B6DBEB12-DA5D-4756-8495-DD2A15B432FE.jpeg
    409 KB · Views: 214
  • 16AE125A-F181-4C58-873C-C483FFE5BE3E.jpeg
    16AE125A-F181-4C58-873C-C483FFE5BE3E.jpeg
    290.6 KB · Views: 221
  • F3BC5C96-9952-42BB-AD01-AD7C395E4AC9.jpeg
    F3BC5C96-9952-42BB-AD01-AD7C395E4AC9.jpeg
    334.2 KB · Views: 256

Sean S.

Supporter
I’ve finalized the shifter, everything seems to work well and it’s all under the car now.

I’m going to take the shifter handle its self apart to see if I can tighten it up. There is a bit of play in that assembly I don’t like.
 

Attachments

  • 21A195A0-79AC-473A-8A52-5CD5A6C23333.jpeg
    21A195A0-79AC-473A-8A52-5CD5A6C23333.jpeg
    380.9 KB · Views: 245
  • FD6D05DC-84A4-4869-8B7B-368EC8FE4F06.jpeg
    FD6D05DC-84A4-4869-8B7B-368EC8FE4F06.jpeg
    322.4 KB · Views: 252
  • C2887EE9-8475-45AC-A2A9-7C570A0A28F1.jpeg
    C2887EE9-8475-45AC-A2A9-7C570A0A28F1.jpeg
    317.3 KB · Views: 283
  • 83A83E20-A834-4A35-A1BB-DB7FDB5790C7.jpeg
    83A83E20-A834-4A35-A1BB-DB7FDB5790C7.jpeg
    405.5 KB · Views: 252
  • 524D2504-044B-4247-A9E1-6353DD1F3AD5.jpeg
    524D2504-044B-4247-A9E1-6353DD1F3AD5.jpeg
    621.1 KB · Views: 264

Vinny P

Supporter
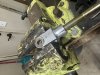
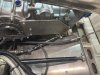
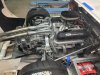
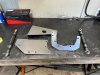
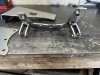
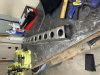
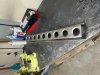
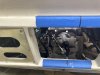
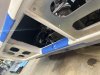
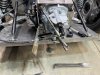
Ive been working on Wiring the last couple weeks. I originally planned to mount the battery in the passenger side foot box, but I decided it would be much easier to mount it in the engine bay in the box behind the fuel tank. I fabricated a mount to hold the battery level, then used flat bar to secure it.

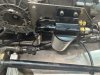
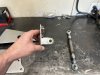
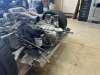
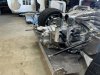
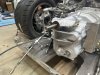
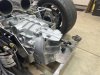
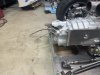
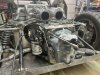
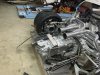
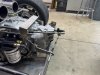
I have most of the engine wired up minus a couple of sensors. I'm hoping to get a good bit of the dash wiring completed this weekend.... getting very close to being able to start it.:cool:

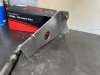
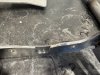
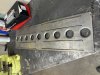
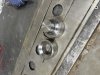
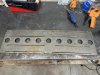
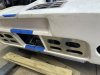
I decided to give these turbo spiral baffles a shot, I figure I might make another set of tail pipes with mufflers as well to have 2 different sounds if I want them. I have to say the straight pipes do look cool.

We took it to its first car show 2 weeks ago, even in its partially assembled state it took everyone's attention.
Where did you get the straight pipes and inserts? I want to look into getting a set for my gt40 my collector is for 2.5"
 

Sean S.

Supporter
Where did you get the straight pipes and inserts? I want to look into getting a set for my gt40 my collector is for 2.5"
Hi Vinny

The inserts are Spiral Turbo Baffles. There are 2 places you can buy them.
First is from their website, but he only takes checks.
https://www.spiralturbobaffles.com/
The Second place is his son in laws site Dynamic Exhaust Systems, you can pay with CC or PayPal with him.

I got all the piping from Performance Tube Bending

Sean
 
Last edited:
Back
Top