Southern GT #70

Davidmgbv8

Supporter
Rear Tyres arrived today so I got them mounted,a bit of a thrill fo the kids at Discount Tire
A3AAC30E-4DC8-4E38-9763-674412388051.jpeg
E156325E-688B-43AC-9F30-959EC2F92453.jpeg
 

Davidmgbv8

Supporter
Tried fitting the rear clamshell yesterday evening. Because I have an original body, it would not fit on the SGT chassis, the down tubes for the roll bar diagonal fouled the inner panels. So out with the sawzall and the cutoff wheel and removed them. Now clam does not go on because the two top trailing arms are out too wide and will not go in the original slots in the rear clam, so out with the socket and wrench and dropped it down. Rear clam almost fits.... the sway bar now interferes with the inner panels just a bit so off it comes. Now my clam fits, kinda but my tyres are too big and will not fit under the fender. They are 295/55-15 on 10" x15" wheels Wheels have been specially made, waited 6 months for tyres, Do not want to flare the beautiful glass work and stray from the street car homage.

Talked to Roger Kraus tires this morning they will take the 295's and swap for 275's and that should gain me an inch and Morten gave me tips of how to move the suspension in to get another 1/2-3/4" in to pull the wheel under the fender and this should help get the top trailing arms in their slots.

Fingers crossed, we will see how this goes.
IMG_4586.JPG
IMG_4587.JPG
 

Davidmgbv8

Supporter
Tried to mount Parrot beaks to SGT rear framework after having bobbins made. Appears SGT framework is 3” shortin an upward diagonal. Now to a plan B
332EBF20-C325-4503-B392-31276C829BEA.jpeg
 

Davidmgbv8

Supporter
Frustrating day, reconfigured radiator mounts and front body bobbins to get the front clam to sit better, got 3/16 better. New rear tyres arrived,just awaiting new lower wishbone mount brackets to see if they fit.
49B425B8-00FB-4080-ABAC-AFBFFB56A125.jpeg
 

Attachments

  • 2A980C89-9853-4E94-B6B7-F711D0DC4E45.jpeg
    2A980C89-9853-4E94-B6B7-F711D0DC4E45.jpeg
    452 KB · Views: 113

Davidmgbv8

Supporter
Well with a lot of guidance from Morten, my rear tyres just barely fit under the rear clam. I had to cut 1” out of the top links and 1/2” out of the bottom A-Arm move the holes back 5/16” on the A-arm bracket. The tyres are 275/55/15 and are still touching the fender lip but for now I am happy. I don’t want to go down to a 9” rim and 245 tyre.
06692142-EFA1-440C-AE7F-7478F93841B6.jpeg
64E19FB7-7046-4B75-B630-A6121006FB3A.jpeg
 

Davidmgbv8

Supporter
Easter brought a lot of new beginnings. I was so close but every time I touched the rear clam it moved in a diagonal direction. I unbolted the parrot beaks, listened the substructure, realigned and shimmed the clam. Drilled new parrot beak mounting holes, 3 shims on one side, none on the other and things started to fall in place with the sills.

A trim of the inner roof allowed the spyder to meet the rear clam. Cutting my front substructure down tubes to relax them then allowed the front clam to un bind and tuck up to the spyder and align with the sills.

put the wheels on and have clearance on the right side and 1/16th from the left.

Had to stop and cook for the family. Great day.
A0C7452D-02EB-4486-8A57-B7171ACE54BC.jpeg
B84783EE-C7BF-4344-8865-9B24EF903BB7.jpeg
48E5B587-467C-4833-A485-A48218939DE4.jpeg
A60D5D76-57C9-465F-B789-45A7D8CEFFCB.jpeg
5F628E67-0184-4578-90CB-EA05BDB47B6A.jpeg
 

Davidmgbv8

Supporter
I just got a windshield to try from RCR. Will try that fit next. Morten warned more about roof sag but my spyder is carbon and Kevlar reinforced. I was concerned about flex that I saw at the roof windshield top corners on a body that came out of England.

Fingers crossed, the windshield will fit the opening.
 

Davidmgbv8

Supporter
Well another weekend spent aligning body. Found my front frame work was not exactly straight so measured a lot , cut tacks, refit, repeat. I can say for sure now we are good, however the clam is still very finicky to slide on. Realignment on the rear clam allows tyres to fit under. The body alignment pins make fitting the front clam a challenge
1F79EF93-F31B-4A56-BC24-418E29847403.jpeg
3CE223EA-79E4-4F7D-AE78-E133B5F8C4B4.jpeg
 

Ian Clark

Supporter
Hi David,

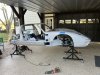
Really nice work! Having been down the rabbit hole of body fitment several times now with KVA, GTD, CAV, RCR and MDA I can confirm there will be many hours chasing the optimum alignment of all the panels.

The key is to make sure the roof spider and windshield are square on the car, then put the doors on. Don't even think about the front and rear clips until the roof and doors are happy.

Then set the front and rear clips on and adjust for gap to the roof spider and cowl. Be prepared to change the sitting height of the roof spider at the sill boxes or windshield surround as it rests on the top of the cowl (keeping an eye on door gaps). Remember to give yourself some allowance for the thickness of whatever you're closing off the cowl with as that will raise the roof.

Then put the sill box cover moldings on and see where the overall length of the total body fit between the wheel arches and the sill box ends line up. It takes a lot of fiddling but it will all work out. You may have to play with the front and rear pivots to get the best fit horizontally along the sill box too.

Make sure you have about 1/8 inch clearance between the front and rear clips, doors and roof spider above the sill box moldings. Once the overall alignment is at it's best, then you can fit the latches and catches and pins.

This process should give you the best body fit with the least amount of rattles and squeaks on the road.

Cheers
Ian
 

Davidmgbv8

Supporter
Thanks for the info Randy and great tips from Ian and Morten. I started with the rear clam because I had to find a way to get both tyres to fit under without rubbing. Bill Hough told me Friday that he had seen sills on many cars were out 1/4" from the front so they had a taper from front to rear. With my fitting this weekend I found that is how this body and sill relationship wants to work as well. I also discovered that the only bodywork that seems to be even from side to side seems to be the rear clam, however the inner panel on the left is 7/8" more forward on the left side than the right therefor fouling against the sway bar. Honestly though I cut the last 3/4" off of both sides this does not matter as the sway bar is still too wide to fully function under the side panels.

Right sill is 5cm longer than the left. The right part of the front clam where it meets the door/cowl is about 10mm longer, which affirms what Randy said concerning symmetry on original cars. I measured out my chassis this weekend and found it is pretty darn square within 2mm by my tape. So when going from rear to front I noticed that how much the rear clam sits off the sill changes the height where it meet the rear of the spyder and that line. In mocking up, this body looks like it would be best with a 3/16" gap. The body alignment pins and plates I got from Flatchat, make this about 5/16" gap which looks to much to me. So I will mill them down and glue in the holes I already drilled.

My spyder legs are turned out at the bottom it starts where he cut for the airduct is. Bill said that lower leg is a separate mould so I will just cut at that parting line and turn in. The plan is to then shim the spyder legs to then have the rear roof line flow to the clam once I have that sill clam gap where I like it.

The plan is I now have a plan. Then I need to either narrow the sway bar or just make a new one. It really needs to turn 90° like the originals so the top suspension link does not foul it on compression. With the suspension blocked up to what I feel is close to ride height, it is close to the bar. If I lift the tyre up it hits.

Should have done like Andy and film this for tube of you.
 

Davidmgbv8

Supporter
Mucked about with rear camber settings and ride height to get a little more tyre clearance. This is at 5” ride height. Really glad I stuck with the 10” wheel and 275 tyre as it fills the wheel well really well. The side view really shows the original road car wheel opening vs more modern interpretations that have a round wheel arch.
EB25F025-B391-4C9D-B0CA-B8574531CEDE.jpeg
F8E0A41F-76AB-46CC-A888-574499B40316.jpeg
FBFAE49D-A91D-4377-AEF9-F3F3DACB9AA0.jpeg
 

Davidmgbv8

Supporter
Well nothing done on the car as I have been finishing the 1952 MG TD and a short vacation to Croatia. If you have not been there, I highly recommend as it is a beautiful country. I digress, before I left I was working on an A/C design and I ordered the first bits I need for control. The B switch will engage the compressor while the lever will operate the heater valve . More to come
I’m
C97195FC-1FAC-411F-A2B0-8DE2B3F33048.jpeg
 
Back
Top