Tornado Build - www.gt40builder.com

Trev,
You may already know this but to clean the ali panels, Andy S recommended T-Cut. Works a treat at much reduced cost compared to aluminium polish. Also works really well on the polished panels. I had a few scratches and the T-Cut took them all out.
Ian.
 
Trev,
You may already know this but to clean the ali panels, Andy S recommended T-Cut. Works a treat at much reduced cost compared to aluminium polish. Also works really well on the polished panels. I had a few scratches and the T-Cut took them all out.
Ian.

Thanks Ian, I'll pop to Halfords tomorrow and get some.
 
Chassis finally right way up

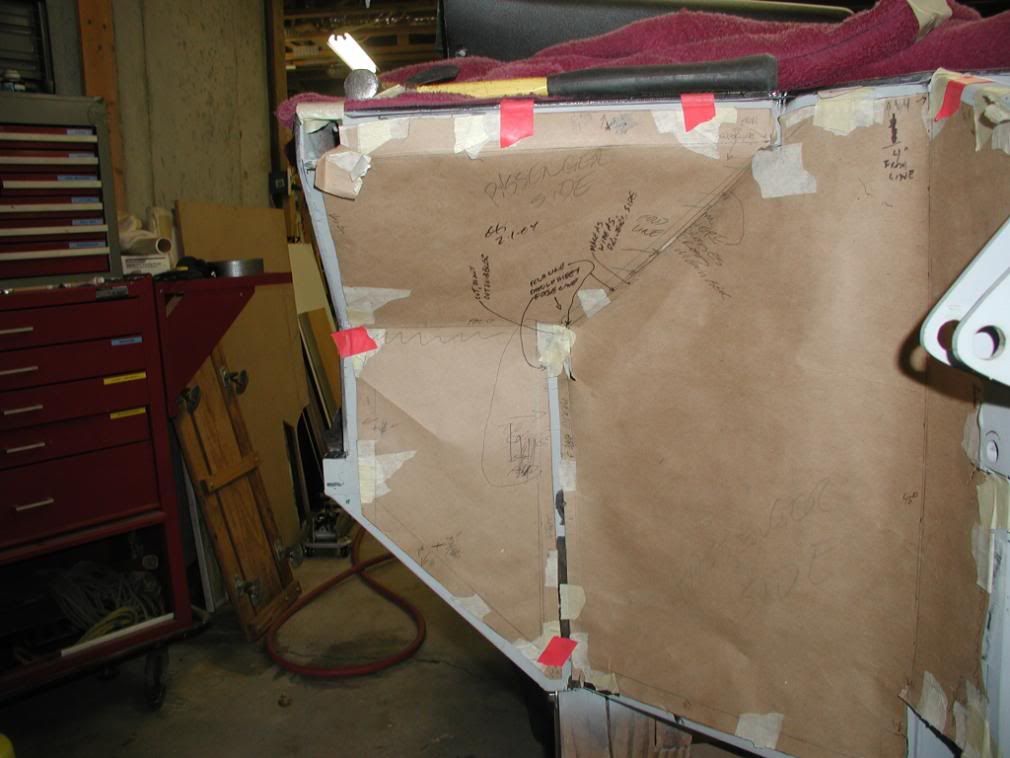
Finally got the chassis the right way up today and onto its build table. Had to wait for my mate to get back from holiday and give me a hand. Also started to eye up the sill panels and thinking that some cardboard templates might be a good idea.

build-march10.jpg


Oh, I also strapped the chassis down to the build table to avoid any accidents

Trev
 
Trev:
Looking good, that table should make things easier to get at as it gets pretty busy as the build progresses.
I use a thin board for templates. Regular corrugated is a bad choice as it wont replicate bends faithfully if there are any involved.
I get my template material from a fiend who has a small retail store, it is used as sheets between the product on pallets. It is about 1/16 ( 1 1/2 mm) thick and cuts easily, also stiff enough to sand the edges to get a good fit.
Use a sharp pointed marker on your panels, you will get a close fit, it wont scratch them and the markings can be removed with solvent later. Even a pencil will produce scratches that are difficult to remove.
Happy building
Cheers
Phil
 

Chris Duncan

Supporter
For the patterns there's double thick poster-board.

another step you could do when putting the sealer on is to scuff the contact areas on the chassis and the panels where the sealer goes with a scotch-brite pad to give it a little bite for the sealer to grip.

when cutting an inside corner drill a 3/16" or 1/4" hole at the corner and cut to the hole.

I posted a how-to on aluminum panels but it was several years ago

all rivets are not created equal. hardware store rivets are generally low end, structural/aircraft rivets are generally too expensive. Somewhere in between is a flush break all aluminum rivet.
 
Re: Chassis finally right way up

Trevor,
Can't see properly, but it looks like you have not put any flooring under the rear either side of the engine bay. You might want to consider it.

Brett
 
Re: Chassis finally right way up

Trevor,
Can't see properly, but it looks like you have not put any flooring under the rear either side of the engine bay. You might want to consider it.

Brett

Hi Brett

There is no mention of engine bay panels yet in the manual, but I am sure Scott will be along in a bit to inform me if these are needed or not.

As this is my first build and I've not done anything like this at all before I am sticking completly to following the manual. If there is something I am not sure of I'll ask Scott or Andy and they will advise on what they thinks is the best approach based on their knowledge and experience with the tornado chassis'.

I'll also be feeding back to Andy anywhere in the build process where I struggled to follow the manual etc as I know Andy is keen to know how I get on from a amateurs point of view as he is always looking at ways to improve his cars. So far the only thing I wanted that wasn't in the manual was a list of all the tools required to build a car. 2 days later, Andy had produced a list for me. Andy and Scott have been extremely helpful, thanks guys.

Trev
 
Cardboard templates

bought some decent cardboard today and started producing the templates for the sills. I've done 3 out of the 4 sills mockups and they will certainly make my life much easier when cutting the aluminium panels

build-march11.jpg


build-march12.jpg


Trev
 
Trev

Its amazing what you can achieve with a few old pizza boxes and some masking tape.

Regards Martin.
 

Attachments

  • P1040278.jpg
    P1040278.jpg
    23.5 KB · Views: 830
With a little time and patience you can get aluminum to do just about anything you'd like.

Brian
 

Attachments

  • Aluminum interior 2.jpg
    Aluminum interior 2.jpg
    50.4 KB · Views: 929
Hi Trev,

Congratulations on your build, I have come to a stand still with my build due to my work and the end of the financial year. So little progress for me for the next two weeks :-(

On the templates that you have made, watch our on the side sills for the return by the fuel tank it needs to return so you can fix it to the plate(if you can know what I mean) otherwise you will not be able to rivet it,

Just thought I would point it out before you cut the ally..

Keep up the hard work,

John
 
Trev,
Looks like you are off to a good start on your paneling. For my templates I used the heavy butchers block paper or generic wrapping paper along with the cardboard. I found that the cardboard was difficult to cut and transfer to the metal. If you cut a little short on the paper, you can tape little piece(s) to it to fit exactly as it should. You will want to make notes and measurements directly to the material as you check the fit prior to cutting the metal.
P1010044.jpg


I also found that if any time at all lapses between the template and the cutting of metal that small details will slip away, so write it down on the template. Its better to get it right, rather than have to make compromises or second cuts. As you can guess, some of the angles and positions are a little difficult to transpose. Use the paper to get the proper measurements, transfer to the cardboard and see how it fits. Some of the placements of the stiff boards will tell you how difficult it will be to place the panel. Then cut the metal.

Bill
 
Hi Trev,

Congratulations on your build, I have come to a stand still with my build due to my work and the end of the financial year. So little progress for me for the next two weeks :-(

On the templates that you have made, watch our on the side sills for the return by the fuel tank it needs to return so you can fix it to the plate(if you can know what I mean) otherwise you will not be able to rivet it,

Just thought I would point it out before you cut the ally..

Keep up the hard work,

John

Sorry John, you've lost me a little. I've cut the templates to the size in the manual. Should I hold off cutting the ally and get the fuel tanks mounted first?

Trev
 
Trev,
I also found that if any time at all lapses between the template and the cutting of metal that small details will slip away, so write it down on the template. Its better to get it right, rather than have to make compromises or second cuts. As you can guess, some of the angles and positions are a little difficult to transpose. Use the paper to get the proper measurements, transfer to the cardboard and see how it fits. Some of the placements of the stiff boards will tell you how difficult it will be to place the panel. Then cut the metal.

Bill

Hi Bill, yeah I did think last night that I should write down all the measurements so that everything matches when it comes to cutting the ally. The plan at the moment is to make a few more templates tomorrow and Saturday and then cut all the panels on Sunday and Monday so I am not leaving the card templates too long.

Trev
 
A little more progress

Another mini update. Last night I cut the final sill template out of card and all the templates seem to be a very good fit. I've cut the slots/holes in the templates a tiny bit shorter than I need so that when I transfer it to the aluminium sheets that I don't over cut anything and leave big gaps.

I decided to give the inside of the car the sealant treatment and have sealed around seating areas and also the floor panel so hopefully it should be pretty well sealed

build-march13.jpg


Trev
 
Trev,
I left a slight overhang as shown below so that the ally plate is supported on both sides.
Ian
 

Attachments

  • Picture.jpg
    Picture.jpg
    39.6 KB · Views: 775
Back
Top