Tornado GT40 in Texas

Darrin,

I can make aluminum or carbon fiber dash switch plates if you really want to go that way. My fiberglass was probably thick enough but I put another layer of fiberglass on the back side just to be safe. I don't plan to make removable switch plates.

-Bob Woods
 
PM me with the cost for getting that done if you would please. I think on mine it would make some sense for the reasons stated by others.


Darrin,

I can make aluminum or carbon fiber dash switch plates if you really want to go that way. My fiberglass was probably thick enough but I put another layer of fiberglass on the back side just to be safe. I don't plan to make removable switch plates.

-Bob Woods
 
Bob,

It was a pleasure meeting you today and getting a chance to see this car. I look forward to seeing the progress on here and hope to hear the motor firing soon.

Pody
 
Any update on your dash Bob? I know you were planning to make it removable. Very interested in seeing what you do. I have mine cut to fit the roll bars up front and am not sure how I want to fasten the thing.

Also, any thought to covering? What Clayton did with the Dash Doctor is the route I'd really like to go but there doesn't seem to be one of those in the US.
 
Darrin,

See my post #78 for both questions. The way I supported the front section of my dash requires that I lift the front part of the roof section a little to remove the dash. That is ok since I plan to use rivet nuts (2 large and several small) to secure the roof section.

I have talked to Al Knoch in El Paso about the vacuum-formed dash and I think he will be able to do it the same way as Clayton's. I will let you know the price when he responds to my pictures.

Bob Woods
 
Thanks Bob. Very interested in the vacuum-formed dash if possible.

I have to do the same as you...lift the roof slightly to get the dash in BTW.
 
I have finished my wheels. I ordered them without a powder coat so I could choose the color here. They are done in "Hyper Silver". This is a multi-step powder coat process. I think they match the rims well.

I did find a problem with the center part that covers the lug nuts. It has a very rough finish and I thought it would be completely covered by the spinner. It is not, so I sanded and polished the rough section to make a polished aluminum look just as the spinner.

-Bob Woods
 

Attachments

  • full wheel center.jpg
    full wheel center.jpg
    219.2 KB · Views: 923
  • rough nut cover.jpg
    rough nut cover.jpg
    165.1 KB · Views: 787
  • polished nut cover.jpg
    polished nut cover.jpg
    149.7 KB · Views: 842
Thanks. I do too. I forgot to say that the spinners only had two set screws in them and they weren't very stable. I put another in them.

Bob Woods
 
Fiberglass Work

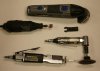
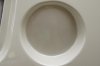
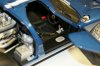
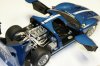
I have started on the front and rear body clips and doing a lot of fiberglass work. I have found the Dremel Multi Max to be a great tool for removing the fiberglass parts (shown at the top of the photo). It has vibrating saw blades. It cuts a very smooth and thin line and does not chip the fiberglass on either side. It comes with a circular and square tool. The circular is great for cutting a long line; the square can plunge straight through and can be used to cut a bit of a curve if you tilt it. It also has sandpaper attachments.

The round Dremel sander is great for finishing out the round corners. A pneumatic rotary sander removes thick fiberglass quickly and I sometimes use the pneumatic saw but it chips the fiberglass so you have to cut wide and go back in to finish the surface with a sander.

My fiberglass thankfully has a thin line molded into the surface to show where to cut. It is basically not visible and certainly not when you are trying to cut along it. I trace over the line with a Sharpie and then use a cloth with a small amount of Acetone and lightly rub over the sharpie mark. This removes most of the Sharpie mark and puts the color into the molded lines.

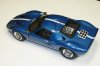
I have almost finished all of the fiberglass work on the rear body section. The front is next.

Incidentally, I now have the car at ride height and I am using my roll-around saw horses for the bodywork since I do my fiberglass work outside. They have been extremely useful for both the chassis and bodywork.
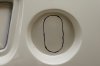
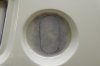
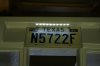
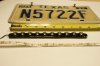
License Plate

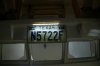
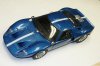
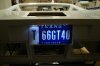
I wanted to put the license plate in the normal place where the British plate goes, but the indentation for that is long and thin which would make a USA plate drop too far down into the exhaust opening. I cut a thin (1/8" using the Multi Max) opening in the top of the license indentation so the plate would insert into the bodywork and give me some more space in the exhaust cutout. I secured the license plate with a thin bar having two rivet nuts. This rivet nut bar will be attached to the bodywork with adhesive so I can just screw on the license plates from now on.

I wonder who besides Scott will recognize the license number... This is an old license plate, my new one reads 66GT40.

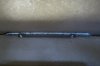
I found a LED light bar and drilled holes in the bodywork so I could mount the light bar on the inside and illuminate the license. I think this will be the cleanest way to mount a license in the USA.

-Bob Woods
 

Attachments

  • good fiberglass tools.jpg
    good fiberglass tools.jpg
    82.4 KB · Views: 867
  • rear light untreated.jpg
    rear light untreated.jpg
    44.4 KB · Views: 792
  • rear light with Sharpie line.jpg
    rear light with Sharpie line.jpg
    56.3 KB · Views: 776
  • rear light with light cleaning.jpg
    rear light with light cleaning.jpg
    63.7 KB · Views: 798
  • license plate with light.jpg
    license plate with light.jpg
    71.2 KB · Views: 905
  • back view of plate with rivetnut holder.jpg
    back view of plate with rivetnut holder.jpg
    89.6 KB · Views: 841
  • view of LEDs.jpg
    view of LEDs.jpg
    78.1 KB · Views: 822
Nice work Doc, nice 140 too!

My Pop used to own a Piper Archer. I had used my IA to put every Knots-2-U speed mod on it, except the Lo Presti cowling. It was just as fast as an Arrow.

Cheers!
 
Scott,

I knew you would figure it out immediately, but I didn't know you would go further and find out the actual plane type. I'm impressed (as usual).

Bob Woods
 
I too like the plate mount, not so happy with the 66GT40 though. On the other hand I'm still two years out on my build and MY66GT40 should work. I'm not sure how many letters we can have on a plate though.
 
David,

Sorry to take your number. There are different catagories for plates. Go to MyPlates.com. I used the T-plate which gave me 6 letters and I could use a name that was already used in a standard plate, so technically mine is T 66GT40. The standard plate can only use 7 characters, so your MY66GT40 won't work.

-Bob Woods
 
Ian,

I got them from a Chinese supplier AliExpress; however, I found a better one. Mine only has 10 lights and is about 7.7 inches long. The one below has 12 lights and is about 9.5 inches long and will fit the USA plate better. See the photo with the black housing and round lenses.

New 2X Car DIY 12 LED Super White 12V DRL Driving Daytime Running Light Bar Soft Head Lamp TK0003-in Daytime Running Lights from Automobiles & Motorcycles on Aliexpress.com

For your British plates, you might want a longer light bar.

New 2PCS Car DIY 18 LED DRL Driving Daytime Running Light Bar Soft Head Lamp Super White 12V Free Shipping-in Daytime Running Lights from Automobiles & Motorcycles on Aliexpress.com

In general find several more here:

Diy Led Light Bar Promotion-Online Shopping for Promotional Diy Led Light Bar on Aliexpress.com

I had no problems in getting them from China.

Another solution is the lights that are sold by the inch from Lighthouse LEDs. The problem with these is that they don't have the round lens to stick through the fiberglass. See the white strip of lights in the photo below. This strip is red lights that I was considering in using above the back window as an additional brake light.

Red - PLCC6/5050 12V LED Strip - Adhesive Backing - Waterproof - 5cm Section

I will let you know if I find more information. PM me if you want further details of how I mounted the bar.

-Bob Woods
 

Attachments

  • license lights 002.jpg
    license lights 002.jpg
    101.6 KB · Views: 699
Would you believe... that I finished my car?

I didn't think so... However, this model is so realistic and accurate that I thought I could convince you that I had.

My new best friend gave me this model and it is very close to what my car will be. It was manufactured by GMP who are no longer in business. Pity.

-Bob Woods
 

Attachments

  • Model - 4.jpg
    Model - 4.jpg
    133.4 KB · Views: 734
  • Model - 5.jpg
    Model - 5.jpg
    141.4 KB · Views: 756
  • Model - 1.jpg
    Model - 1.jpg
    114.2 KB · Views: 833
  • Model - 2.jpg
    Model - 2.jpg
    104.2 KB · Views: 666
  • Model - 3.jpg
    Model - 3.jpg
    155.4 KB · Views: 861
  • Model - 6.jpg
    Model - 6.jpg
    70 KB · Views: 699
New light bar.

My previous light bar was 10 LEDs with lenses. I have now installed a 12-light bar that gives a slightly wider coverage. I also have my personalized plates.

-Bob Woods
 

Attachments

  • New tag.jpg
    New tag.jpg
    86.5 KB · Views: 778

D. Nye

Lifetime Supporter
Very nice Bob. I too have a model of my car I reference while building the Mk IV. Very useful. Keep up the great work.
Regards,
Don
 
Back
Top