Tornado GT40 in Texas

More Fiberglass Work

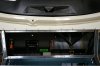
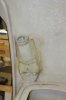
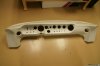
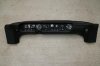
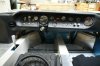
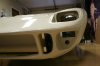
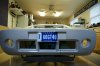
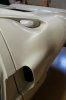
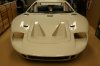
I just thought the panels took a lot of time… well fiberglass might take more. I have continued the fiberglass work. I have removed most of the openings in the front and rear and polished all of the edges and removed fiberglass strands from the back side of the clips.

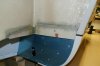
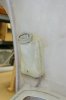
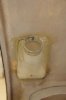
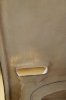
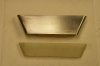
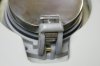
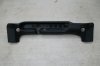
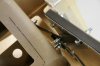
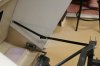
I have attached the body mount bars for front and rear. I have mounted the front and rear clip holding stays. I put an extra piece of fiberglass to make hard points at the body mounting points and the holding stays.

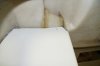
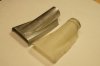
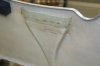
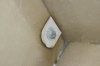
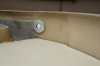
I also glued a washer around the rear holding pins to align the pins as they go through the fiberglass and to prevent wear on the fiberglass.

More updates soon.

-Bob Woods
 

Attachments

  • Body work 011.jpg
    Body work 011.jpg
    95.4 KB · Views: 1,168
  • Body work engine area.jpg
    Body work engine area.jpg
    75.4 KB · Views: 1,108
  • Body work lights.jpg
    Body work lights.jpg
    77.7 KB · Views: 1,007
  • Body work rear.jpg
    Body work rear.jpg
    115.1 KB · Views: 1,020
  • Body work rear inlets.jpg
    Body work rear inlets.jpg
    37.1 KB · Views: 1,137
  • Front body stay.jpg
    Front body stay.jpg
    99.9 KB · Views: 1,137
  • Rear body stay.jpg
    Rear body stay.jpg
    95.4 KB · Views: 1,031
  • Hard point for rear body stay.jpg
    Hard point for rear body stay.jpg
    95.7 KB · Views: 1,071
  • Hard point for rear pin locator.jpg
    Hard point for rear pin locator.jpg
    73.9 KB · Views: 1,035
Gaps in Rear Wheel Well

I hope I don't have to drive the GT40 in the rain, but if I do there are some gaps in the rear wheel well that could dump water (or dirt and debris for that matter) into the tops of the sill area around the engine.

The first concern was the 2 inch gap from the wheel well to the top of the sill covers as viewed from the wheel well. I put a strip of fiberglass on the wheel well to drop down below the sill area and used a round pipe as a mold on the corner as shown by the before and after photos. That would be a simple change in the original molds, but I see why it wasn't done that way. With the wheel well sections trimmed high as they are, the rear clip can sit on the ground when removed and be supported by the stronger sides of the rear clip. Mine will now sit on the wheel well extensions. I suspect the extensions will support the rear clip and I think it is worth the tradeoff.

The second spot was a small gap at the top of the wheel well around the area where the air inlet ducts pass through. I put a small piece of fiberglass to seal that hole.

-Bob Woods
 

Attachments

  • Gap in fiberglass in right rear wheelwell.jpg
    Gap in fiberglass in right rear wheelwell.jpg
    89.4 KB · Views: 1,077
  • wheelwell patch from wheelwell.jpg
    wheelwell patch from wheelwell.jpg
    119.4 KB · Views: 1,093
  • wheelwell patch from engine side.jpg
    wheelwell patch from engine side.jpg
    71.1 KB · Views: 1,003
  • Small seal for right wheel well around air inlets 60.jpg
    Small seal for right wheel well around air inlets 60.jpg
    85.6 KB · Views: 1,036
Last edited:
Front NACA Ducts

Clayton really inspired me on several things. The first that I have finished is the small NACA ducts on the front. Read his post #107 on page 6 of "Roaring Forties 66".

He put a flat base on the bottom of the NACA duct. I thought it would be nice to be able to use that air for something, either brake or cabin cooling, so I made a mold that would attach to the NACA duct and converge to a 2.25 inch round hose. I then pulled fiberglass parts off the mold and attached them to the underside of the NACA duct.

A/C Cover Support

I didn't see how to support the back side of the A/C cover in the Tornado Manual. I bent an aluminum angle piece to the proper angle and attached it to the frame. I can now secure it on all four sides.

-Bob Woods
 

Attachments

  • NACA mold and part.jpg
    NACA mold and part.jpg
    59.5 KB · Views: 1,021
  • NACA hole.jpg
    NACA hole.jpg
    39.1 KB · Views: 889
  • NACA duct installed.jpg
    NACA duct installed.jpg
    37.9 KB · Views: 985
  • NACA duct side view.jpg
    NACA duct side view.jpg
    51.7 KB · Views: 1,020
  • Support lip for AC cover.jpg
    Support lip for AC cover.jpg
    117.1 KB · Views: 1,095
Last edited:
Nice work Bob
If you do run into a clearance problem. You could always move them rearward a tad, closer to the ball joint line.
Keep up the good work.

Clayton
 
Ian,

Nice catch... Since I don't have the wheels and tires mounted, I totally missed that. Thank you.

I made some measurements and I think it would have cleared 1" laterally and 1.5" vertically. I went ahead and tilted them inward a little more. It should be fine now. We'll see when I mount the tires.

-Bob Woods
 

Attachments

  • More NACA work 004.jpg
    More NACA work 004.jpg
    63.9 KB · Views: 947

Ian Anderson

Lifetime Supporter
Hi Bob
I have seen some of these ducts in use and what tends to happen is the rectangular section is run back to aid with clearance over the tyres and rins above the top of the "tub" footwell area

At the rear a hole is cut in the rectangular section and a soft sponge washer system used to connect direct to the front of the tub - inside the tub it goes to round tube to the eyeball vents

There are always more than one way to skin a cat and perhaps yours will work better!

Ian
 
Center NACA Duct

I made a mold and fabricated a fiberglass piece to extend the bottom of the center NACA duct so it looks like it does something (even though it doesn't). I will smooth over the transition with Bondo.

-Bob Woods
 

Attachments

  • Center NACA mold and part.jpg
    Center NACA mold and part.jpg
    124.8 KB · Views: 981
  • Center NACA installed.jpg
    Center NACA installed.jpg
    94.2 KB · Views: 1,142
It's looking very good Bob. I'm going to be doing something with the NACA ducts too. I have the cutouts made but that's as far as I've gotten. Haven't been working on the car much the last month. Still waiting on the dash to get completed and the guy who is doing a modification to my rear clam shell was in an auto accident and put that on hold for another month or so. I think I've found a thin enough adapter for the 01E to Aluminator that will allow me to keep the chassis as is. Going to end up being 15mm made of a high grade steel. Hope to have that and my engine in the car before the end of the year.
 
Darrin,

I have the molds I have been making for these modifications if you want to do the same thing.

-Bob

I made some troughs out of aluminum for the front two ducts but haven't installed them yet. Was planning to glass them in but that might make more sense.
 
Well done sir. A very nice "tip of the hat" to both you and your car. Keep up the great work. Nice photo of you also looking very pleased with yourself and for good reason. :thumbsup:
 
Hi Bob
I'm really like yours and Clayton's build threads for the little details that go in to turning these parts into something will stand out on the road like few others..
Makes me think I must get on with mine.

Cheers Craig young
 

Attachments

  • DSCF3925.JPG
    DSCF3925.JPG
    371 KB · Views: 1,128
Craig,

Clayton is really setting the bar and has inspired me. Thanks for the encouragement, I will give more of the little details as they progress.

-Bob
 
Gas Caps

The edge of the gas caps were hitting the front clip as I opened it. I rounded the edges and then sand blasted the modification to make them look more like the original casting. I probably should have rounded them more, but it is better now.

-Bob Woods
 

Attachments

  • Gas cap cover modified.jpg
    Gas cap cover modified.jpg
    83.5 KB · Views: 1,086
Vinyl Dash

I had originally planned to use a leather dash, but after seeing the vacuum-formed vinyl dash by Clayton, I wanted to use that (thank you Clayton). It seems more complete and easier to form around some of the curves and shapes.

I hunted for people that could do it in the States and found Just Dashes in California. They seem to be very professional, but expensive. I then found Al Knoch Interiors in El Paso, TX and had them do my dash. Here are some pictures of the steps to the finished product.

My Tornado fiberglass dash was of very good quality and strong. I decided to just mount the switches directly to the fiberglass instead of making aluminum panels. Since my whole dash is easy to remove, I don't think I need switch panels.

The owner is Elliot Knoch who did most of the technical coordination; however, you will probably communicate with Lisa.

Phone: 800-880-8080
Email: [email protected]
Web: www.alknochinteriors.com

The price is $500, which is lower than the cost estimates for leather and I think it looks better. Darrin did his dash at the same place.

-Bob Woods
 

Attachments

  • Dash front.jpg
    Dash front.jpg
    80 KB · Views: 1,185
  • dash 001.jpg
    dash 001.jpg
    148 KB · Views: 1,175
  • dash 003.jpg
    dash 003.jpg
    163.7 KB · Views: 1,243
  • dash 008.jpg
    dash 008.jpg
    139.8 KB · Views: 1,430
Back
Top