
You are using an out of date browser. It may not display this or other websites correctly.
You should upgrade or use an alternative browser.
You should upgrade or use an alternative browser.
Tornado in Vermont
- Thread starter Steamerbill
- Start date
Sunday proved to be a slower day.Watched F1 this morning then had a lazy mid-day.When all was said and done,steering rack was fit as well as both sides of the front suspension.Time to rest now,later.
Bill
Bill
Attachments

Beautiful. I think a work like this deserves to form a centrepiece in the lounge room. I could look at it for hours; fantastic.
All,
I can attest to Bill's workmanship and quality to detail after getting the chance to drop by last Saturday and seeing the car up close. This is one build log to subscribe to and watch closely. Bill is putting some thought into his build and if it's anything near the effort he put into his FFR Daytona (by far the best Daytona build I've come across), then be ready for a showstopper!
The satin black krinkle 'lite' finish on the panels looks great, guys.
For those wanting a closer look, he may just have it done in time for Carlisle.
Bill....Thanks for the hospitality and for letting me sit in the Daytona. Oh, and sorry I hung around too long and made your lunch get cold. Lookin' forward to the next visit and checking on the progress.
Tom
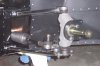
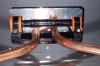
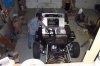
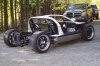
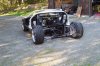
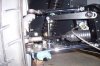
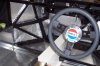
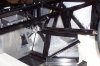
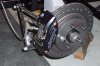
After some time away I got back to some GT work.First I posted a picture of the rack bushings that was wrong.After talking with Andy at Tornado and Scott Calabro here in the states I got the rack bushings installed correctly,with both tab down and to the outside of the mounts. I've now got the rear suspension in place and the rear wheels mounted.Today I got the steering coupler fit, bulkhead seal in place and the upper shaft and steering wheel mounted.Then went on to assemble the front hubs disks and caliper mounts.I had to fit the front wheels before quiting for the night.
Thats all folks, Bill
Thats all folks, Bill
Attachments
-
 TSC GT40 142.jpg43.3 KB · Views: 962
 -
 TSC GT40 141.jpg32.4 KB · Views: 2,243
 -
 TSC GT40 138.jpg46.1 KB · Views: 1,070
 -
 TSC GT40 139.jpg43.8 KB · Views: 1,102
 -
 TSC GT40 145.jpg42 KB · Views: 1,079
 -
 TSC GT40 153.jpg45.7 KB · Views: 1,142
 -
 TSC GT40 152.jpg24 KB · Views: 999
 -
 TSC GT40 150.jpg52.4 KB · Views: 1,010
 -
 TSC GT40 147.jpg37.7 KB · Views: 1,082
Top shelf Bill!
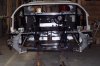
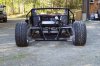
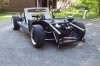
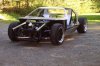
As the weekend comes to an end the GT came off of the stands and was rolled outside for some pictures.It was nice to see it on the ground for the first time.It was also a nice day for a short ride on the Harley.
Bill
Bill
Attachments
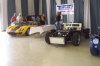
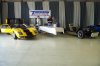
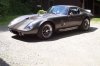
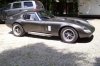
After a long weehend in Carlisle last weekend,I've taken some time for spring maintence on my Daytona coupe. Her is a shot of the Tornado booth at Carlisle with my rolling chassie and Scott Calabro's demo car.We had a great weekend.Here also are some shots of my Daytona coupe.
I hope everyone here at home has a great long weekend and please give a moment of thought for our troops.
Bill
I hope everyone here at home has a great long weekend and please give a moment of thought for our troops.
Bill
Attachments
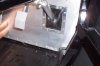
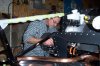
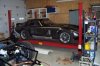
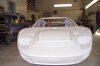
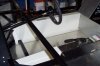
After a good amount of time away from the GT work has been begun again. In the time away I also added a new four post lift to the shop.The body is now at the body shop where some of the rough work that can be done before the body gets mounted.
I just had to sit in it even though I'm on a milk crate.
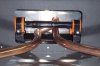
Last night I got the front sway bar mounted to the front bulkhead. More work to be done after work today.
I just had to sit in it even though I'm on a milk crate.
Last night I got the front sway bar mounted to the front bulkhead. More work to be done after work today.
Attachments
Love the 4 post Billy!
Talk soon,
S
Talk soon,
S
Well, the customs thing is done:thumbsup::thumbsup:
As soon as it arrives we need pictures (shameless plug)!
This Friday perhaps?
___________________
watch free movies online
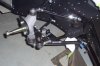
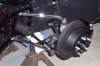
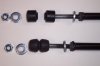
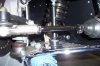
Well, after not being able to get the supplied sway bar link bushings to fit the hole in the lower control arms, I scraped them and took a trip to the local NAPA parts store. I found a bushing set with the proper boss to fit the 5/8 hole in the control arm and the correct ID to fit the drop link that would hold the bushings on center in the arm. Funny thing is they are for a Ford. With no struggle to push the bushings through the arm, assembly only took minuets. They are also a harder rubber compound.
Bill
Bill
Attachments
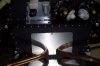
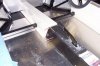
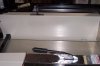
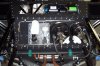
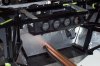
I was able to spend the afternoon working on the GT and this is what I got done. All of the brake lines from the master cylinder to the front and rear brake boosters fit. The line from the clutch master to the clutch bulk-head fitting fit. The line for the rear brakes, booster out to the bulk-head, fit and the line from the front booster to feed the front brakes fit. I mounted the three-way connector for the front brakes below on the front bulk-head to keep the front area as neat as I could. The lines to the front flex lines are also done. Rear brakes tomorrow.
Bill
Bill
Attachments
excellent build hopping to see more clean and neet the only way to finish a great replica
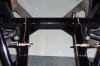
Sunday's work was a bit slower with some progress but not a lot.I took the time to put some insulation on the inside walls of the panels that make up the wheel wells. I did seal, with black silicone, the open gaps in the panels around the suspension mounts.
I've also got the hand brake fit to the central tunnel and the fiberglass front part trimmed and fit. I also trimmed and rough fit the 'glass side panel covering the shifter and feed lines to the rear brakes and clutch.
Bill
I'm tired!
I've also got the hand brake fit to the central tunnel and the fiberglass front part trimmed and fit. I also trimmed and rough fit the 'glass side panel covering the shifter and feed lines to the rear brakes and clutch.
Bill
I'm tired!
Attachments
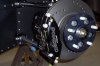
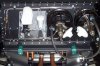
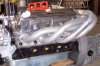
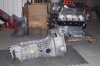
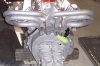
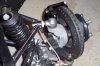
Thought I would take a break from chassis work and play with the heart of the car. I got the dust shield painted and fit before I fit the flywheel to the rear of crank. I ran into a small problem with the pressure plate bolts. The ones I had were 5/16x18. The ones I needed for the flywheel I have were 8mmx1.25. A call to Summit and I had them in 2 days.
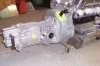
With this done, I went on to get the bell housing fit to the gearbox. No problems here at all. Just for the heck of it, I weighed the assembled unit.Dry but ready to fit,127lbs on the bathroom scale.
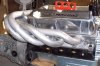
I want to get the pipes sent out to be coated so I took the time to fit them to the engine. This was the first fit for them and for me. They will require a little adjustment to give a perfect fit but I was pleased they fit as well as they did right out of the box. Thanks for a good product Andy.
Here are pics' of the work.
Bill
With this done, I went on to get the bell housing fit to the gearbox. No problems here at all. Just for the heck of it, I weighed the assembled unit.Dry but ready to fit,127lbs on the bathroom scale.
I want to get the pipes sent out to be coated so I took the time to fit them to the engine. This was the first fit for them and for me. They will require a little adjustment to give a perfect fit but I was pleased they fit as well as they did right out of the box. Thanks for a good product Andy.
Here are pics' of the work.
Bill
Attachments
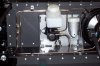
It has been awhile since my last update and though no great progress there has been some movement. I now have all of the brake lines run and ready to take fluid. I've fit the front part of the shift linkage and rough fit the 'glass cover into the tub. I also started the fitting of the a/c unit. With the dash in place there is plenty of room for the evaporator to hang and the hoses to be run to it. The hoses run down the right side of the cockpit below the shift linkage. It does get tight inside the cover. I also have gotten the fuel pumps and filters.
Winter's on it's way, 4" of snow Friday night.
Bill
Winter's on it's way, 4" of snow Friday night.
Bill
Attachments


Looking good Bill, you're not that far behind me now. My bodywork is on, but you're ahead of me on gear shift and the aircon unit.
Similar threads
- Replies
- 53
- Views
- 13K
- Replies
- 18
- Views
- 7K
- Replies
- 3
- Views
- 1K
- Replies
- 2
- Views
- 1K