
You are using an out of date browser. It may not display this or other websites correctly.
You should upgrade or use an alternative browser.
You should upgrade or use an alternative browser.
Tornado in Vermont
- Thread starter Steamerbill
- Start date
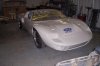
I returned home today after 3 days of working on the GT at the body shop. It was a long drive of 5 hrs' for 250 miles with the first 25 miles from home to the interstate @ 35 mph in 4 wheel drive, not fun with a 24 ft enclosed trailer in tow.
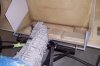
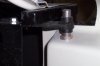
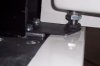
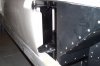
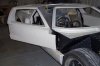
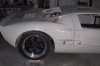
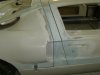
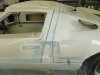
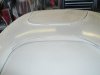
The work on mounting the body to the chassis went very well. We started with mounting the roof spider going by the specs' provided by Tornado. All went very well and the rear and front of the spider fit with no problems, measure twice, cut and drill once.
We then put the rear section in place and fit the rear hinge. Once again, following the book this went very well and soon I had a hinged rear body section that opened and closed with no issue and body lines that Randy, the body shop owner was very pleased with.
With the sills held in place with tape, we went on to fit the nose hinge to the chassis and then the nose to the hinge. Once again, we had no issues with this. Opened and closed against the front of the roof spider with no fit issues that won't be an easy adjust for Randy.
After trimming the door edges so they would fit the door openings in the roof spider, we fit the hinge plates to the top and botton to the right door put the door in place and drilled and fit the right door. It fits and opens and closes as well. Then we ran out of time.
It was a good weekend of work that turned a chassis into a car. I'm so happy I could just -hit!! Well, you know what I mean. Here are some photos of the work.
Bill
Attachments
-
 TSC GT40 250.jpg35.1 KB · Views: 897
 -
 TSC GT40 249.jpg26.2 KB · Views: 898
 -
 TSC GT40 254.jpg40.9 KB · Views: 893
 -
 TSC GT40 252.jpg33.3 KB · Views: 909
 -
 TSC GT40 253.jpg32 KB · Views: 871
 -
 TSC GT40 256.jpg21.3 KB · Views: 864
 -
 TSC GT40 257.jpg20.3 KB · Views: 908
 -
 TSC GT40 259.jpg32.8 KB · Views: 920
 -
 TSC GT40 260.jpg35.5 KB · Views: 909
 -
 TSC GT40 262.jpg25.1 KB · Views: 884
 -
 TSC GT40 269.jpg33.5 KB · Views: 902
 -
 TSC GT40 267.jpg19.5 KB · Views: 876

Just a quick note on something I found out when fitting the rear body section,if your thinking about using tall valve covers, they won't fit. I had to take mine off to fit the rear body.
Bill
Bill
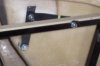
I spent Saturday working on the GT and made some good progress. The first things done was to get both the front and rear hood stays mounted. The rear went quickly and works well. The action of the front stay had us confused at first but the mystery was solved and the stay works as it should.
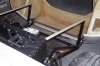
I then went on and made patterns for the left and right side and upper engine side rear bulkhead panels got them cut out of alu' and drilled for rivets. Also fit are the hinge close off panels. All of these pieces are off to be powder coated.
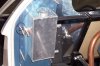
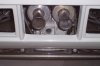
While the bulkhead panels were in place I mounted the two fuel filters to the off side and the radiator header tank to the near side. We then ran out of time. Sunday was a day off with Monday seeing me having a long session of oral surgery. All is well but I feel like I've been eating glass.
So here's some shots of what was done,
Bill
I then went on and made patterns for the left and right side and upper engine side rear bulkhead panels got them cut out of alu' and drilled for rivets. Also fit are the hinge close off panels. All of these pieces are off to be powder coated.
While the bulkhead panels were in place I mounted the two fuel filters to the off side and the radiator header tank to the near side. We then ran out of time. Sunday was a day off with Monday seeing me having a long session of oral surgery. All is well but I feel like I've been eating glass.
So here's some shots of what was done,
Bill
Attachments
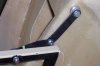
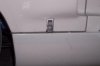
I've been away from the 40 for awhile taking care of work and personal health. With that being said I was able to spend last Sat' working on the car. Time was spent getting the upper safety pins fit to the rear of the roof spider and through the rear clip. We also got the lower locating pins and latches for the rear clip in place. Randy will now be able to get the body lines and gaps to what he wants.
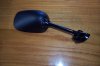
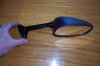
I also found these mirrors on the FFR Daytona Coupe web page. They work well on the coupe in clearing vision over the rear fenders and should work as well on the 40, time will tell when the seats are in and we hold them in place. If not I'll fit them to my Daytona.
Bill
I also found these mirrors on the FFR Daytona Coupe web page. They work well on the coupe in clearing vision over the rear fenders and should work as well on the 40, time will tell when the seats are in and we hold them in place. If not I'll fit them to my Daytona.
Bill
Attachments
Just thought that I'd let forum members know that I had an e-mail from Nuala, Scott Calabro's wife today. Scott took a fall on some ice this morning and broke his ankle,surgery this week to repair the damage.
For those who don't know, Scott is the U.S. rep' for Tornado Sports Cars in the U.K.
If you wish,you can send Scott wishes @ [email protected]
Bill :sad::sad:
For those who don't know, Scott is the U.S. rep' for Tornado Sports Cars in the U.K.
If you wish,you can send Scott wishes @ [email protected]
Bill :sad::sad:
While the GT has been at the body shop, I've had little to do here at home. I did manage to get the holes cot in the dash for all of the gauges. I still need to drill holes for all of the warning lights and switches but they will have to wait. Sarah and I are off to Aruba for a weeks long winter vacation on Sunday. It can't come soon enough. When we get back on the 28th,I'll be going to fetch the GT minus the nose, tail and doors and bring it home to finish the mechanical work. We're still on track to have a finished car this spring.
Talk to you all in a week,
Bill
Talk to you all in a week,
Bill
Attachments

Get back to work you bum!
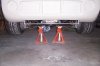
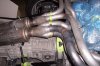
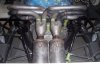
Even though I'm fighting a bad cold I spent the afternoon Sat getting the exhaust final fit so that I can send it out for coating. Pipes needed to be tweaked to give a good fit and clear all nuts, bolts and each other. At the end of the day all pipes fit with no stress, collectors and silencers slip on with no pressure needed.
Bill
Bill
Attachments
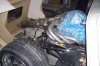
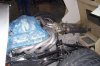
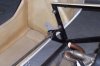
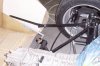
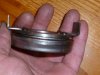
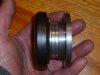
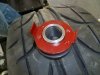
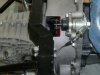
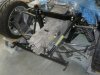
I've not posted for awhile but I have been at it. AS body work continues, I've solved a major problem. After getting the pipes back from being coated I thought that I would get the clutch bleed so I could fit the pipes. After fitting the rear x-member it was clear there was a problem. The top of the clutch release arm was to far to the rear. After confirming all supplied parts with Andy at Tornado;release arm,pivot stud,throw out bearing; were correct it came down to a question of the flywheel. It seems that there might be a difference between a late 60's flywheel and a new steel one. What I needed to do was move the bottom of the clutch arm back to move the top of the arm to the front.
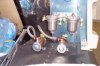
I bought an adj bearing from Summit because it has a long center section. I had to sleeve the I.D. down to fit the diameter of the input shaft tube. I then turned a top hat piece to ride against the clutch arm. When all was done I had a throw out bearing that was .500 thicker than what was supplied.
I am pleased to say when assembled the top of the clutch arm was where it needed to be and when bleed the clutch works as it should.
I've heard of one other builder who had the same issue so there might be something to the flywheel difference.
Any way,here are some photos of what I had to do.
Bill
Attachments
-
 TSC GT40 344.jpg159.6 KB · Views: 605
 -
 TSC GT40 346.jpg156.4 KB · Views: 597
 -
 TSC GT40 350.jpg155.6 KB · Views: 610
 -
 TSC GT40 351.jpg157.5 KB · Views: 694
 -
 TSC GT40 352.jpg155.5 KB · Views: 720
 -
 TSC GT40 353.jpg163 KB · Views: 682
 -
 TSC GT40 354.jpg175.7 KB · Views: 704
 -
 TSC GT40 341.jpg180.6 KB · Views: 671
I am looking at either building a 65 coupe or the same gt40 you are now building. I've never built a kit car and was wondering how the kits compare, especially in regards to build cost (assuming no crazy mods) and build difficulty. What are your thoughts?
Greg, do a search on here there are plenty of threads on the subject of building GT40's and how kits compare. I've been building my Tornado for a year now as a complete novice with no previous kit car experience and so far so good. Tornado offer great support and a clear build manual and this website is full of people who can help with any problems you encounter along the way.
If your interested my build log is here: http://www.gt40s.com/forum/gt40-build-logs/29836-tornado-build-www-gt40builder-com.html
Trev
Hi Greg, I enjoyed the coupe build as well as the current GT. At this point I would think that coupe can be built for less coin than the GT. Both Factory Five and Tornado have been very good with support during my builds. The most time you will spend is paneling the car. Where FFR gives panels cut and bent, some did not fit all that well, Tornado gives you flat alu' sheets that you template then cut to shape, bend as needed, then fit. Takes more time but I got a much better fit. A bigger difference was the fiberglass work. The quality of the Tornado glass was much better than the glass of the FFR. I do know that FFR has new molds and a better body from when I built mine.
The only GT I've driven is Scott Calabro's Tornado,with several hours seat time with Scott before buying mine. If your really interested you should get in touch with Scott. As for the difference between the two cars, the coupe would be sledge hammer where the GT would be a finishing hammer, two very different cars.
Bill
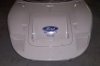
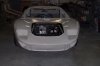
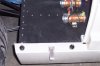
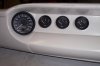
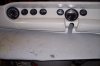
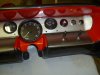
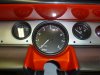
After a long delay, the GT is at home and I can now finish the mechanical work to get a running chassis. Randy took care of fitting the dash and painting it for me, before I brought the car home from his shop. The top is done in a semi-gloss black with some texture to reduce windshield glare. The area around the gauges and the switches are done with some silver and greys with shading and blending to bring it all together. The orange, called Inferno Orange, is a tie in to what the body is going to be, Inferno Orange. So now you know.
Bill
Bill
Attachments
Bill,
Dash looks great, a really stiking colour. Cant wait to see the body with this colour.
Ian
Dash looks great, a really stiking colour. Cant wait to see the body with this colour.
Ian
Similar threads
- Replies
- 53
- Views
- 13K
- Replies
- 18
- Views
- 7K
- Replies
- 3
- Views
- 1K
- Replies
- 2
- Views
- 1K