USA GTD Build

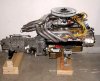
Time for some motivating. I shopped around a bit and ended up purchasing a completed engine from the Engine Factory guys. They were the only ones who would touch my flywheel and were great at what they did. The engine was assembled and test run before delivery and included a video of my engine running on their test set up. My engine spec is as follows

Complete Carbureted Engine 302 CI/373 HP


þ Blueprinted machined 302 Roller Block version,
þ Nodular Cast Iron Crankshaft
þ Federal Mogul 10:1 CR Hyperuetectic pistons
þ Heavy Duty double roller Dynagear Timing set
þ Comp Cams Hydraulic camshaft # 35-430-8 224 / 224 duration @ .050 .560 / .560 Lift
þ Comp Cams 1.6 to 1 Ratio Pro Magnum Roller Rocker Arms
þ Edelbrock RPM Aluminum fast burn cylinder heads with stainless 2.02 “ valves and hardened locks, chrome moly retainers and HD valve springs.
þ Melling high volume oil pump
þ Canton baffled road race pan
þ Edelbrock performer RPM dual Plane intake
þ Edelbrock 650 cfm 4 barrel AVS carb with electric choke
þ Short nose water pump
þ Small diameter Accel electronic Ignition

I'm not planning on dynoing the engine, if it makes half of what they advertise, it will be good enogh for me. I just want it to start and run without having to screw with it

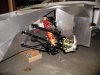
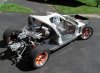
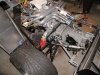
Transaxle is a Mach I unit with some internal mods to tighten up shifting a bit, flywheel is a Roy Lane item from TechCraft and clutch is AP Racing, Frank Catt design throwout bearing, starter is a Tilton high output with an MDA adapter.

I realize that I am going to have to re-run the spark plug wires so that they do not cook and much to my dismay, the headers do not fit properly.
 

Attachments

  • 72050-aoenginewheaders.jpg
    72050-aoenginewheaders.jpg
    182.3 KB · Views: 1,026
Hi Keith, many thanks for your kind comments. My package was delivered at the end of March in 99. I have asked around to see if Ray had delivered any chassis subsequent to mine, but I have been unable to find out for sure.

Brian
 
Brian,
Congratulations on your build. You are putting me to shame. /ubbthreads/images/graemlins/flehan.gif I have done nothing for months /ubbthreads/images/graemlins/banghead.gif

Brett
 
Here is a close-up shot of a sill. A few years ago my wife gave me a bead roller for Christmas that has several madrels for making different shapes. I found that between laying down accurate lines and using fences, we could accurately put beads into the sills and floors. However it is a very time consuming process, as this was all manually done, these three beads would have taken me an entire afternoon. All of the white goop seeping around the rivets and out of the seams is the 3M adhesive, it buffs off when briskly rubbed with a coarse acetone soaked rag. The 3M is very difficult to get off of anything it touches, including skin, as a consequence I was going through boxes and boxes of disposable gloves while using it.
 

Attachments

  • 72061-aacloserlookatpaneling.jpg
    72061-aacloserlookatpaneling.jpg
    251.1 KB · Views: 1,011
Those beaded sill panels are a very nice touch, Brian. Maybe I can bring my removable rear bulkhead panel up to NH sometime and roll a few beads onto it to reduce its potential for drumming.

What's wrong with the exhaust? Do you have to source a new one or just a couple pipes? I think one of my pipes may interfere with my rear clip, but I won't be sure until I install the engine.

Nice job - you're making great progress.
 
Very NICE build Brian,, few questions for you;

What type of flywheel are you using, is it custom?

Is your UN1 setup with 21 spline input shaft, or the 23?

And last, is that an original GTD radiator? If so, you may have cooling issues if you live in HOT area. I changed mine to Ali and made one of pipes enter from the top of the radiator (where it should have been!). If you ever decide to go that way, I will send you my drawings and part numbers.

Cheers /ubbthreads/images/graemlins/beerchug.gif
 
Thanks for the positive feedback. I am happy to see a "low-tech, hi-sweat" approach go over so well.

Mark, as always you hit the nail on the head. When I advised my fellow GTD-40 club members that I was going to do the tub in ali, the universal reply was "do something to eliminate the possibility of drumming". Sure we can give your panel a go sometime, preferrably when it warms up and the Christmas decorations are out of the garage. We need some scrap to practice on though as if the rollers are adjusted improperly, the material will stretch and crown, putting a bow in the panel.

Regards to my exhaust, The top pipes contact the clip, I think the whole set should be several inches lower. I'll find the correct set sooner or later, sooner if one of the guys on the West coast decides to lower his motor and is interested in stainless headers. Perhaps Fran's will fit?? I find that with a little patience, things resolve themselves over time.


My flywheel is a modified item, I don't know the original vehicle application, but it had to be drilled, tapped and pinned for my application. From the numbers on the clutch box it appears I have a 21 spline input shaft.

For a little more on the transaxle , it is an R-21T with a 3.44 dif, modified for either right or left hand shift, Solid 1st and 2nd fork connection, 1st and 2nd double sprung synchro and lightweight spring bias fitted to the changer.This should help with gear selection. As I know engine movement can bugger up solid gear changes, I am going to use poly mounts fore and aft rather than the traditional soft rubber ones, and if the motor STILL walks around, I am going to fit struts to limit movement of the motor/transaxle assembly.

For the last bit, the radiator started out life as a GTD stock item, but I just had it re-cored with a high flow core and then painted it with a ceramic based paint that is claimed to radiate heat better from radiators. I am going to also run an oil cooler. If things get too hot, I'll go with an aluminum radiator.


Brian
 
Front suspension. Standard GTD upper and lower "A" arms with rubber bushes knocked out and poly bushed fitted. AN fasteners from Pegasus holding it all together. These are Ray Christopher's big bearing uprights. I don't know what the stock item looks like but I took this one apart and these have some substantial bearings. Pin drive adapters are also Ray's items. Anti-roll bars are GTD heavy duty units, I'll swap the mounts and links out for poly items before we hit the road. Shocks and springs are stock GTD items, probably going to be the first thing to go when I do any upgrades, but I got these for a song and they'll do for now. Steering rack has been raised 7/16" to improve bump steer.

Seen in previous pics, the front wheels are 17 x 8 PS Engineering's "looks kind of like BRM" pattern. Tires are Yokohama 235-45/17 AVS 100s. Front brakes are in development.
 

Attachments

  • 72165-aoleftfrontupright.jpg
    72165-aoleftfrontupright.jpg
    332.5 KB · Views: 1,067
Fantastic aluminium work, Brian!

I am totally impressed with the idea of using a router to clean up (or was it carve out?) the panel edges.

Looking forward to seeing more progress with the build.
 
Hi Brian and everyone else.
As you said other than Brett there's not many GTD builds going on or reported about, but hopefully I can soon start to add my little bit. My GTD is a Roy Smart chassis just after Bretts and as far as I know there is no more sold at present, you can see part of the build under Bakers build.
Although different from most the car will be built cosmetically the same as the original but there are some bits removed and some personal bits and pieces added, namely a 640 HP Chevy 7 Ltr small block with Porsche G50 together with 90 % of the panelling in structural carbon fibre.
I will be adding posts more frequently under Bakers Build in the very near future.
Your car looks great and although very rewarding to make the ally panelling yourself, I know it's not easy, keep up the good work.
 
Richard, I don't know if it is adviseable to try, but I used the router to trim the paneling as you would use a knife to trim the edge of a pie crust. There are probably more efficient ways of doing the same job.

Keith, my build certainly sounds tame compared to yours!!! I anxiously await reading of your build experiences and any advice you can give me while I make my way through this project. Of particular interest is whatever you can contribute in the way of shocks and springs.

A little more build progress........

As my build is a non-standard one, I find that I have been putting things together and taking them apart in order to check clearances and adjust as necessary. This past summer after I had dry-assembled the chassis, I decided to fit the motor/transaxle combo in. I happened to have a set of Roy Smarts new motor mounts so I bolted them in and hoisted the motor in. Remarkably, I put the motor in single-handed from the rear of the car in a matter of about 15 minutes on the first try.
 

Attachments

  • 72362-aafromrightside.jpg
    72362-aafromrightside.jpg
    263.3 KB · Views: 994
Hopefully the only perspective that the motor heads up here get.... /ubbthreads/images/graemlins/cool.gif
 

Attachments

  • 72366-aarearonshot.jpg
    72366-aarearonshot.jpg
    254 KB · Views: 956
Brian,
These photos show a very clean and neat build. This car I'm sure will win many awards just on the detail I can see here. Keep up the great work. I luv those sill plates and the floor pan.

Hersh /ubbthreads/images/graemlins/smile.gif
 

Tim Kay

Lifetime Supporter
Brian,

Beautiful work /ubbthreads/images/graemlins/flehan.gif


Would you mind posting the info on your shocks? Brand, part number, length, and where you purchased them. I would like to replace my current shocks on my Tornado and I am sure your shocks would be a very simalar fit.
 
Hello Brian,
awesome work, this build is a benchmark to others I think!
Certainly, If I am able to get somewhere near your level of work, I would be happy. A credit to you.
 
A few of Roy Smart's items are at work in this picture. Those being his;
- motor mounts which are nicely done and feature three mounting bolt holes to offer a range of engine heights.
- engine bay struts which prove additional strength to the roll hoop structure above the cabin.
- And finally his rod shifter set up which is adjustable in almost every way.
The struts are being mocked up here to ensure they tie properly into the chassis and allow proper movement of suspension arms.
 

Attachments

  • 72824-arenginebaystrut.jpg
    72824-arenginebaystrut.jpg
    337.5 KB · Views: 1,072
Cabin being mocked up for trial fitting of driver position. Wheel, switches, instruments, shifter, etc feel to be just about on. Next I need to get the pedal box in and ensure pedal relationships are proper. Yellow stickers populating dash are to suit moving switches and instruments to get positioning correct.
The dash needs trimming to fit down over steering column.
 

Attachments

  • 72825-aslookingin.jpg
    72825-aslookingin.jpg
    250.2 KB · Views: 1,025
Back
Top